EasyManua.ls Logo

Drucker Diagnostics 642VES - User Manual

Drucker Diagnostics 642VES
26 pages
Print Icon
To Next Page IconTo Next Page
Loading...
1
Drucker Diagnostics
Innovative Solutions for a Healthier World
Drucker Diagnostics
Innovative Solutions for a Healthier World
Operator’s Manual
Model 642VES, 642VFD & 642VFD-
Plus • Laboratory Centrifuge
Bedienungsanleitung
Modell 642VES, 642VFD &
642VFD-Plus • Laborzentrifuge
P/N 03-0-0002-0096 Rev. G
P/N 03
-
0
-
0002
-
0096 Rev. G
(642VES Shown)
(Abbildung: 642VES)

Questions and Answers

  • B
    Brandon HughesSep 4, 2025
    What to do if my Drucker Diagnostics Laboratory Equipment machine does not unlock after a run?
    • B
      Brian TaylorSep 4, 2025
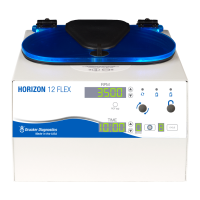
      The lid should remain locked until the rotor almost stops, then unlock for 60 seconds. For more unlock time, press the 'OPEN / STOP' button while plugged in and stopped. If it remains locked, the electronics may be damaged and require professional assistance.
  • B
    Brenda JohnsonSep 18, 2025
    How to set run time on Drucker Diagnostics 642VES?
    • J
      Jaime TurnerSep 18, 2025
      To set the run time on your Drucker Diagnostics Laboratory Equipment, check the run preset by following the instructions on page 5. If the preset is not the desired length follow the instruction on page 6 to change the run preset time.
  • C
    Cheryl HaynesSep 16, 2025
    Why does my Drucker Diagnostics Laboratory Equipment centrifuge cycle stop prematurely and the yellow LED is blinking?
    • S
      Scott AndrewsSep 16, 2025
      If the centrifuge cycle stops prematurely and the yellow LED indicator is blinking on your Drucker Diagnostics Laboratory Equipment, the internal tachometer has either not sensed a speed, the sensed speed is out of range, or the wrong rotor is installed. Verify that the rotor being used is programmed correctly in the settings. Reprogram the correct rotor selection if necessary. Remove the rotor following the instructions on page 7. Check to see that there is a small silver reflective sticker on the exterior vertical wall of the rotor. If the reflective sticker is present on the rotor and the correct rotor is programmed in the settings, contact Drucker Diagnostics for further assistance.
  • C
    Carolyn ChristensenSep 14, 2025
    What does it mean when the yellow and green LED indicators are blinking with 4 short audible beeps on my Drucker Diagnostics 642VES Laboratory Equipment?
    • N
      Natalie PhillipsSep 14, 2025
      If the yellow and green LED indicators are blinking with 4 short audible beeps on your Drucker Diagnostics Laboratory Equipment, this indicates that the lid is not properly latched and the cycle has entered the 'paused' state. Turn the knob clockwise to re-latch the lid and resume the cycle. If the cycle does not resume and the knob is fully turned, contact Drucker Diagnostics for further assistance.
  • J
    James BonillaSep 12, 2025
    What does it mean when the yellow and red LED indicators are blinking with 3 short audible beeps on my Drucker Diagnostics 642VES Laboratory Equipment?
    • J
      Jamie NolanSep 13, 2025
      If the yellow and red LED indicators are blinking with 3 short audible beeps on your Drucker Diagnostics Laboratory Equipment, the electrical current to the motor has exceeded the allowable limit, indicating that the full cycle was not completed. Make sure that nothing has fallen into the rotor chamber preventing the rotor from spinning freely. If there is nothing obstructing the rotor, the motor may be damaged. Contact Drucker Diagnostics for further assistance.
  • K
    kimberlywilliamsSep 12, 2025
    What does it mean when all LED indicators are blinking with 2 short audible beeps repeating continuously on my Drucker Diagnostics 642VES Laboratory Equipment?
    • M
      Mrs. Brianna NelsonSep 12, 2025
      If all LED indicators are blinking with 2 short audible beeps repeating continuously on your Drucker Diagnostics Laboratory Equipment, it means the imbalance detection threshold has been reached during the cycle, indicating a full cycle was not completed. Check the balance of the load. If it is determined that the detection is too sensitive this can be adjusted by increasing the imbalance detection threshold. Refer to page 6 for programming settings.
  • E
    Evan HorneSep 9, 2025
    What to do if my Drucker Diagnostics 642VES machine does not unlock after run?
    • T
      Tina StewartSep 9, 2025
      The lid should remain locked until the rotor has nearly come to a complete stop and then unlock for 60 seconds. If additional unlock time is needed, press the 'OPEN / STOP' button with the machine plugged in and the rotor stopped. If the lid remains locked after this and will not unlock, the electronics may have been damaged. Contact Drucker Diagnostics for assistance. To access the rotor chamber, follow the procedure on page 10, 'Emergency Rotor Chamber Entry'.
  • G
    Gary StricklandSep 7, 2025
    What to do if my Drucker Diagnostics Laboratory Equipment rotor does not spin freely?
    • D
      Darren MartinSep 7, 2025
      If the rotor of your Drucker Diagnostics Laboratory Equipment does not spin freely, ensure the unit has power and the lid latch is turned completely clockwise to its stop position. The latch makes contact with a switch underneath the front top of the cabinet. If this switch is not activated, the light will not turn on and the machine will not run. Also, check for any obstructions in the rotor chamber. If there are no obstructions, contact Drucker Diagnostics for further assistance.
  • J
    Jennifer PerrySep 5, 2025
    Why does the rotor on my Drucker Diagnostics 642VES Laboratory Equipment not spin freely?
    • D
      Dana SampsonSep 5, 2025
      Ensure nothing is obstructing the rotor chamber. If there are no obstructions, further assistance is needed.
  • K
    kristine29Aug 21, 2025
    What to do if my Drucker Diagnostics 642VES Laboratory Equipment centrifuge does not run?
    • A
      Andrew KentAug 21, 2025
      If your centrifuge isn't running, first check the electrical outlet and ensure the lid latch is fully clockwise to its stop position, which should illuminate the latch light. Also, inspect the circuit breaker switch at the bottom left of the machine; if it's white, the breaker has tripped. If these steps don't resolve the issue, further assistance is needed.

Summary

Model Description

Intended Use

Supplied Equipment

Features

Specifications

Permitted Environmental Conditions

Setup Location

Initial Setup Procedure

Programming Memory Locations for 642 VES

Verifying Settings for 642 VFD and 642 VFD-Plus

Programming Settings for 642 VFD and 642 VFD-Plus

Operation

Balanced Loads

Rotor Removal, Installation, and Selection

Rotor Removal

Steps to safely detach the rotor from the centrifuge's cone-shaped adapter.

Rotor Installation

Procedure for securely mounting a rotor onto the centrifuge's cone-shaped adapter.

Rotor Selection

Process for choosing and programming the correct rotor type for the centrifuge.

Care and Preventative Maintenance

Cleaning and Disinfection

Troubleshooting

Calibration Testing

Transportation

Repaired Units

Safety - Lid Safety Switch

Lid Safety Interlock System

Emergency Rotor Chamber Entry

4 A Resettable Circuit Breaker

Available Accessories

WEEE Disposal Instructions

Warranty

Drucker Diagnostics 642VES Specifications

General IconGeneral
TypeCentrifuge
Maximum Speed3, 900 RPM
Maximum RCF2, 000 x g
Frequency50/60 Hz
ApplicationLaboratory
Timer1-99 min

Related product manuals