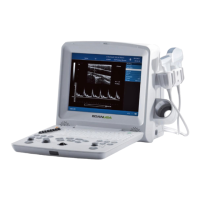
DUS 60 Digital Ultrasonic Diagnostic Imaging System Service Manual
- 59 -
4.4. Functional Checks
CAUTION
System requires all covers. Operate this unit only when all board covers and frame
panels are securely in place. Then covers are required for safe operation, good system
performance and cooling purposes.
4.4.1. System Features
Measurement and calculation in abdomen, gynecology, urology, cardiology, hypothyroid,
galactophore, and other apparatus.
In addition to the measurement of such parameters as distance, circumference, area, volume,
angle, heart rate, slope, movement speed, time etc., and the measurement of fetus parameters
such as weight, gestation week and expected date of childbirth is included.
Can equip the equipment with wide frequency band or frequency alterable electronic convex
array probe, electronic linear probe and cavity probe.
4 focuses can be set at will to get a vivid and well-proportioned image.
In B mode, you can select the expected area, and zoom in the area using the zoom function.
The CINE review function gives doctors more operation freedom, which can play the
dynamic images forward and backward or frame-by-frame.
Display language can be switched among Chinese, English, French, Spanish, etc. (The
language options varies with language software installed.) freely. Prompt function facilitates
doctors to operate this equipment. Character note can be inserted at any position in the
image.
Puncture leading line is possessed.
External video printer and ultrasound station can be connected to this equipment.
4.4.2. Function Checks
B mode checks
Step Task Expected Results
1 Contrast Rotate the contrast Knob to adjust the contrast of the entire image.
2 Brightness
Rotate the brightness Knob to adjust the brightness of the entire
image.
3 Gain
Rotate the Gain Knob to adjust the sensitivity (brightness) of the
entire image.
4 Acoustic Power Optimizes image quality and allows user to reduce beam intensity.
5 Depth Use this control to adjust the depth to form the tissue image.
6 Image Orientation
Use the left / right and the up / down keys on the control panel to
alternate the image orientation.
7 Frequency
To adjust the range of the receive frequency.
High resolution / lower penetration, mid resolution / mid penetration,
low resolution / high penetration.
8 TSI
TSI allows to “fine tune” the system for scanning different kinds of
tissue.
 Loading...