-52-
Project #469
OBJECTIVE: Light the number 3 using a
light-controlled display.
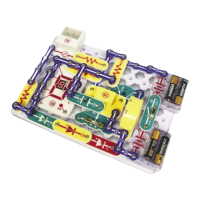
Use the circuit from project 467. Connect A, B, G,
C, & D to the circuit. Turn on the switch (S1), the
display should be off. Place your hand over the
photo resistor (RP), now the number 3 lights.
Automatic
Display #3
Project #475
OBJECTIVE: Light the number 9 using a light-controlled display.
Use the circuit from project 467. Connect A, B, F, G, & C to the circuit. Turn on
the switch (S1), the display should be off. Place your hand over the photo
resistor (RP), now the number 9 lights.
Automatic Display #9
Project #476
OBJECTIVE: Light the number 0 using a light-controlled display.
Use the circuit from project 467. Connect A, B, C, D, E & F to the circuit. Turn
on the switch (S1), the display should be off. Place your hand over the photo
resistor (RP), now the number 4 lights.
Automatic Display #0
Project #470
OBJECTIVE: Light the number 4 using a
light-controlled display.
Use the circuit from project 467. Connect B, G, C,
& F to the circuit. Turn on the switch (S1), the
display should be off. Place your hand over the
photo resistor (RP), now the number 4 lights.
Automatic
Display #4
Project #471
OBJECTIVE: Light the number 5 using a
light-controlled display.
Use the circuit from project 467. Connect A, F, G,
& D to the circuit. Turn on the switch (S1), the
display should be off. Place your hand over the
photo resistor (RP), now the number 5 lights.
Automatic
Display #5
Project #472
OBJECTIVE: Light the number 6 using a
light-controlled display.
Use the circuit from project 467. Connect A, C, D,
E, F, & G to the circuit. Turn on the switch (S1), the
display should be off. Place your hand over the
photo resistor (RP), now the number 6 lights.
Automatic
Display #6
Project #473
OBJECTIVE: Light the number 7 using a
light-controlled display.
Use the circuit from project 467. Connect C, B, G,
& D to the circuit. Turn on the switch (S1), the
display should be off. Place your hand over the
photo resistor (RP), now the number 7 lights.
Automatic
Display #7
Project #474
OBJECTIVE: Light the number 8 using a
light-controlled display.
Use the circuit from project 467. Connect A, B, C,
D, E, F & G to the circuit. Turn on the switch (S1),
the display should be off. Place your hand over the
photo resistor (RP), now the number 8 lights.
Automatic
Display #8