12
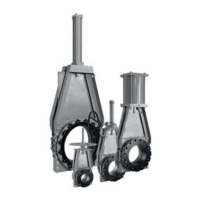
CLARKSON SLURRY KNIFE GATE VALVES
KGA+
11 DISASSEMBLY AND ASSEMBLY
INSTRUCTIONS
Note: sizes NPS 8 (DN 200) and below may
or may not have the optional retainer flanges.
Retainer flanges are standard on sizes NPS 10
(DN 250) and larger. Larger diameter valves are
supplied with segmented (multipart) retainer
flanges. If your valve has segmented retainer
flanges, take note of the special sections.
CAUTION
Valve assembly and parts may be heavy, use
proper lifting and support techniques, refer
toLifting, Section 15.
Disassembly
1. Before working on the KGA+ valve, verify
that the valve is in the open position. If it
isnot, move it to the open position.
2. Remove the valve from the piping.
3. For ease of reassembly, using a permanent
marker, draw a line on the gate face along
the top of the secondary retainer plate. If
marking gate is not an option, make note
of the dimension from top of valve housing
to top of gate in full open position (refer to
Table 5, Figure 13, dimension A).
4. Visually inspect and verify that the sleeve
bore is clear of all debris, scale and
elastomer residue.
5. Remove the retainer flange bolts taking
caution to prevent retainer flanges from
falling free if in vertical position. Remove
theretainer flanges from the valve.
6. For valves with segmented retainer flanges
(see Figure 9), loosen retainer bolts and pull
each individual segment straight up away
from the valve, do not remove more than
one section at a time.
7. Remove the two elastomer sleeves by
simply pulling each sleeve out of the
housing assembly. (Sometimes a putty knife,
large screwdriver or pry bar is necessary to
pry the retainer flange away from the sleeve
and the sleeve from the valve flange).
8. Remove the cotter pin from the clevis pin
and remove the clevis pin from the gate. It
may be necessary to actuate the valve down
slightly in order to relieve pressure on the
clevis pin to facilitate removal.
9. Remove the actuator/frame subassembly at
one time by removing the frame bolts that
fasten the frames to the housing and pulling
it away from the housing assembly.
10. Loosen the secondary seal retainer plate
bolts.
11. Remove the gate by lifting it out of the
secondary seal.
12. Remove all fasteners and lockwashers that
retain the secondary seal retainer plate in
position.
13. Remove the secondary seal retainer plate
bylifting it up.
14. Remove the secondary seal by inserting
aflat blade screwdriver midway along the
outside of the seal, between the seal and the
valve housing. Pry the seal up and remove.
15. Remove housing bolts, and pull halves
apart.
Note: the KGA+ does not have spacer plates.
16. Remove old housing gaskets (two).