15
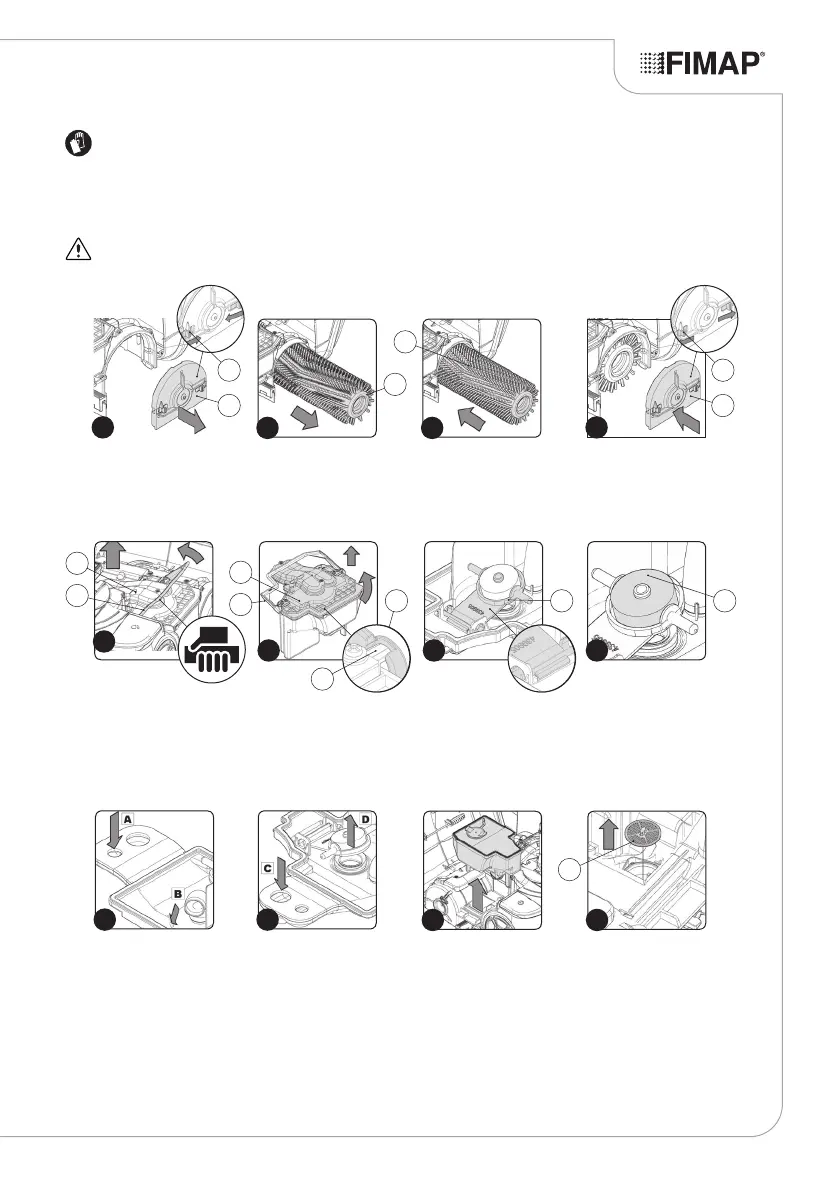
ATTENTION: these operations must be carried out using
protective gloves to avoid any possible contact with the edges
or tips of metal objects.
7. Remove the tunnel cover (6) and shift the stop levers (7) as
indicated by the arrows (Fig.5).
8. Remove the brush (8) from the appliance (Fig.6).
ATTENTION: during this process, keep the control handlebar
still, in order to prevent the appliance from moving
accidentally.
9. Clean the brush under running water to remove any impurities
present in the bristles. Check that the bristles are not worn; in the
event of excessive wear, replace the brush (the bristles should be
at least 10 mm long).
10. Fit the brush (8) on the pin in the brush motor (the brush can only
be inserted in one direction) (Fig.7).
11. Replace the tunnel cover (6) and shift the stop levers (7) as
indicated by the arrows (Fig.8)
12. Remove the recovery tank (9) from the appliance - do this with the
aid of the handle (10) (Fig.9).
13. Remove the recovery tank cover (11), then rotate the handle (10)
completely to free the pin (12) from the clamp (13) (Fig.10).
14. Use a jet of water and then a damp cloth to thoroughly clean the
rotation fulcrum (14) of the vacuum motor oats (Fig.11).
15. Use a jet of water and then a damp cloth to thoroughly clean the
central oat (15) (Fig.12).
16. Clean the dirty water conveyor compartment with a jet of
water; the entrance hole to this compartment is identied by the
letter (A), while the outlet is identied with the letter (B) (Fig. 13).
17. Clean the vacuum motor air conveyor compartment with a jet
of air; the entrance hole to this compartment is identied by the
letter (C), while the outlet is identied with the letter (D) (Fig. 14).
18. Fix the cover on the recovery tank, then rotate the handle (10)
completely to x the pin (12) on the clamp (13).
19. Remove the solution tank from the device (Fig.15).
20. Remove the lter cartridge (17) and clean it under a jet of water
to remove any impurities that might be attached. If necessary,
replace it (Fig.16).
21. Remove the vacuum duct cleaning brush (18) from its support
(Fig.17).
22. Clean the inside of the vacuum duct (19) with the brush (18)
(Fig.18).
23. Replace the vacuum duct cleaning brush (18) in its support
(Fig.19).
24. Rotate the front carter (4) as far as the work position - do this with
the aid of the handle (5) (Fig.20).
25. Block the handlebar in the horizontal position (Fig.21).
8
8
6
6
76
5
8
7
7
9
10
9
11
10
13 14 15
10 11 12
12
13 14
1615
17