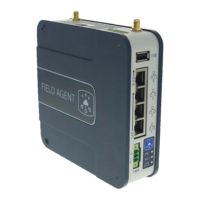
5 Getting Started with the Field Agent
5.1 What’s the Minimum I Need to Do to Get Going?
This lists the minimum steps that need to be done to start using a Field Agent. The details of how to perform each step are
described elsewhere in this document and are just referenced here.
1. Register the Field Agent in the Customer Portal (See Register the Field Agent
).
2. Start the Field Agent (See Start the Field Agent).
3. Log into the Web Console (See Log into the Web Console).
4. Configure the Network (See Configure the Network).
5. Configure Time Synchronization (See Configure Time Synchronization).
6. Update the Field Agent (See Update the Field Agent).
7. Enroll Field Agent in Predix Cloud (See Enroll Field Agent in Predix Cloud). Note, even if you do not plan to
stream data to the cloud, it is still required that you enroll your Field Agent.
8. If you plan to stream data to the cloud:
a. Create Configuration (See Configuring Data Collection and Sending Data to the Cloud
).
b. Deploy Configuration (See Configuration Management).
9. If you plan to deploy your own applications to run on the Field Agent:
a. Create an application. Information about how to write and deploy a custom machine adapter or data processor,
including sample Predix Machine application source code, can be found by searching for “Predix Machine SDK
Overview” in https://docs.predix.io
.
b. Deploy Application (See Application Management).
5.2 Register the Field Agent
Field Agents must be registered on the Customer Portal under the Assets tab. The process for registering a Field Agent, which
includes the process of requesting a new EdgeManager tenancy if needed, is documented in GFK-3018, Field Agent
Registration Guide. This documentation can be found on the Landing Page for each Field Agent type referenced in
Related
Documentation.