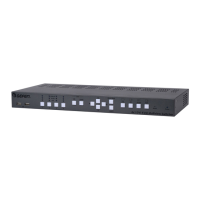
Connection Instructions
► Video Source
1. Use DVI cables to connect a DVI source (e.g. computer) to each one of the DVI-D In
ports (Source 1 - Source 4) on the rear panel. Note that only DVI-D (digital) sources
are supported.
► Audio Source
2. Connect 3.5mm mini-stereo cables from the audio output on the computer to the L/R
In jacks on the rear panel.
► USB (Host)
3. Connect USB cables from each computer to the USB Host ports on the read panel.
► Displays
4. Connect a DVI display to each of the Workstation ports (Video A DVD-D and Video B
DVI-D). Note that the display connected to Video A will support multiple sources.
The display connected to Video B will only be used to display the currently selected
source and cannot display multiple sources.
► Mouse & Keyboard (Switcher Control)
5. Connect a computer keyboard to the Keyboard USB port. Connect a mouse device
to the Mouse USB port. To take advantage of all the control features, we recommend
a mouse that has a scroll wheel.
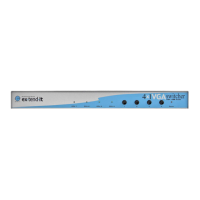
4x1 DVI KVM Multiview Switcher
Menu/Back
Select
USB
Video B
Audio
USB
USB 1 2 3 4
Solo
Audio
Full PIP Quad
Reset Power
PAP
®
USB USB
Source 1 Source 2 Source 3 Source 4
EXT-DVIK-MV-41
RS-232 In12V DCMain RS-232 Out
Keyboard Mouse Mic L/R Out
Mic L/R In USB Host Mic L/R In USB Host Mic L/R In USB Host Mic L/R In USB Host
Video A DVI-D Video B DVI-D
DVI-D In DVI-D In DVI-D In DVI-D In
page | 7
Installation
Getting Started
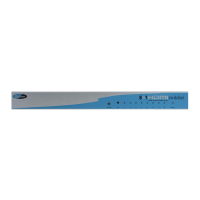
4x1 DVI KVM Multiview Switcher
Menu/Back
Select
USB
Video B
Audio
USB
USB 1 2 3 4
Solo
Audio
Full PIP Quad
Reset Power
PAP
®
USB USB
Source 1 Source 2 Source 3 Source 4
EXT-DVIK-MV-41
RS-232 In
RS-232 Out
Keyboard Mouse Mic L/R Out Mic
L/R In USB Host Mic L/R In USB Host Mic L/R In USB Host Mic L/R In USB Host
Video A DVI-D Video B DVI-D
DVI-D In DVI-D In DVI-D In DVI-D In
USB USB
Workstation