36
Installation / Installation
Reihenfolge: / Sequence:
• Befestigen Sie den MC300 mit Schwingungsdämpfern an den 4 * M6 Gewindebohrungen an der
rechten und linken Seite des Kühlkörpers an der Struktur. Install the Power Inverter with rubber
damper at the 4 holes M6 in the left and right side from the heatsink. (See Figure 3) / Mount the
MC300 on the structure with vibration dampers and using the 4 * M6 threaded holes on the right
and left side of the heatsink. Install the Power Inverter with rubber damper at the 4 holes M6 in the
left and right side from the heatsink. (See Figure 3)
• Bitte beachten Sie, dass der Luftfluss ungestört an den Ventilator und durch den Kühlkörper
stattfinden kann. Please make sure that the air flow to the fan and through the heat sink is
undisturbed.
• Verbinden Sie die drei Motorleitungen U/V/W mit dem MC300. Achten Sie darauf, dass die
Motorleitungen nicht länger als 0,5m sind. Verlegen Sie die Leitungen dicht beieinander und fixieren
Sie die Leitungen. Connect the three motor phases U/V/W with the MC300. Make sure that the
motor phase cables are not longer than 0.5m and lay them side by side close together and fix them.
• Verbinden Sie den Motortemperatursensor mit dem MC300. Connect the motortemperature sensor
to the MC300 connector (See Figure 4). / Connect the motor temperature sensor to the MC300.
Connect the motortemperature sensor to the MC300 connector
• Montieren Sie das RCM Modul an einer stabilen Position mit Klebeklettband und verbinden es mit
dem Anschluss am PI-Adapter. Mount the RCM Module at a solid position with velcro and connect
the RCM module to the right connector at the PI-adapter..
• Schließen Sie die Akkuanschlusskabel an den MC300 an. Die Leitungen dürfen nicht länger als 1m
sein. Für größere Kabellängen wird das CAP7 Modul benötigt. Verlegen Sie die Leitungen dicht
beieinander und fixieren Sie diese. Die notwendigen Querschnitte sind 16mm² bis 200A und
2*16mm² für Ströme bis 300A. Connect the battery connection cables to the MC300. The cables
must not be longer than 1m. The CAP7 module is required for longer cable lengths. Route the
cables close to one another and fix them in place. The necessary cross sections are 16mm² for
currents up to 200A and 2*16mm² for currents up to 300A.
• Fixieren Sie alle Kabel, so dass keine Bewegung oder Vibration der Leitungen stattfinden kann. Fix
all cables in place so that no movement or vibration of the cables can occur.
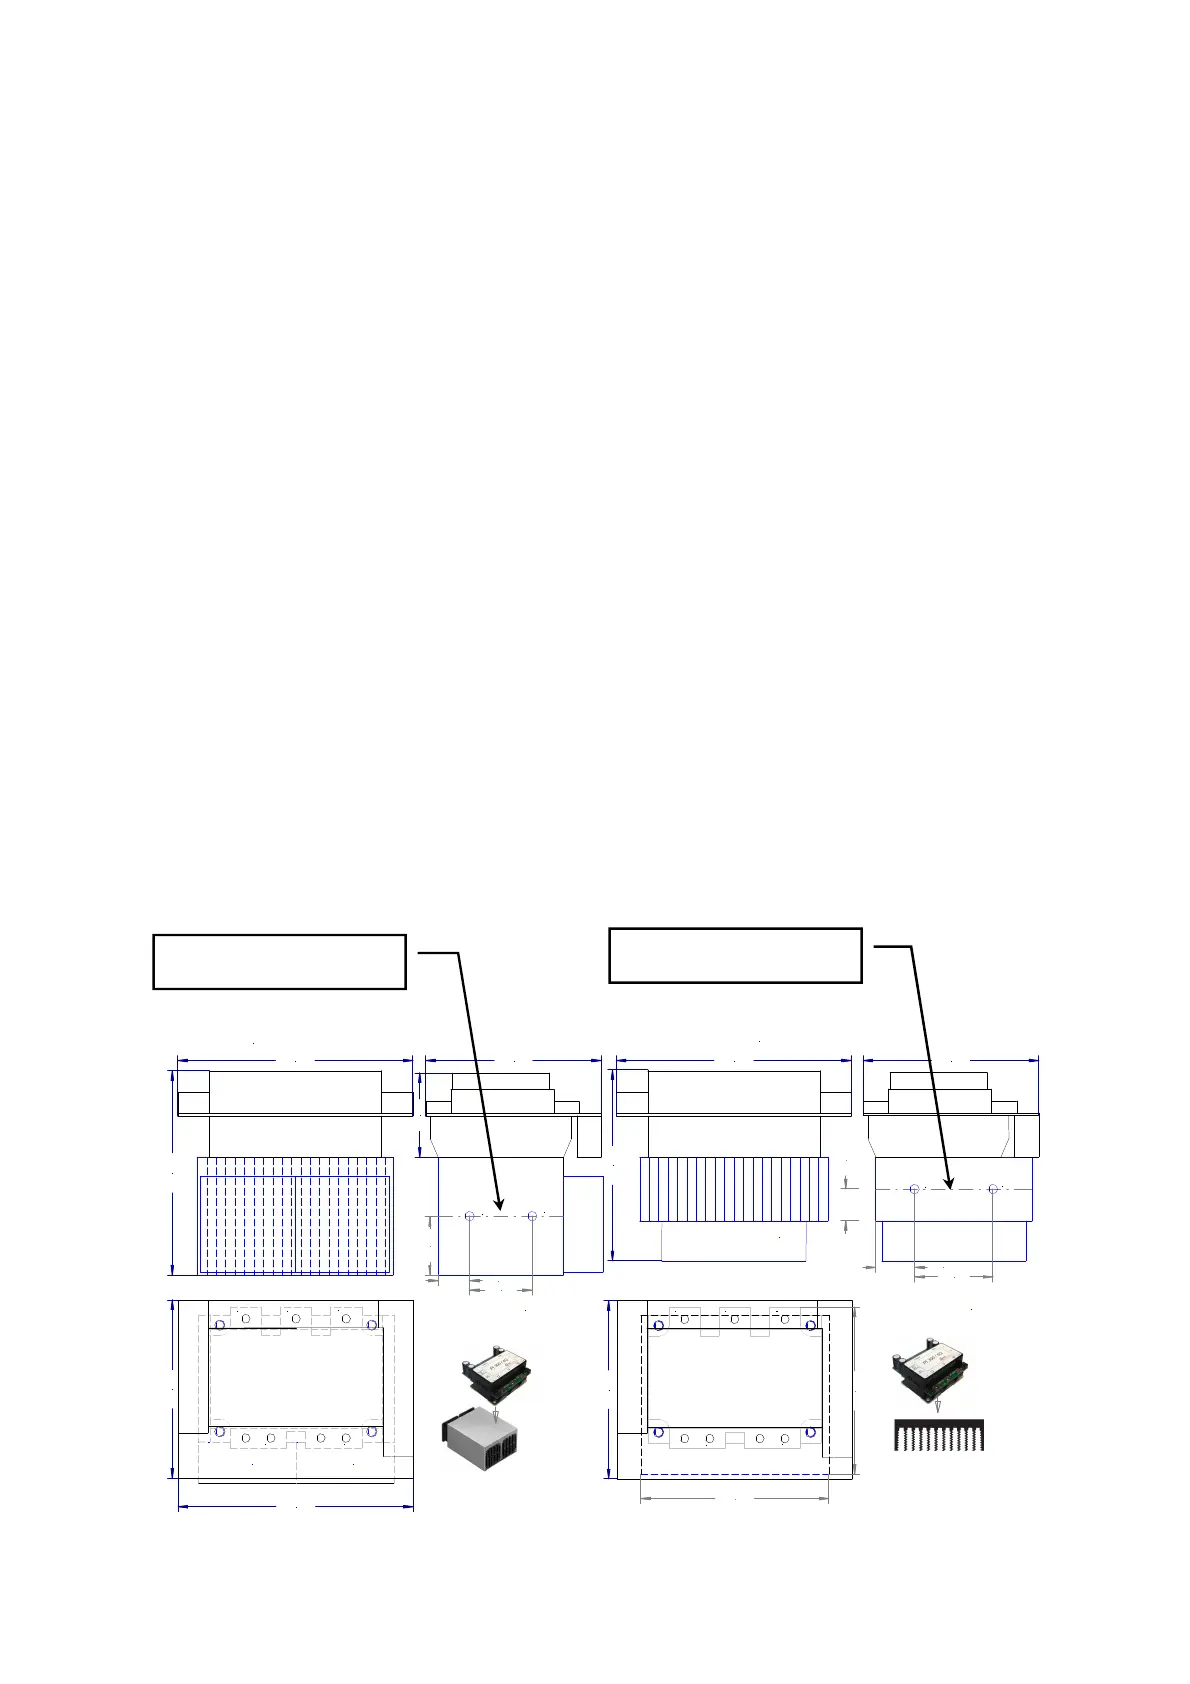
Figure 3: / Figure 3:
W
V
U
-Akku-
+Akku+
Lüfter 1 Lüfter 2
+Akku+-Akku-
U V
W
Lüfter 92*92*25 ; 48V/6W
16kW Variante:
12kW Variante:
Gesamtmasse:1800gramm
Gesamtmasse:1600gramm
*
*
*
*
37,00
W
105,02
120,00
20,00
40,00
25,00
50,00
20,00
128,50
120,00
112,00 112,00150,00 150,00
150,00
112,00
112,00
53,00
4 Holes M6 for mounting
4 Holes M6 for mounting