Section 3: InstallationPage 8
3.4 WIRING CENTRE
The wiring centre should be located in a suitable and neutral
position to avoid damage and tampering.
3.4.1 FITTING THE WIRING CENTRE
The wiring centre should be mounted on to a at surface, e.g.,
wall.
1. Drill and t 2 mounting points for the mounting holes provided
on the upper Section of the back of the wiring centre. (See
Figure 3-5).
2. Slot the wiring centre in place ensuring it is fully down.
3. Remove wiring centre lower front cover (via 2 screws) and
mark position of lower 2 holes. (See Figure 3-5)
4. Remove wiring centre, drill and t wall plugs
5. Set wiring centre back in position and x controller with lower
holes to secure in nal position.
6. Ensure the wiring centre is securely in place and replace
lower controller case front.
! NOTE !
Ensure to leave adequate access to the ON/OFF switch if
the left side of the wiring centre is close to a side wall.
3.5 TEMPERATURE SENSORS
The Smart Controller should be used only with the Grant supplied
Outdoor and Water temperature sensors. At least one Water
temperature sensor is necessary to activate the controller.
3.5.1 WATER TEMPERATURE SENSORS
The water temperature sensors should be installed in an area of
the system relevant to their function. For heating circuits the most
suitable location would be after controlled valves on the circuit
ow to give the most accurate reading for the circuit.
Insulate the sensors axed to the external surface of the pipe
using thermal insulation covering the sensor together with the
pipe. (Refer to Figure 3-6)
3.5.1 OUTDOOR WEATHER SENSOR
The Outdoor weather sensor is the only external sensor to be
used with the Grant Aerona Smart Controller. It should:
• Be xed to a coldest wall in the building, usually a north wall
under the roof.
• Not be exposed to direct solar radiation or rain.
• Be xed on a minimum height of 2m above the ground and
in a distance of at least 1.5m from windows, chimneys and
other heat sources which could interrupt the temperature
measurement.
• Use a connecting cable with a cross section of at least 0.5
mm
2
and length of 25m. Polarity of wires is not important.
To fasten the external sensor to the wall.
1. Remove the front of the sensor housing. (Refer to Figure
3-7).
2. Position the rear part of the housing against the wall, mark
and drill xing holes.
3. Insert the supplied wall plugs, place the housing back into
position and secure in place with the screws.
180mm
190mm
185mm
3mm
35mm
3mm
142 mm
Figure 3-5: Wiring centre xing centres
3
1
2
2
3
4
Figure 3-6: Circuit temperature sensor tting
Table 3-2: Temperature Sensor installation
No Description
1 Flow Pipe
2 Zip tie
3 Thermal insulation
4 Water Temperature sensor
Screw holes
Cable 2x0.05mm²
Max. Length 25m
Ø cable 3-6.5mm
Screw
2 pcs
Figure 3-7: Outdoor weather sensor
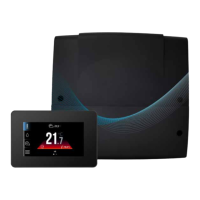
Table 3-1: Touchscreen display & mounting plate
No Description
1 Touchscreen display mounting plate
2 Touchscreen display
3 Mounting plate cut-away
4 Screw terminal
5 Terminal connection guide
6 Cable Channel
5-12V
GND
D+
D-
UP
117
65
1
5
4
6
Figure 3-4: Mounting plate wiring
 Loading...