GENERAL INFORMATION
SECTION 1.4
TESTING, CLEANING AND DRYING
PART 1
selector switch that permits the power supply voltage
to be selected. It also mounts a breakdown lamp that
will illuminate to indicate an insulation breakdown dur-
ing the test.
STATOR INSULATION RESISTANCE TEST
GENERAL:
Units with air-cooled engines are equipped with (a)
dual stator AC power windings, (b) an excitation
or DPE winding, and (c) a battery charge winding.
Insulation tests of the stator consist of (a) testing all
windings to ground, (b) testing between isolated wind-
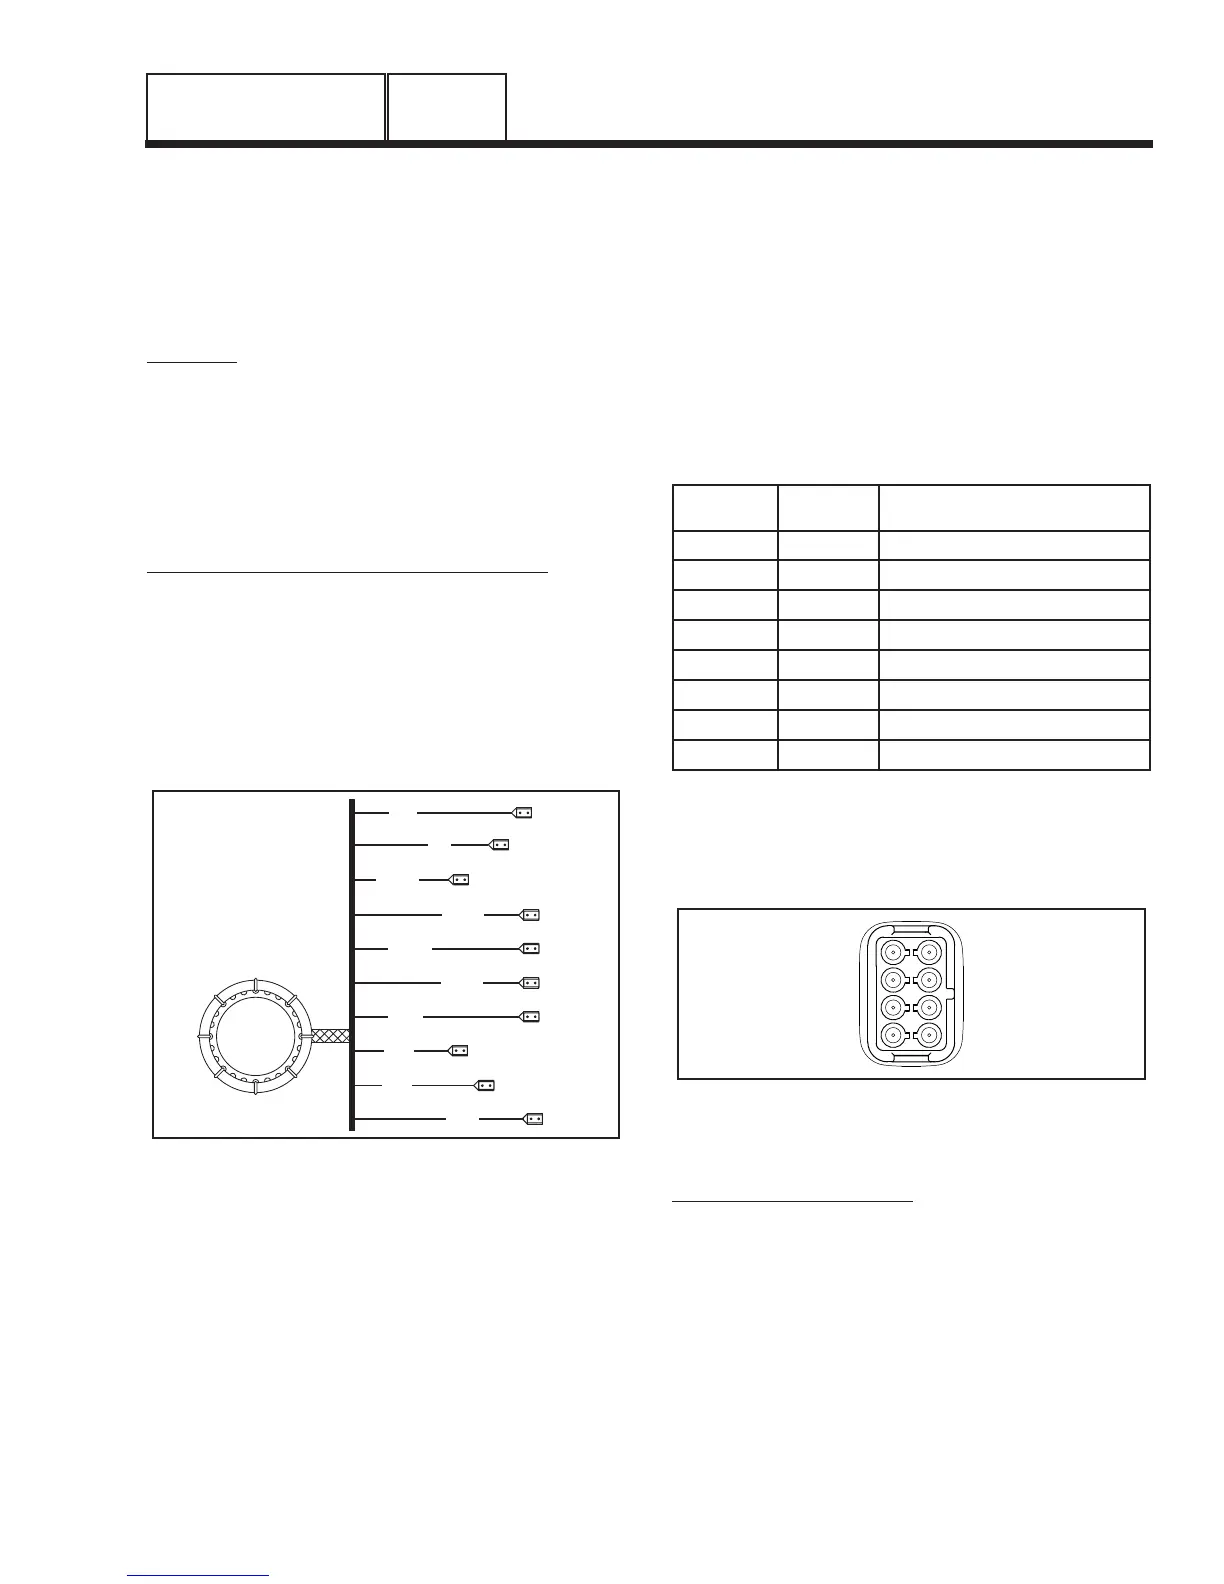
ings, and (c) testing between parallel windings. Figure
8 is a pictorial representation of the various stator
leads on units with air-cooled engine.
TESTING ALL STATOR WINDINGS TO GROUND:
1. Disconnect stator output leads 11 and 44 from the gen-
erator main line circuit breaker.
2. Remove stator output leads 22 and 33 from the neutral
connection and separate the two leads.
3. Disconnect C2 Connector from the side of the control
panel. The C2 Connector is the closest to the back
panel (see Figure 9, Section 6.1).
2
6
11P
44
66
77
33
22S
22P
11S
Figure 8. Stator Winding Leads
4. Connect the terminal ends of Wires 11, 22, 33 and 44
together. Make sure the wire ends are not touching any
part of the generator frame or any terminal.
5. Connect the red test probe of the Hi-Pot tester to the
joined terminal ends of stator leads 11, 22, 33 and 44.
Connect the black tester lead to a clean frame ground
on the stator can. With tester leads connected in this
manner, proceed as follows:
a.Turn the Hi-Pot tester switch OFF.
b. Plug the tester cord into a 120 volt AC wall
socket and set its voltage selector switch to
“1500 volts”.
c. Turn the tester switch ON and observe the
breakdown lamp on tester. DO NOT APPLY
VOLTAGE LONGER THAN 1 SECOND. After
one (1) second, turn the tester switch OFF.
If the breakdown lamp comes on during the one-sec
-
ond test, the stator should be cleaned and dried. After
cleaning and drying, repeat the insulation test. If, after
cleaning and drying, the stator fails the second test,
the stator assembly should be replaced.
6. Now proceed to the C2 Connector. Each winding will be
individually tested for a short to ground. Insert a large
paper clip (or similar item) into the C2 Connector at the
following pin locations:
Pin
Location
Wire
Number
Winding
1 77 Battery Charge
2 66 Battery Charge
3 22 Sense Lead Power
4 11 Sense Lead Power
5 6 Excitation
6 2 Excitation
7 0 Ground
8 4 Positive to Brush
Next refer to Steps 5a through 5c of the Hi-Pot proce-
dure.
Example: Insert paper clip into Pin 1, Hi-Pot from
Pin 1 (Wire 77) to ground. Proceed to Pin 2, Pin 3,
etc. through Pin 8.
1
5
8
6
7
4
3
2
Figure 9. C2 Connector Pin Location Numbers
(Female Side)
TEST BETWEEN WINDINGS:
1. Insert a large paper clip into Pin Location 1 (Wire 77).
Connect the red tester probe to the paper clip. Connect
the black tester probe to Stator Lead 11. Refer to Steps
5a through 5c of “TESTING ALL STATOR WINDINGS
TO GROUND” on previous page.
2. Repeat Step 1 at Pin Location 5 (Wire 6) and Stator
Lead 11.
3. Connect the red test probe to Stator Lead 33. Connect
the black test probe to Stator Lead 11. Refer to Steps 5a
through 5c of “TESTING ALL STATOR WINDINGS TO
GROUND” on previous page.
Page 21



 To Next Page