30 CD 2301 Order No. BA 92-12-0231A Issue 05.01.10
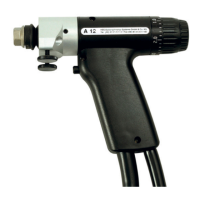
Insert the welding element into the chuck.
As soon as the power unit is ready for the welding process,
place the welding gun vertically against the work piece,
push the welding gun firmly with both hands onto the work piece until the welding
gun support (distance device) is evenly seated on the work piece,
hold the welding gun firmly, still, and straight,
take care that you do not touch any metallic part of the welding gun,
press the trigger button of the welding gun.
This initiates the welding process.
The welding process can only be initiated, if the current circuit
is closed, i.e. the welding element is in electrical contact with
the base material.
After the welding process has been completed, withdraw the
welding gun straight back from the welding element. If you
remove the welding gun at an angle, the chuck will be stret-
ched, this reduces its life expectancy.
You can now insert a new welding element in the chuck and repeat the welding process
as described above.
5.8 Checking the Quality of the Weld
You can check the quality of the weld by means of a visual inspection and a bending
test.
See also actual standards in the appendix “Arc stud welding of
metallic materials“ in section irregularities and corrective
actions.
5 Stud Welding Procedure
5.8 Checking the Quality of the Weld