Do you have a question about the HighLine BM1400 and is the answer not in the manual?
Location and importance of the equipment's unique identifier for record-keeping and service.
A record-keeping document for operator training and understanding of safety procedures.
Explanation of hazard symbols (Danger, Warning, Caution) and their severity levels.
Guidelines for safe operation, maintenance, and the importance of keeping decals legible and in place.
Instructions on following all safety messages, stopping the tractor before servicing, and operating with guards.
Warnings regarding moving chains, proximity during loading/unloading, lift arms, and overhead power lines.
Precautions for SMV signs, operating on slopes, and checking for hydraulic leaks safely.
Diagram illustrating the placement of various safety decals on the machine.
Specifies necessary tractor features like ROPS, seatbelts, and SCVs for safe towing.
Procedures for adjusting the tongue plate to ensure the mover is level when connected to the tractor.
Steps for securely attaching the bale mover's hitch and safety chain to the tractor drawbar.
Instructions for connecting hydraulic hoses and lighting cables between the tractor and the mover.
Procedures for stowing the hitch jack and lowering the bale mover bed before transport.
Checks for tire condition, pressure, and securing lift arms with transport lock chains.
Ensuring the SMV sign is visible and adhering to maximum transport speed limits.
Preparing the operating site and ensuring all safety decals are clean and visible.
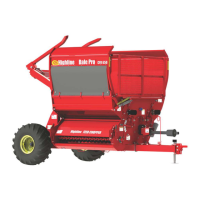
Adjusting the bed chain rails to accommodate different bale sizes for optimal loading.
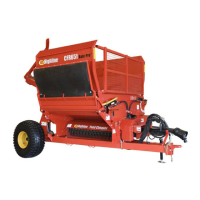
Checking the bale chains for wear, debris, and ensuring proper tension for reliable operation.
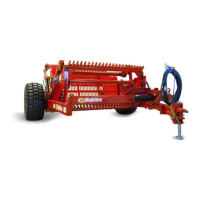
Removing transport chains and safely lowering the bale lift arms before operation.
Adjusting the width of the bale lift arms to match the bale size for secure pickup.
Verifying lift arm free movement and ensuring all motor chain guards are in place.
Ensuring bale chain motors operate smoothly and checking the condition of the tires.
Visually inspecting hydraulic hoses, fittings, and connections for leaks or damage.
Checking hydraulic motors, lubricating fittings, and ensuring all fasteners are tightened.
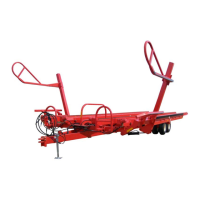
Basic setup before operation, including parking and removing lift arm transport chains.
Driving the mover into the field, recommended speeds, and loading bales evenly for stability.
Using the tractor cab controller and remotes to operate bale lift arms and roller chains during loading.
Steps for positioning lift arms, aligning, and driving under the bale for pickup.
Lifting bales onto the bed, moving them back with chains, and loading up to 7 bales per side.
Driving to the storage site, adjusting speed for terrain, and following roadway regulations.
Using controls to tilt the bed, engage chains, and drive forward to unload bales.
Reloading bales from storage by tilting the bed, engaging chains, and backing up.
Guidelines for safely crossing ditches and inclines at specific approach angles.
Essential steps to follow before performing any maintenance or servicing on the machine.
Using quality grease for all fittings as per the manufacturer's recommendations.
Lubricating grease points on the axle and tandem axle pivots as per the schedule.
Applying quality chain oil to the bale chains to prevent wear and corrosion.
Lubricating rear chain rollers and hubs on the spindles at specified intervals.
Visually inspecting hydraulic hoses and fittings for damage, leaks, or wear.
Procedure for checking and adjusting the tension on all bale chains for optimal performance.
Step-by-step instructions for safely changing a tire on the bale mover.
Maintaining correct tire inflation pressure to prevent damage and ensure proper operation.
Cleaning debris, lubricating, tightening bolts, and checking for worn parts before storage.
Parking the mover on level ground and lowering the bed fully onto the frame for storage.
Raising lift arms to the upright position and fastening transport chains to lock them.
Removing the hitch jack from storage, placing it on the hitch, and supporting the hitch weight.
Relieving hydraulic pressure, disconnecting hydraulic hoses, and disconnecting the electrical connection.
Securing hydraulic hoses and electrical connectors to a holder to keep them off the ground.
Details the one-year warranty period, what it covers, and the purchaser's maintenance responsibilities.
Lists conditions and causes for which the warranty is void, including accidents, misuse, and unauthorized alterations.
Identifies common wear items and outlines the warranty terms for replacement parts.
States that Highline makes no other warranties and limits liability for incidental or consequential damages.
| Brand | HighLine |
|---|---|
| Model | BM1400 |
| Category | Farm Equipment |
| Language | English |