56
3.10 Water Tank Pipeline Connection
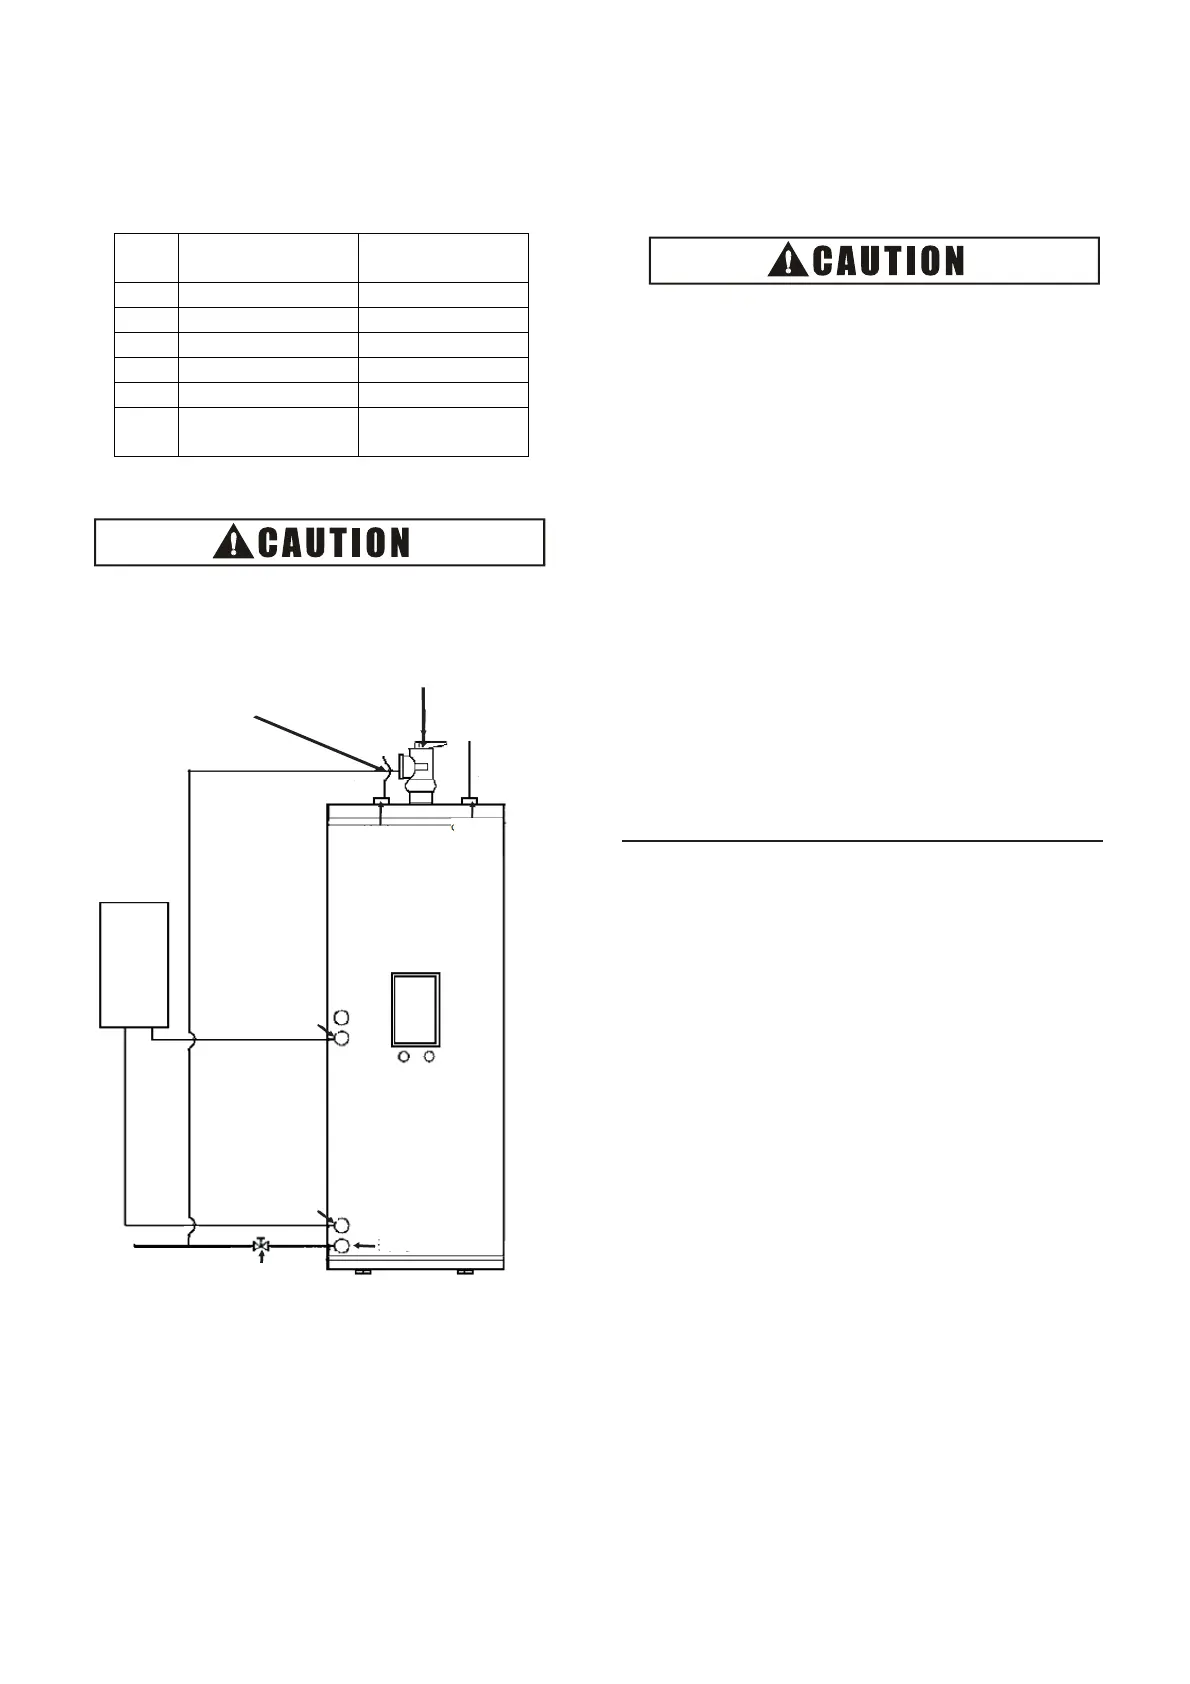
Connect pipeline of water tank as shown in
Fig.3.4. The size of connecting pipe thread of
water tank is seen below.
Rp is British sealed cylinder female thread.
G is British non-sealed cylinder thread.
● Clean pipelines and fixed elbow connected on
site and ensure no impurities inside piping before
connected to water tank, otherwise, the equipment
fails normal operation.
No. Name
Connecting pipe
thread
1 Cold water joint Rp3/4”(male thread)
2 Hot water joint Rp3/4”(male thread)
3 Coil inlet G3/4”(male thread)
4 Coil outlet G3/4”(male thread)
5 Drain outlet Rp3/4”(male thread)
6
Temperature pressure
valve interface
G3/4”(male thread)
Fig.3.4
3.11 Pipeline Requirements
● All pipelines connected to faucet must be
gradually lowered.
● Do not use electrical welding, cooper welding or
other welding material to connect pipelines or
weld pipelines.
●
Outlet pipe, safety valve and drain valve must
be mounted far from electrical apparatus.
● To ensure safe use, inlet and outlet pipe must
be connected to PPR pipe of a certain length >
70*R2(R is pipe inner diameter). Do not use
metal pipe.
●
Drain pipe of temperature pressure safety valve
must be connected to a safe location without
hurting people.
● Water pipelines are installed after water tank is
fixed.
●
Do not make dust and other impurities invade
into pipeline system when connection pipe are
installed.
●
Temperature pressure valve may spray hot
water. To avoid hurting people, proper pipe joint
must be connected to temperature pressure
valve, and connect temperature pressure valve
to stop valve of drain outlet through PPR pipe,
seen in Fig.3.4.
●
Drain pipe introduces water into building
downcomer. A stop valve suitable for pipeline
size must be mounted in drainage pipeline. Stop
valve must be installed in a place that is
convenient to the user.
● Inject water into water tank after all water
pipelines are mounted. Ensure stop valve
connecting drain pipe is closed.
● Check leakage in all water pipelines. Thermally
treat all pipelines after ensuring no water
leakage.
3.12 Discharge Water
● Inject water
Inject water into water tank:
1.
Power off.
2. Open each hot water faucet and discharge air in
system pipeline.
3. Open cold water supply valve.
4. Check no leakage.
5. Close all faucets after air is discharged.
6.
Open temperature pressure valve to ensure
water flows through effluent pipe (move ball type
wrench to the left). The location of temperature
pressure valve refers to Fig.3.4.
● Discharge water
Discharge water from water tank as follows:
1.
Power off.
2. Close cold water supply valve.
3. Open hot water faucet.
4. Open stop valve of drain port.
● Anti-freezing measures
1. If not use for long time, drain circulating water
from the unit and on-site piping.
2. If the above operation fails, keep the unit
connected to power supply, make water pump
regularly automatically run to prevent water
circuit freezing.
Connect to Use End
Temperature Pressure Valve
Connect to Tap Water
Cold
Water Joint
Hot
Water Joint
Water
Module
Coil Inlet
Drain Outlet
Stop Valve
Coil Inlet
Connect
to
Building
Downcomer
>
<



 To Next Page