18
Assembly
Assembly instructions
Linear Guideways
GW-04-0-EN-1910-MA
5.2.5 Mounting the profile rail on the follow-on side
5.2.5.1 Requirements
A reference rail must be mounted.
A block is mounted on the reference rail.
X Move the block that the dial gauge is mounted on, gradually over the reference rail.
X Tighten the fixing screws of the follow-on rail one after the other, working from one end of the guideway to the other.
X Tighten the fixing screws using a torque spanner to the specified tightening torque.
A list of optimum screw tightening torques can be found in Section 12.2 on page 57.
The follow-on rail is mounted and aligned parallel with the reference rail.
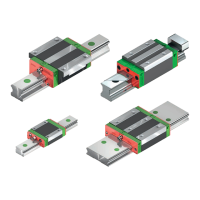
Fig. 5.10 Scanning and aligning the follow-on rail with the reference rail
Fig. 5.11 Plate mounted on the block
5.2.5.2 Aligning the follow-on rail with a reference rail using a dial gauge
X Place the dial gauge on the mounted block of the aligned reference rail.
X Attach the dial gauge sensor to the follow-on rail.
5.2.5.3 Aligning the follow-on rail with a reference rail using a plate
X Mount a plate on two blocks on the aligned reference rail.
X Mount the other side of the plate on two blocks on the follow-on rail to be aligned.
This setup results in the second rail being positioned in parallel.
X Gradually move the plate over the rails.
 Loading...