Getting Started
3 Getting Started
♦ Power-on the Instrument
♦ Set the Output Voltage
♦ Set the Output Current
♦ Use the Front Panel Menu
♦ Output On/Off Control
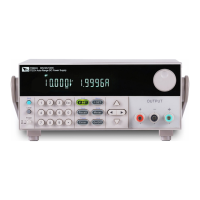
3.1 Power-on the Instrument
When you turn the POWER switch on for the first time after purchase, the instru-
ment starts with its factory default settings. Each time thereafter, the instrument
starts according to the setting that you selected as outlined in 4.2.2 Set the
Power-on State.
Precautions
Before operation, please confirm that you have fully understood the safety
instructions.
• Before connecting power cord, be sure to confirm that the power
voltage matches with the supply voltage.
• Ensure that the input electrodes are either insulated or covered us-
ing the safety covers provided, so that no accidental contact with
lethal voltages can occur.
• If you notice strange sounds, unusual odors, fire, or smoke around
or from inside the instrument, flip the POWER switch to the (O) side
to turn the instrument off, or remove the power cord plug from the
outlet. The detachable power cord may be used as an emergency
disconnecting device. Removing the power cord will disconnect
AC input power to the unit.
Power Switch Introduction
The power switch is located in the lower left corner of the front panel. The power
switch is a button, and pressing once indicates ON and pressing again indicates
OFF.
Copyright © Itech Electronic Co., Ltd.
34
 Loading...