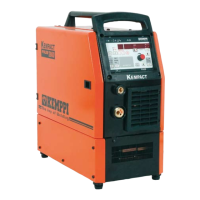
4.2.6 Wire feeder control panel
Use the Control panel on the X3 Wire Feeder to adjust the
welding parameters.
1
2
3
1. Wire feed speed
Turn to adjust the wire feed speed. The amperage
level is automatically changed to match the wire
feed speed setting. See the value tables at the end of
this manual.
2. Welding voltage
Turn to adjust the welding voltage level. The voltage
level determines the arc length.
3. Wire inch
Press to feed the ller wire into the welding gun.
4.3 Selecting shielding gas
Press the shielding gas selection button to set the shield-
ing gas type to either CO₂ or mixed gas according to the
gas you are using.
Select CO₂ if you are using carbon dioxide. Select Ar + CO₂
(MAG) if you are using mixed gas.
X3 MIG Welder has a factory set Pre gas time of 0.2 s
and a Post gas time of between 2 – 4 s, depending on the
welding power settings.
4.4 Gas test
To test the shielding gas ow, press the gas test button
once. The shielding gas starts to ow and stops automati-
cally after 20 seconds.
To interrupt the gas test, press the button again.
4.5 Trigger logic and Crater ll function
The purpose of Crater ll is to facilitate controlled nishing
of welding and to reduce the welding faults caused by
the nal crater. The Crater ll parameters can be specied
in the Setup panel.
2T mode
MIG welding with 2T mode of the gun trigger.
• Push the trigger – welding starts after preset Pre
gas time.
• Release the trigger – welding ends. Post gas
ows for preset time.
1. 2.
1. Pre gas time
2. Post gas time

 Loading...