Do you have a question about the KIP 7100 and is the answer not in the manual?
Indicates possibility of death or serious injury if instructions are ignored.
Indicates possibility of injury or physical damage if instructions are ignored.
Covers symbols for 'Do Not Attempt' and 'Pay Close Attention'.
Emphasizes grounding, dedicated circuits, power source specs, and fire prevention.
Covers warnings about opening covers, liquids, and toner handling.
Covers environmental conditions, unplugging before moving, and long-term storage.
Alerts to hot components, power cord safety, and ventilation needs.
Details the standard IEC60320:C13 connector and its ratings.
Lists various plug standards and their common countries for 220-240V.
Specifies voltage, amperage, dedicated circuits, and outlet accessibility for installation.
Details acceptable temperature, humidity, and avoidance of dust, flames, and direct sunlight.
Advises on required clearance around the machine and ensuring it is level on a stable floor.
Lists items like currency, negotiable instruments, and stamps that cannot be legally copied.
Advises care with private securities, passports, and licenses to avoid legal issues.
Outlines restrictions on copying copyrighted works like books and music, except for personal use.
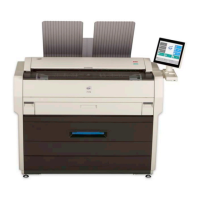
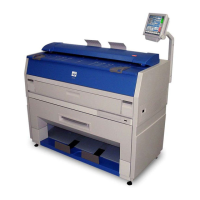
The KIP 7100 is a multi-function printer supporting copy, scan, and print with advanced drivers.
KIP HDP technology and mono-component toner ensure high definition lines and consistent blacks.
Supports various media sizes, roll feeding, cut sheets, and USB port for printing and scanning.
Details model, configuration, power consumption, and acoustic noise.
Covers dimensions, weight, operating conditions, and interface.
Specifies voltage, frequency, and amperage for US and European power inputs.
Covers printing method, speed, resolution, and maximum print dimensions.
Details paper size compatibility, warm-up, and first print times.
Explains the fusing method and the dry type non-magnetic mono-component toner development.
Lists available media sources: Roll Decks, Manual Feeder, and Paper Tray.
Specifies recommended paper weights, types, and brands for US and EU/Asia models.
Advises on temperature and humidity for storing toner cartridges.
Details CIS sensor, LED source, optical/digital resolution.
Covers original placement, scan area, width, length, and thickness limits.
Specifies original transportation type and maximum scanning speed.
Identifies main switch, UI, buttons, stylus, and USB port.
Locates Scanner Unit, Toner Hatch, Engine Unit levers, and Bypass Feeder.
Identifies Print Tray for output and Roll Deck for media loading.
Identifies the Exit Cover for paper jams and the LAN port for network connection.
Details the Dehumidify Heater Switch, Breaker, Inlet Socket, and COM/USB ports.
Specifies the required thickness, width, and length for scan originals.
Lists types of originals that can damage the scanner, like those with paste or tears.
Warns against scanning originals that are not square or are wet.
Advises against scanning metal, fabric, or rough-surfaced items.
Discourages scanning clipped or stapled documents.
Mentions that patched or punched originals can be read with a carrier sheet.
Lists paper types that should not be used, like excessively curled, folded, or torn sheets.
Lists pre-printed, slippery, sticky, thin, soft, and OHP film as restricted.
Warns against staples, conductive paper, and advises on print image quality factors.
Provides guidance on keeping paper away from sunlight and humidity.
Explains problems like void of image or creases due to low/high humidity.
Details using humidifiers, dehumidifiers, and proper paper storage in polyethylene bags.
Emphasizes plugging into a dedicated wall outlet and lists safety warnings for power connection.
Instructs to press the power switch on the right side to turn the machine on.
Describes the UI starting and displaying the Copy Mode Screen with a warming indicator.
Explains that the machine is ready for operation when the indicator stops flashing green.
Details pressing the power switch on the right side to initiate shutdown.
Warns against unplugging immediately, as the controller PC needs time to shut down properly.
Instructs to pull a blue lever to unlock and draw out the Roll Deck.
Describes lifting and removing the roll media or empty core using flanges.
Guides on removing flanges from the old core and inserting them into the new roll media core.
Explains how to move a slide guide to match the roll media width, with automatic adjustment of others.
Details fully inserting the flange so the inside rim touches the roll media side face.
Instructs to push down levers to secure the roll media against the flange.
Advises on correct winding direction and aligning the flange edge with the slide guide marking.
Guides on inserting media under the plate and rotating the feed knob to engage rollers.
Describes turning the guide plate and rotating the feed knob to expose the leading edge.
Explains using the cutter knob to create a straight edge and remove cut portions.
Advises closing the Roll Deck firmly until it locks to prevent paper jams.
Instructs to open the toner hatch to access the cartridge.
Details sliding a green lever to the right to unlock the cartridge.
Describes turning the cartridge body to close the toner supply hole.
Guides on pressing the lock lever and lifting the left side first to remove the cartridge.
Advises shaking the new toner cartridge several times to make the toner smooth.
Details fitting the cartridge pin into the machine's groove and confirming the lock lever position.
Describes turning the cartridge body to open the toner supply hole and fitting the projection into the notch.
Instructs to close the toner hatch, noting the lever will engage automatically.
Instructs to open the Bypass Feeder to load cut sheet paper.
Explains placing paper on the table aligning with size markings for proper feeding.
Advises on straightening paper and setting it in 'curl down' direction to avoid mis-feeds.
Details aligning original guides with width markings and placing the original face up.
Explains inserting the original under the scanner unit to start the copy process.
Advises tapping the UI screen to activate the scanner from Sleep Mode for originals.
Describes the ability to eject prints to the top tray or optional rear stacking equipment.
Explains the 'Tray Full' notification and the need to remove prints from the top tray.
Instructs to press the button on the Scanner Unit to immediately halt scanning or copying.
Notes that pressing the button stops document reading and printing instantly.
Warns against pulling or holding the original to stop feeding, recommending the stop button instead.
Explains Warm and Cold Sleep Modes to reduce power consumption after inactivity.
Lists triggers for cancellation: receiving a print job or tapping the UI screen.
Advises that recovery from sleep mode may take time, especially for fuser temperature.
Describes print defects like 'crease of paper' and 'loss of image' from humidified roll paper.
Recommends using the optional Dehumidify Heater for high humidity environments to prevent defects.
Details how to turn the Dehumidify Heater on and off using the rear switch.
Advises caution with hands and removing jewelry when clearing paper jams.
Outlines steps for clearing jams in the Roll Deck, starting with unlocking it.
Guides on inserting media under the plate and rotating the feed knob to engage rollers.
Describes turning the guide plate and rotating the feed knob to expose the leading edge.
Explains using the cutter knob to create a straight edge and remove cut portions.
Advises closing the Roll Deck firmly until it locks to prevent paper jams.
Instructs to remove print trays before opening the engine unit.
Details pulling levers to open the engine unit and closing it firmly.
Guides on removing misfed paper and replacing print trays.
Describes removing print trays and opening the engine unit using levers.
Guides on locating and removing misfed paper from inside the engine unit.
Emphasizes closing the engine unit firmly until it locks correctly.
Instructs to open the engine unit and the exit cover to access the fuser area.
Guides on pulling jammed prints to the rear from the exit cover area.
Details using a white handle to release the fuser door and pull out jammed prints.
Warns about extremely hot parts inside the fuser door and heater unit.
Instructs to close the fuser door and exit cover after removing the jam.
Emphasizes firmly closing the engine unit and replacing print trays.
Instructs to remove prints from trays and then remove the print trays themselves.
Details opening the engine unit via levers to clear stacked prints.
Guides on pulling jammed prints upwards and refers to Fuser Jam procedure if needed.
Instructs to pull levers to open the scanner unit and remove the original.
Advises gently pressing down both sides of the scanner unit to close it firmly.
Refers to the user manual of the relevant accessory for mis-fed paper removal.
Covers 'Roll Replacement' and 'Toner Empty' prompts and their resolutions.
Addresses 'Cutter Set NG', 'Scanner Unit Open', and 'Printer Not Available' errors.
Lists error codes indicating serious failures requiring service.
Advises restarting the machine or calling service personnel for persistent errors.
Explains cleaning Scan Glass, rollers, and guides to prevent defective scan/copy images.
Details turning off the machine, opening the scanner unit, and wiping with a detergent mix.
Warns against using organic solvents, glass cleaner, or anti-static spray for cleaning.
Instructs to wipe feed rollers, press rollers, and the inside surface with a dry cloth.
Guides on gently pressing down both sides of the scanner unit to close it firmly.
Advises wiping the touch screen with a dry cloth.
Warns against using water, alcohol, organic solvents, or glass cleaner on the touch screen.
| Category | All in One Printer |
|---|---|
| Functions | Print, Copy, Scan, Fax |
| Print Technology | Laser |
| Print Resolution | 1200 x 1200 dpi |
| Copy Resolution | 600 x 600 dpi |
| Scan Resolution | 600 x 600 dpi |
| Fax Speed | 33.6 kbps |
| Paper Capacity | 250 sheets |
| Connectivity | Ethernet |
| Operating System Compatibility | Windows |
| Display | Touchscreen |