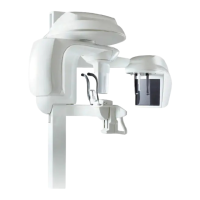
Installing the Cephalostat Unit
KODAK 9000C and KODAK 9000C 3D Extraoral Imaging System Installation Guide (SM714)_Ed 01 5–3
Installing the Cephalostat Unit
WARNING
You MUST comply with the standards currently in force while installing
and using the radiological unit. Whenever necessary, you MUST use a
shield or wear a lead-lined apron.
ONLY an approved Trophy technician is qualified to inspect or maintain
the unit while it is switched on and while the covers are removed. In this
case, NO unqualified person must approach the unit.
Before installing the cephalostat unit, make sure that:
• The unit is switched off.
• All the unit covers are removed.
• You have the required tools.
To install the cephalostat unit, follow these steps:
Installing the Cephalostat Arm
1. With the help of 1 person, position the cephalostat arm on the rear of the mobile
component of the column. To attach the arm, insert and then tighten the fixing screws (A)
and (B).
IMPORTANT
If you install the cephalostat at a later date than the KODAK 9000
and KODAK 9000 3D, then you need to install the cephalostat
Frankfort positioning laster and the cephalostat positioning
locker.
A
B
13