Do you have a question about the Kodak 9000C and is the answer not in the manual?
Explains special messages and symbols used in the guide.
Provides crucial warnings and guidance for using the radiology unit safely.
Details critical safety warnings regarding electric shock and laser radiation.
Illustrates and explains various safety and operational symbols used on the unit.
Outlines manufacturer's liability, warranty terms, and product amendment rights.
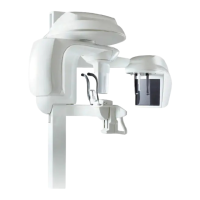
Lists the functional components of the KODAK 9000C and KODAK 9000C 3D units.
Illustrates the mobile parts and rotation of the KODAK 9000C/3D unit.
Details and labels the various functional components of the KODAK 9000C/3D unit.
Illustrates the placement of panoramic, 3D, and cephalometric digital sensors.
Identifies the positions of various laser beams used for patient positioning.
Shows the locations of important labels and warnings on the KODAK 9000C/3D unit.
Explains the function of each button and indicator on the unit's control panel.
Describes the function and usage of the x-ray remote control for image acquisition.
Details the components included in the cephalometric assembly packaging.
Specifies compliance with radiation protection regulations and interference reduction.
Lists required ambient temperatures, humidity, and atmospheric pressure for the x-ray room.
Provides detailed measurements and overall dimensions of the KODAK 9000C/3D unit.
Details the unit's operating voltage, current, and recommended electrical supply setup.
Outlines necessary dimensions, wall strength, and floor load-bearing capacity for the x-ray room.
Specifies the minimum hardware and software configurations for the PC.
Lists the necessary tools required for installing the cephalostat component.
Specifies the number of technicians required for installing the cephalostat arm and head.
Provides step-by-step instructions for safely opening the cephalostat assembly packaging.
Details the procedure for installing the main cephalostat unit, including safety warnings.
Guides the installation of the cephalostat arm onto the mobile component of the column.
Describes the steps to attach and position the cephalostat head.
Explains how to connect the various cables for the cephalostat head.
Details the wiring connections between the cephalostat arm and the unit head.
Guides the installation of the optional Frankfort positioning laser.
Explains the installation process for the cephalostat positioning locker.
Details steps to adjust the inclination of the cephalostat head for proper function.
Guides the adjustment of the cephalostat head's vertical position.
Explains how to align the ear cones for accurate patient positioning.
Details the steps for correctly positioning and adjusting the nasion support.
Guides the selection and setting of parameters for the cephalometric blade collimator.
Describes the calibration process for the cephalometric blade collimator.
Details the procedure for checking the image quality using a phantom.
Provides instructions for fitting the main covers onto the KODAK 9000C/3D unit.
Guides the installation of the covers specifically for the cephalostat component.
Recommends an annual inspection by a qualified technician and lists inspection points.
Lists the international and EEC standards and regulations the unit complies with.
Provides detailed technical specifications for the KODAK 9000C and KODAK 9000C 3D cephalometric units.
Details the electrical specifications related to power supply, voltage, and current.
Lists technical specifications for the x-ray generator, including filtration and components.
| Brand | Kodak |
|---|---|
| Model | 9000C |
| Category | All in One Printer |
| Language | English |