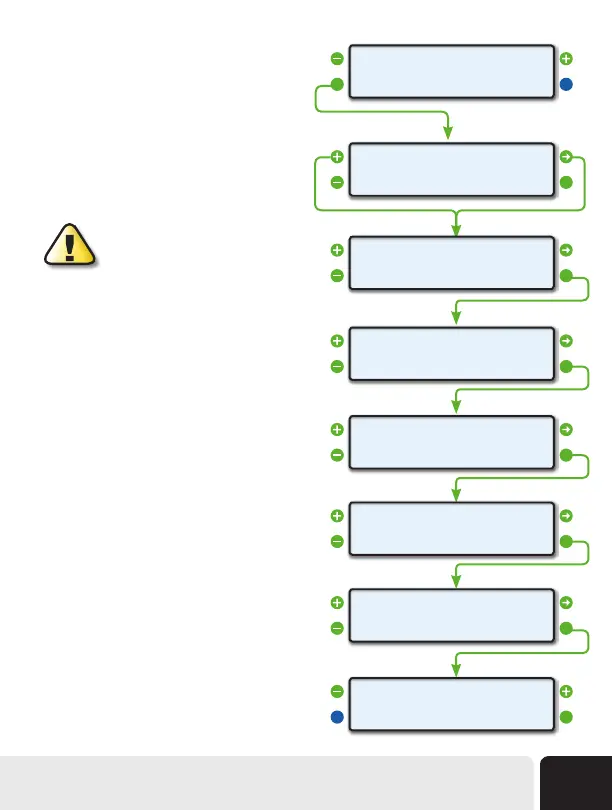
Programming Your Own X-GAUGE
Step 1 - Select an Empty Memory Slot
Start by selecting an empty memory slot by using
the upper left and right buttons. Next, press the EDIT
button.
Step 2 - Enter the TXD Data
The TXD on the lower line means that the value
being entered is the command that will be transmitted
to the vehicle’s computer.
IMPORTANT: Entries must be an
even number of characters. If an odd
number of characters is entered, a 0
will be appended to the string to make it even.
A nonspace entry must be made in the first
character location, or the X-GAUGE will not be
an active gauge.
If the TXD value is blank, no name will be shown;
and this X-GAUGE memory will not appear as a
selectable gauge.
Step 3 - Enter the RXF Data
The RXF Screen is the entry for the receive filter.
This value tells the ScanGauge what to look for in a
response from the vehicle’s computer.
Also, some of the entries tell the ScanGauge how
to display the data. Choices are integer, tenths,
hundreds, hexadecimal or on/off. There are also
some fields that can turn any trip value into a gauge.
When you’re done, press the OK button to proceed
to the next step.
Step 4 - Enter the RXD Data
The RXD Screen is the entry that tells the ScanGauge
where the data and its size are in the response.
Entry in this screen is done the same as the other
X-GAUGE entry screens. When you’re done, press
the OK button to proceed to the next step.
Step 1
Step 2
Step 2 Continued
Step 3
Step 4
Step 5
Step 6
Step 7
<EDIT
<XGAUGE
EXIT>
0>
-
+_
OK>
»
TXD
-
+686AF10100_
OK>TXD
»
-
+000000000000
_
OK>RXF
»
-
+0000
OK>RXD
»
_
-
+000000000000
OK>MTH
»
_
-
+AAA
OK>NAME
»
_
<CANCEL
<XGAUGE
SAVE>
AAA 0>
Advanced Features
43