32
8. Installation
8.1. Installation procedure
The m
2
multi automatic activation device may be installed in the containers of dierent manufactures only by a trained person with senior
authorization - master rigger or a holder of a comparable equivalent in accordance with the legislation of the country where the m
2
multi
will be installed. The m
2
multi automatic activation device must be installed into an original kit supplied by the MarS company and installed
in the container directly by the manufacturer of the container and the harness or by an authorized rigger. During the installation, the rigger
must always ensure that the cutter, cables, pouches for the m
2
multi body and control and processing units are placed in compliance with the
Manual issued by the container and harness manufacturer. When observing the below mentioned principles, the automatic activation device
may alternatively be installed into kits by dierent manufacturers. Before the installation itself, check the device for mechanical damage of
its parts, including the cables; make sure that the cutter connector is inserted in the device body and secured with a locking screw. proceed
to switch the device on and if everything works correctly, switch it o again. The m
2
multi device body shall be inserted in a pouch sewn to
the bottom of the reserve parachute container in such manner that the cables coming from the m
2
multi body are as close to the parachute
container bottom as possible. Such installation reduces the load on the cables caused by the pressure of the reserve parachute in a closed -
packed parachute container.
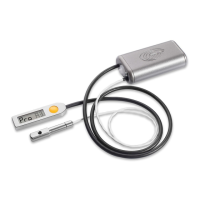
The cables of the m
2
multi automatic activation device shall be installed
in a given order. The thin cutter cable always comes rst. If the set for
installation of the m
2
multi is attached in such a way that after inserting the
m
2
multi body into the pouch, the thin cutter cable is below the thick cable,
coil the cables clockwise (when looking from the front). If the set is attached
in the opposite way, coil the cable counterclockwise.
Insert the coiled cable into the prepared space so that it lies as close to the
container bottom as possible and inside the space closed with a velcro.