to terminal A and terminal B. NOTE: If you use a 0-10
VDC control signal, the actuator will drive to the zero
position regardless of the switch setting.
• Manual Supervisory Control Selecting Manual (Man)
Mode will override the connected control signal and
allow driving the actuator to any position between
Zero and Span, using the CW and CCW push buttons.
There is no need to disconnect or handle live wires.
• Deadband Deadband is the window of control signal
change which the actuator will ignore. The sensitivity
of the actuator to respond to changes in the control
signal is adjustable. Minimum deadband allows the
actuator to respond to small control signal changes.
Maximum deadband allows the actuator to ignore
small control signal changes (such as noise on the
control signal). Deadband adjustment from Minimum
to Maximum varies the dead band from small (1%) to
large (3%) of input signal. The deadband should be set
to the maximum amount which the process will allow.
• Speed Control The Control Board will slow the actuator
by pulsing the motor if the Speed Control feature is
utilized. The speed of the actuator can be regulated
from 1:1 (normal) to 20:1 (1/20th of the normal cycle
time) by adjusting the “Speed Control” dial on the
Control Board.
• Stall (Locked Rotor Protection) Locked rotor
protection prevents the overheating of the motor and
possible premature failure. The Control Board provides
locked rotor protection and Stall LED Alarm in the event
of a stall condition such as a jammed valve or damper.
Should the actuator stall before reaching the position
commanded by the control signal, the actuator will
remove power to the motor within 2-5 seconds. The
Stall LED on the Control Board will continue to ash
until a reverse control signal clears the stall condition.
NOTE: If the process does not allow for controller
signal reversal; the stall can be cleared by selecting
MAN mode and driving the actuator manually using
the CW or CCW push buttons. Be sure to select RUN
before replacing cover.
3.3 Control Board Wiring
NOTE: Assumes option is installed; if installing kit, see
section 3.5 of this manual.
To operate the actuator with the Control Board installed, the
user must supply power to terminal 1 and terminal 2, only!
Power to terminal 3 and terminal 4 can cause damage to
the Motor Board. See (Figure 3) for Diagram. Control signal
wiring to the Control Board terminals should be properly
shielded. To further prevent control signal noise, control
signal wiring should be separated from the power wiring
and should enter the actuator through a conduit opening
separate from the entry used for the power wiring.
WARNING
ACTUATORS SHOULD BE PROPERLY GROUNDED AND WIRED IN
ACCORDANCE WITH LOCAL ELECTRICAL CODE; SEE NAMEPLATE
FOR MAXIMUM CURRENT DRAW.
Terminal 5, counter-clockwise, and terminal 6, clockwise,
position indication does not apply to actuators with the
Control Board option. If status feedback is required with the
Control Board option, install optional limit switches or use
the standard readback feature provided with the Control
Board. See (Section 4) for additional switches.
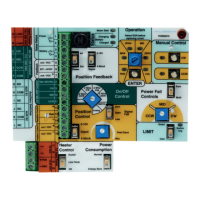
3.4 Operation for Modulating Applications
(Motor Board and Control Board
Installed) (90˚ Rotation)*
WARNING
WHEN CONTROL BOARD IS INSTALLED, POWER TO TERMINAL 3
OR TO TERMINAL 4 WILL DAMAGE ELECTRONIC CIRCUIT BOARDS.
POWER TERMINALS 1 AND 2; USE CW CLOCKWISE AND CCW
COUNTERCLOCKWISE BUTTONS TO DRIVE ACTUATOR.
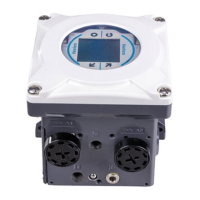
3.4.1 Set Up for Operation
1. Remove actuator cover.
2. Select Input Control Signal type – “mA” or “VDC”
(current or voltage), the actuator will accept 4-20 mA
or 0-10 VDC. The unit will also accept a split range
signal, i.e. 4-12 mA, 12-20 mA or a 2-10 VDC signal.
Slide the [INPUT SIGNAL] switch up to select mA or
down to select VDC.
3. Select Output Feedback Signal type – “mA” or “VDC”
(current or voltage), the actuator will provide a 4-20
mA or 0-10 VDC feedback signal. Slide the [FEEDBACK
SIGNAL] switch up to select mA or down to select VDC.
4. Select Signal Fail Position – “Zero” or “Last” – Slide the
[SIGNAL FAIL] to the right to select Zero or to the left
to select Last. Selecting Zero will drive the actuator
to the minimum signal position upon loss of control
signal. If Last is selected the actuator will remain in
place upon loss of control signal. If using 0 VDC as
the minimum signal, the actuator cannot dierentiate
between a commanded minimum signal or a loss of
signal; therefore, Zero should be selected.
3.4.2 Potentiometer Calibration
• Calibration Field installation of the Control Board
option or replacement of the position tracking
potentiometer requires calibration of the position
tracking potentiometer prior to setting positions
and values for Zero and Span. Control Board options
installed at the factory are fully calibrated at the factory
and should not require further calibration. To conrm
proper potentiometer calibration:

 Loading...