Chapter 2 Microscopy Operations
12
Before Microscopy
Operation Flowchart
1
Before Microscopy
Information for motorized operation of the microscope has been set upon shipment. If you start using the microscope with the
motorized settings of factory default, turn ON the switch of the Control Box A after the assembly of the microscope to use.
However, information on optical elements such as an objective and a filter cube to be attached arbitrarily has “not” been
set as factory default. It is useful to have the device information configured before the use of the microscope.
You can change the factory default motorized setting information according to your needs.
Configure these settings on the [SETUP MENU] screen of a DS-L3 DS Camera Control Unit.
The table shown below summarizes the contents of the SETUP MENU. Make necessary settings accordingly.
See Chapter 3 “23 Operation on DS-L3” – “23.1 Setting Up the Microscope” in this document for the summary of the
setting operation.
See "DS-L3 Microscope Operation" Instruction Manual provided with DS-L3 for details on using DS-L3.
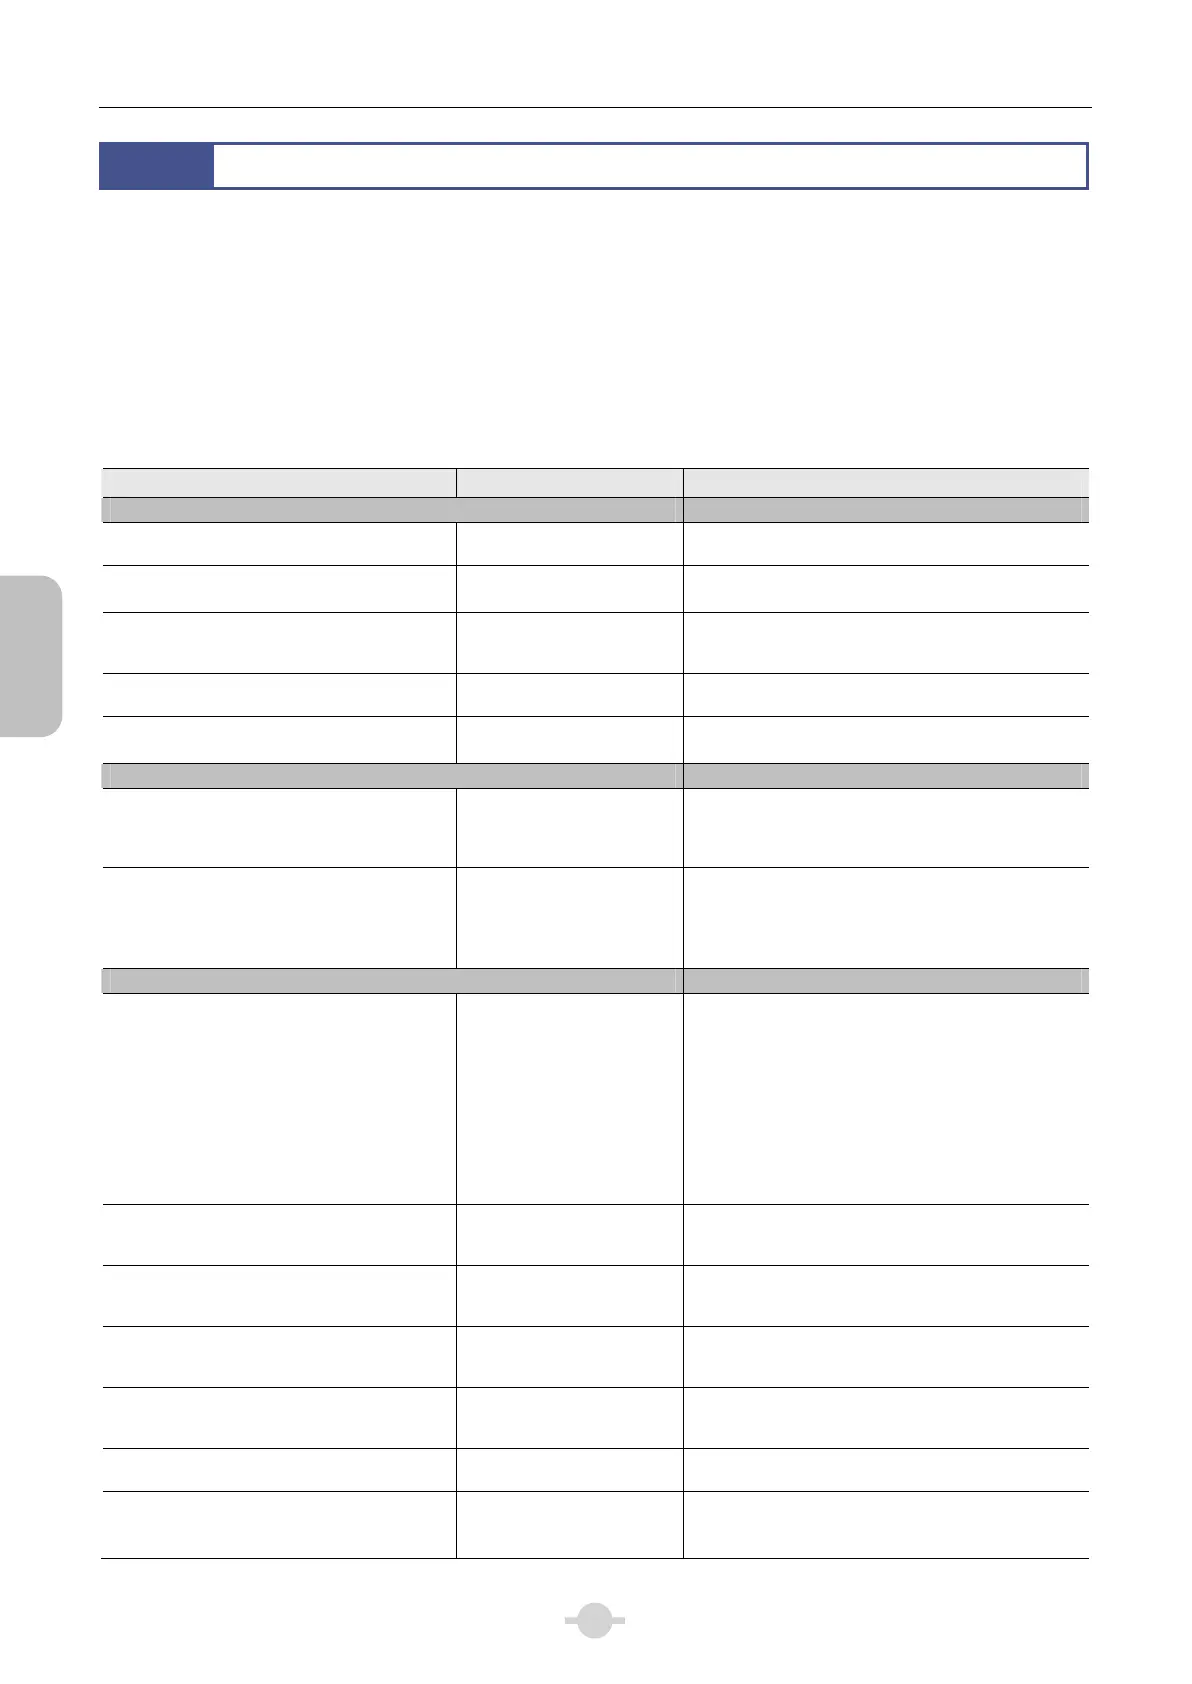
Microscope Setup from DS-L3
Setting Default setting Where to see in this manual (DS-L3 for details)
[COMPONENTS] →Chapter 3 23.1-(1)
Objective
(motorized nosepiece/intelligent nosepiece)
None
→DS-L3 Chapter 6 “2.1 Configuring the Objective
Information”
DIC module, PH module, etc.
(motorized universal condenser)
Address 1: Set to OPEN.
Other addresses: None
→DS-L3 Chapter 6 “2.2 Configuring the
Condenser Module Information”
Filter cube
(motorized/intelligent epi-fluorescence cube
turret on the 1st. and 2nd. layers)
None
→DS-L3 Chapter 6 “2.3 Configuring the Filter
Cube Information”
Excitation filter
(motorized excitation filter wheel)
None
→DS-L3 Chapter 6 “2.4 Configuring the Excitation
Filter/Barrier Filter Information”
Barrier filter
(motorized barrier filter wheel)
Address 1: Set to OPEN.
Other addresses: None
→DS-L3 Chapter 6 “2.4 Configuring the Excitation
Filter/Barrier Filter Information”
[CONNECTION] →Chapter 3 23.1-(2)
Destination camera to output signal from
the DSC connector
(Connector DSC1: Rear of the microscope)
(Connector DSC2: Connector box)
Not connected
→DS-L3 Chapter 6 “3.1 Configuring the
Connection of Digital Camera”
Motorized shutter connected to a SHUTTER
connector
(Connector EPI SHUTTER: Rear of the
microscope)
(Connector DIA SHUTTER: Connector box)
EPI SHUTTER:
Motorized shutter for the
epi-illumination
DIA SHUTTER:
DIA motorized shutter for
the dia-illumination
→DS-L3 Chapter 6 “3.2 Configuring the
Connection of Motorized Shutter”
[BUTTON FUNC] →Chapter 3 23.1-(3)
Ni-E main body
Functions of six FUNCTION buttons
FUNCTION button
1, 2: Motorized universal
condenser
Reverse/forward
rotation
3, 4: Motorized excitation
filter wheel
Reverse/forward
rotation
5, 6: Motorized barrier filter
wheel
Reverse/forward
rotation
→DS-L3 Chapter 6 “4.2.1 Setting the Function of
the Function Buttons”
Ni-E main body
Motorized shutter controlled with the FL
SHUTTER button
Shutter built in the
motorized epi-fluorescence
cube turret on the 1st. layer
→DS-L3 Chapter 6 “4.2.2 Changing the Motorized
Shutter Operated with the FL SHUTTER Button”
Ni-E main body
Digital camera controlled with the
CAPTURE button
Camera controlled directly
with DS-L3 connected to a
USB connector
→DS-L3 Chapter 6 “4.2.3 Changing the Digital
Camera Operated with the Microscope’s
CAPTURE Button”
Ni-E main body
Motorized device operable with the FL
CUBE CW/CCW button
Motorized epi-fluorescence
cube turret on 1st layer
→DS-L3 Chapter 6 “4.2.4 Changing the Motorized
Device to be Operated with CW/CCW Button”
Ni-E main body
Motorized device operable with the OBJ
CW/CCW button
Motorized nosepiece
→DS-L3 Chapter 6 “4.2.4 Changing the Motorized
Device to be Operated with CW/CCW Button”
Ni-E main body
Enabling/disabling operation buttons
Enabled
→DS-L3 Chapter 6 “4.2.5 Enabling/Disabling the
Button Operation”
Ergo controller
Functions of operation buttons
Configured
(See Chapter 3 “20 Using
the Ergo Controller” in this
manual.)
→DS-L3 Chapter 6 “4.3 Configuring the Function
of the Ergo Controller Buttons”