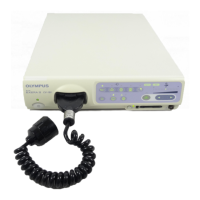
2.2 Front panel
21
CLV-190 INSTRUCTION MANUAL
Ch.2
Each button on the front panel is active only when it is lighting up. When it is not
lighting up, the video system center does not work even if it is pressed.
No. Nomenclature Description
5 Airflow button Press this button to start and stop air-feeding to the endoscope’s distal end.
→ Section 5.9, “Air/water feeding”
6 Airflow regulator
button
This button is used to control the air being fed to the endoscope.
→ Section 5.9, “Air/water feeding”
7 Observation mode
button
Press to switch the observation modes in turn.
→ Section 5.6, “Optical-digital observation”
8 Observation mode
select button
Press to switch the optical-digital observation modes in turn.
→ Section 5.6, “Optical-digital observation”
9 Lamp button Press to turn ON the examination lamp. Press for a longer period while the lamp is ON
to turn it OFF.
→ Section 5.3, “Turning the light source ON and igniting the examination lamp”
→ Section 5.10, “Extinguishing the examination lamp”
10 Transillumination
button
When pressing this button, light emitted from the distal end of the endoscope becomes
brighter for 7 seconds.
→ Section 5.7, “Transillumination function”
11 Intensity mode
button
Press this button to switch between the high intensity mode and normal intensity mode.
→ Section 5.8, “High intensity mode”
12 Brightness buttons Press these buttons to adjust the brightness.
→ Section 5.5, “Brightness adjustment”
13 Brightness mode
button
Press this button to select automatic or manual brightness adjustment.
→ Section 5.5, “Brightness adjustment”
14 Counter reset
button
Press this button for at least 3 seconds to reset the lamp usage indicator after replacing
the examination lamp.
→ Section 6.4, “Lamp usage indicator reset”

 Loading...

