Do you have a question about the Panasonic AJ-PX380G and is the answer not in the manual?
| Sensor type | MOS |
|---|---|
| Total megapixels | 2.2 MP |
| Digital zoom | 4 x |
| Optical zoom | - x |
| Image stabilizer | No |
| Interchangeable lens | - |
| Camcorder media type | Memory card |
| Compatible memory cards | P2 |
| Internal storage capacity | - GB |
| Built-in display | Yes |
| Display diagonal | - \ |
| Camcorder type | Shoulder camcorder |
| Product color | Black |
| Maximum video resolution | 1920 x 1080 pixels |
| Maximum image resolution | - pixels |
| USB 2.0 ports quantity | 1 |
| Component video (YPbPr/YCbCr) out | 0 |
| Battery capacity | - mAh |
| Battery life (max) | - h |
| Storage temperature (T-T) | -20 - 60 °C |
| Operating temperature (T-T) | 0 - 40 °C |
| Operating relative humidity (H-H) | 10 - 85 % |
| Ethernet interface type | Fast Ethernet |
| Depth | 348 mm |
|---|---|
| Width | 144 mm |
| Height | 267 mm |
| Weight | 2700 g |
Essential checks and precautions before operating the camera for the first time.
Lists the items included in the camera package, such as shoulder straps and mount caps.
Details basic and expanded configuration devices compatible with the camera.
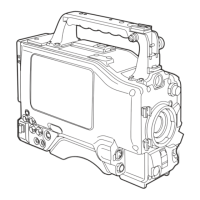
Identifies and describes external power connections and accessory mounting points on the camera.
Explains the camera's microphone and line input terminals and their settings.
Details the camera's audio output terminals for monitoring and connecting external devices.
Covers essential switches and controls for camera shooting, recording, and playback operations.
Describes how to navigate and operate the camera's menu and thumbnail screens.
Explains the time code input/output terminals and related counter functions.
Details the camera's tally lamps and warning indicators for system status.
Explains the main information displayed on the camera's SmartUI HOME screen.
Covers connecting batteries and external DC power supplies for camera operation.
Provides instructions on attaching, adjusting, and performing flange back adjustments on camera lenses.
Explains how to adjust white shading for accurate color reproduction in different lighting.
Details how to connect and configure external microphones and audio devices.
Instructions on attaching essential accessories like tripods and shoulder straps.
Procedure for charging the camera's internal backup battery for date/time settings.
Guide to setting the camera's internal clock and time zone for accurate recording metadata.
Crucial pre-shoot checks for battery, P2 card, and camera unit functionality.
Covers inserting, removing, and managing P2 and microP2 memory cards.
Outlines fundamental steps for shooting, including system setup and recording settings.
Guide to choosing recording parameters like resolution, codec, and frame rate.
Details on configuring focus assist, level gauge, and other shooting adjustments.
Instructions for manually and automatically adjusting white and black balance for optimal image quality.
Explains how to configure the camera's electronic shutter mode and speed.
Describes how to customize the camera's USER buttons for quick access to functions.
Guide to selecting audio input signals and manually adjusting recording levels.
Details on adjusting image parameters like detail, skin tone, RB gain, and matrix.
Covers advanced recording modes like pre-recording, interval, one-shot, and loop recording.
Information on system modes, recording formats, and supported recording functions.
Explains how to record in different formats for main and sub recordings simultaneously.
Guide to setting up and using the camera's live streaming capabilities over a network.
Instructions on saving and loading scene files and user files via SD memory cards.
Details on locking video signals to external reference signals for synchronization.
Covers setting time codes, user bits, and date/time for accurate recording metadata.
Instructions for playing back recorded clips at normal, fast-forward, and fast-reverse speeds.
Covers managing and viewing clips via the thumbnail screen, including selection and basic operations.
Procedure for editing metadata associated with recorded clips.
Explains how to check the remaining capacity and status of P2 and microP2 memory cards.
Overview of the camera's menu hierarchy and how to access different menu types.
Basic operations for navigating and changing camera settings through the menu system.
Resets user file settings to factory defaults, excluding scene file configurations.
Detailed settings for configuring and managing scene files for image quality presets.
Configuration of recording formats, codecs, and shooting modes for video and audio.
Customization options for assigning functions to USER buttons and the lens RET button.
Settings for operating modes when switches are changed, affecting camera behavior.
Comprehensive settings for recording media, file splitting, recording modes, and dual codec options.
Functions for managing clips, including playback, deletion, copying, and metadata editing.
Configuration options for audio input levels, microphone settings, and output routing.
Settings for controlling video and audio output/input signals for various terminals.
Configuration for network connections including USB, wireless LAN, and wired LAN settings.
Customization of information displayed on the viewfinder, such as zebra patterns and markers.
Settings related to battery type detection, charge level indication, and voltage monitoring.
Operations for managing scene files and user files on SD memory cards.
Miscellaneous settings including access LEDs, tally lamps, clock, and INCOM functions.
Procedures for camera firmware updates and lens adjustments.
Displays camera firmware version, model, serial number, and operation time.
Lists additional option menu items for area settings and security configurations.
Explains the buttons used with the SmartUI and basic initialization procedures.
Visual representation of the SmartUI's hierarchical menu organization.
Demonstrates navigation and interaction with the SmartUI for accessing camera settings.
Displays and allows adjustment of camera image-related status and scene file settings.
Provides access to audio level settings for different channels and input/output configurations.
Covers settings for time code, user bits, and video output configurations.
Details all information and indicators displayed on the camera's viewfinder screen.
Shows video output status and recording media information.
Displays audio settings and selection status for each recording channel.
Indicates the assignment status of the USER buttons for customized control.
Displays the operational status and information related to the chromatic aberration compensation function.
Shows the configuration settings for the camera's input and output terminals.
Instructions for connecting the camera to external video monitors or recording devices.
Details on connecting the camera to computers via USB for data transfer and storage device access.
Guide to connecting and operating the camera using the optional AJ-RC10G remote control unit.
Instructions for connecting and using the AG-EC4G extension control unit for remote camera operation.
Procedure for connecting the AK-HRP200G remote operation panel for IP or serial control.
Details on connecting the camera to the AG-BS300 base station for system expansion and control.
Instructions for connecting to the P2 ROP application for remote camera control via wireless LAN.
Configures network settings on the camera for establishing a connection with the P2 ROP application.
Guides on setting up and using the FTP client for transferring clips to a server.
Details on automatically or manually transferring recorded clips to a server while recording or during upload.
Overview of connecting the camera to networks via wireless LAN, wired LAN, or 4G/LTE.
Instructions for connecting wireless modules and USB modems to the camera.
Procedure for connecting the camera to a network using a wired LAN cable.
Configuration steps for wireless LAN, 4G/LTE, and wired LAN connections.
Details on using P2 browser function and P2 playlist editing via network.
Guides on setting up the P2 playlist editor application for managing clips via network.
Configures network settings on the camera for establishing a connection with the P2 ROP application.
Explains how to interpret and address error codes and warning messages indicated by the camera.
Instructions on how to update the camera's firmware using dedicated tools or SD memory cards.
Provides the physical dimensions of the camera body in millimeters and inches.
Details the camera's general specifications, including power, operating conditions, and pickup device.
Pin assignments and signal descriptions for all camera terminals and connectors.