Other connections
09
67
En
Switching components on and off using
the 12 volt trigger
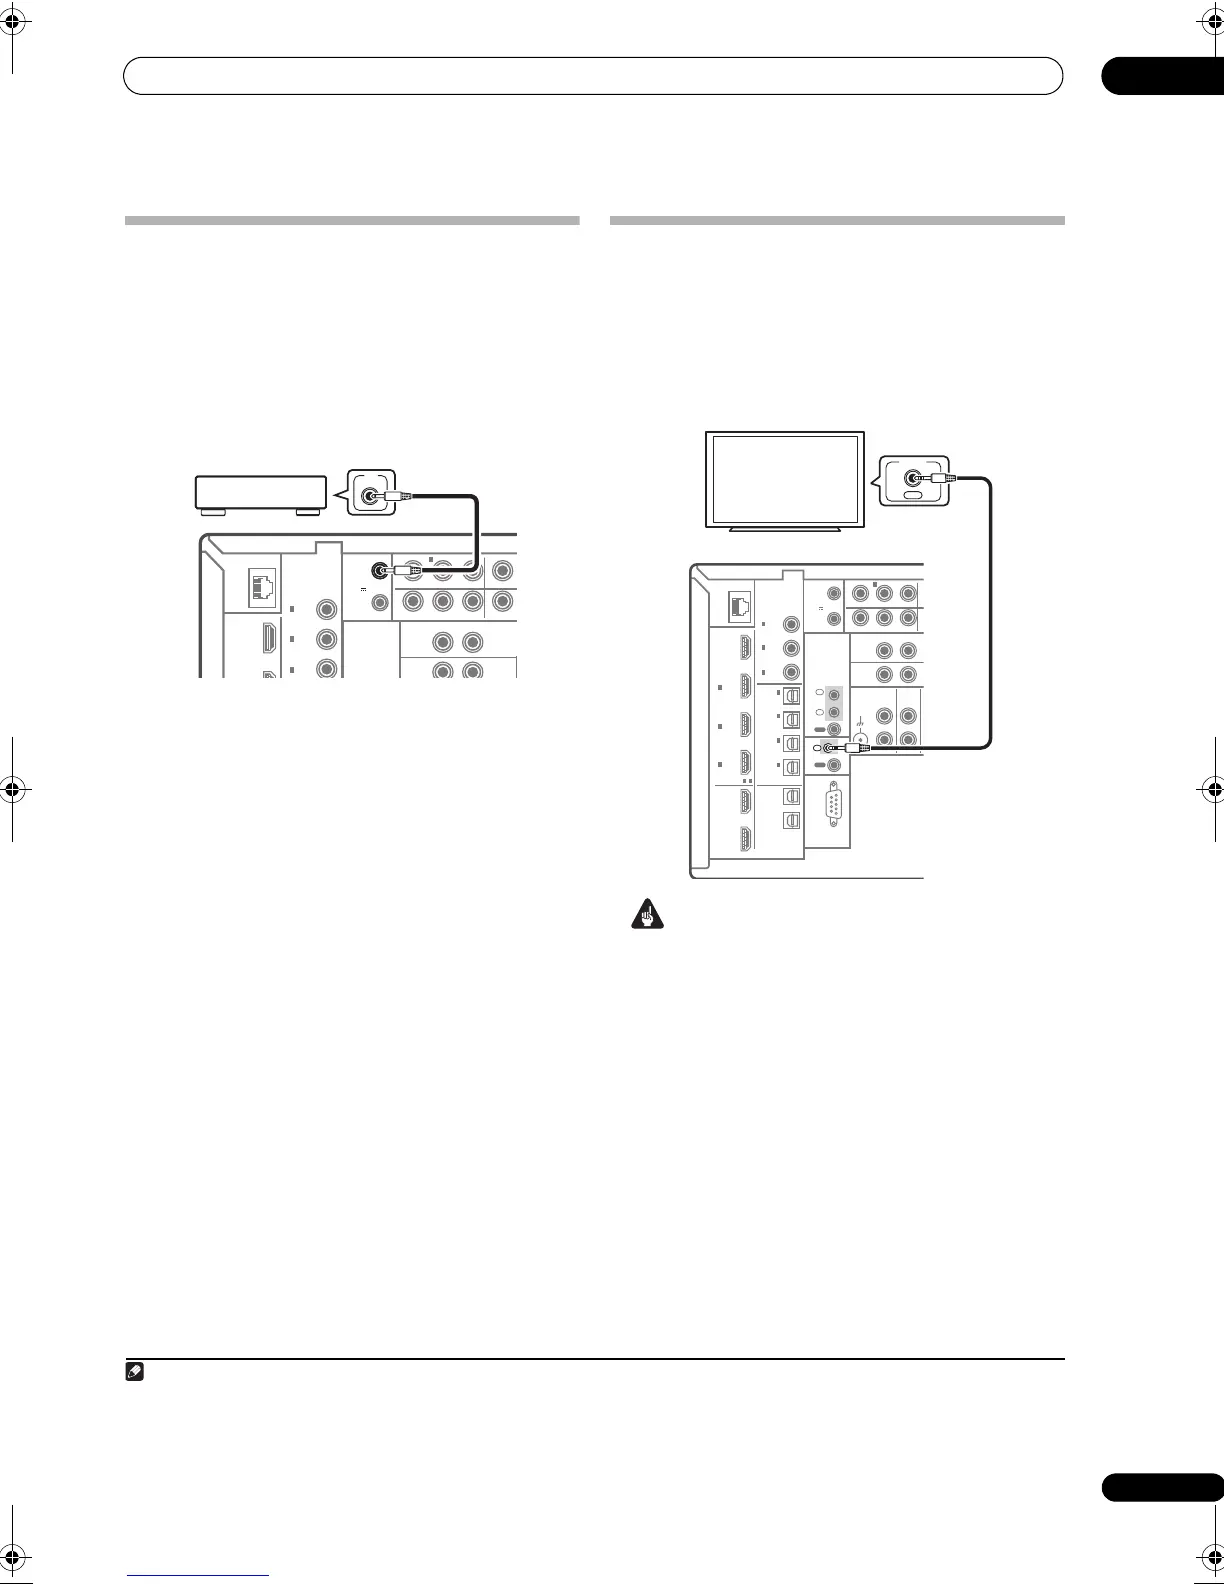
You can connect comp onents in your system (such as a
screen or projector) to this receiver so that they switch on
or off using 12 volt triggers when you select an input
function. However, you must specify which input
functions switch on the trigger using the The Input Setup
menu on page 89. Note that this will only work with
components that have a standby mode.
1
• Connect the
12 V TRIGGER
jack of this receiver to
the 12 V trigger of another component.
Use a cable with a mono mini-plug on each end for the
connection.
•The trigger maximum power is DC OUT 12 V/50 mA.
After you’ve specified the input functions that will switch
on the trigger, you’ll be able to switch the component on
or off just by pressing the input function(s) you’ve set on
page 89.
Using this receiver with a Pioneer flat
screen TV
If you have a Pioneer flat screen TV, you can use an SR+
cable
2
to connect it to this unit and take advantage of
various convenient features, such as automatic video
input switching of the flat screen TV when the input is
changed.
3
Important
• You can’t use the SR+ features when HDMI Control
is set to ON. Make sure to set HDMI Control to OFF
when you use the SR+ features (page 87).
• If you connect to a Pioneer flat screen TV using an
SR+ cable, you will need to point the r emote control
at the flat screen TV remote sensor to control the
receiver. In this case, you won’t be able to control the
receiver using the remote control if you switch the flat
screen TV off.
•Before you can use the extra SR+ features, you need
to make a few settings in the receiver. See The Input
Setup menu on page 89 and SR+ Setup for Pioneer flat
screen TVs on page 92 for detailed instructions.
1Triggered connections with up to two devices compatible with 12-volt triggers can be made with this receiver.
LAN
(10/100)
HDMI
COAXIAL
IR
BD
IN
12 V
TRIGGER
ASSIGNABLE
IN
3 (DVR2)
IN
2 (CD)
IN
1
(DVD)
IN
1 I
(OUTPUT
12V
TOTAL
50mA
MAX)
1
2
(DVD)
PR PB YPR
(VIDEO1)
R
ZONE 2 OUT
ZONE 2
OUT
ZONE 3
L
12 V
TRIGGER
(OUTPUT
12V
TOTAL
50mA
MAX)
1
12V
TRIGGER
2 The 3-ringed SR+ cable from Pioneer is commercially available under the part number ADE7095. Contact the Pioneer Customer Support
division for more information on obtaining an SR+ cable (you can also use a commercially available 3-ringed mini phone plug for the
connection).
3This receiver is compatible with all SR+ equipped Pioneer flat screen TVs from 2003 onward.
LAN
(10/100)
DIGITAL
OPTICAL
RS-232C
HDMI
COAXIAL
IR
CONTROL
BD
IN
12 V
TRIGGER
IN
1
IN
2
IN
3
OUT
1
OUT
2
SOURCE
OUT
ZONE3/
SOURCE
OUT
31
ASSIGNABLE
-
(HDMI
CTRL)
ASSIGNABLE
ASSIGNABLE
(CD-R)
IN
4
(VIDEO1)
IN
3
(DVR1)
IN
2
(TV/SAT)
IN
1
IN
3 (DVR2)
IN
2 (CD)
IN
1
(DVD)
IN
1
(OUTPUT
12V
TOTAL
50mA
MAX)
1
2
IN
1
IN
IN
2
OUT
OUT
(DVD)
P
R
P
B
YP
R
(VI
R
ZONE 2 OUT
PHONO
IN
CD
IN
SIGNAL
GND
Z
Z
L
L
R
SCLX81_71.book 67 ページ 2008年7月25日 金曜日 午後3時1分

 Loading...