steel
washers
nylon
spacers
locknuts
rear seat spacer
fabric rail mounts
Figure 6o
front seat spacer assembly
1/4-20x 1-1/4" bolts
Figure 66
1/4-20x 1-1/4" bolt
locknut
et"
74
.\7
4
"
,,
gt
••:
.
:"..,w...
1
...• <
.....7.44:•“Ii:Q•Clii,
1
".• N.
**,
Nli,..N.P.11ZY liV
.
N.litZ
b
.. 400t
..
s..N.N.N......
....‘
,
44..
.
4.
.5
%.
-.
..
1
"
...."411.
7
.
,
•14. .. ••• mi., ,
.
7
..:".
1:
A.....-Ztzt
rk
,..,
-"•,...
,
V". ....
1.2...• ••‘
.."L
'Illi. ',. ... \ Z"
.
"%:......
14...-..
t
.'"I
Z
E.
i.
. ...... ..i
1.4
11“...
I
,
................ N.,: ,
-
No
s..
." ,
w
.
.." .................. 4,
1
%,..c.Z
.
V
,
..,,
.....
'
SW.: lik 41•:
..
.,411....7.1i..
1.
7e
,
.... .IIL.,
•
3.
,
..4..."It .
I
..
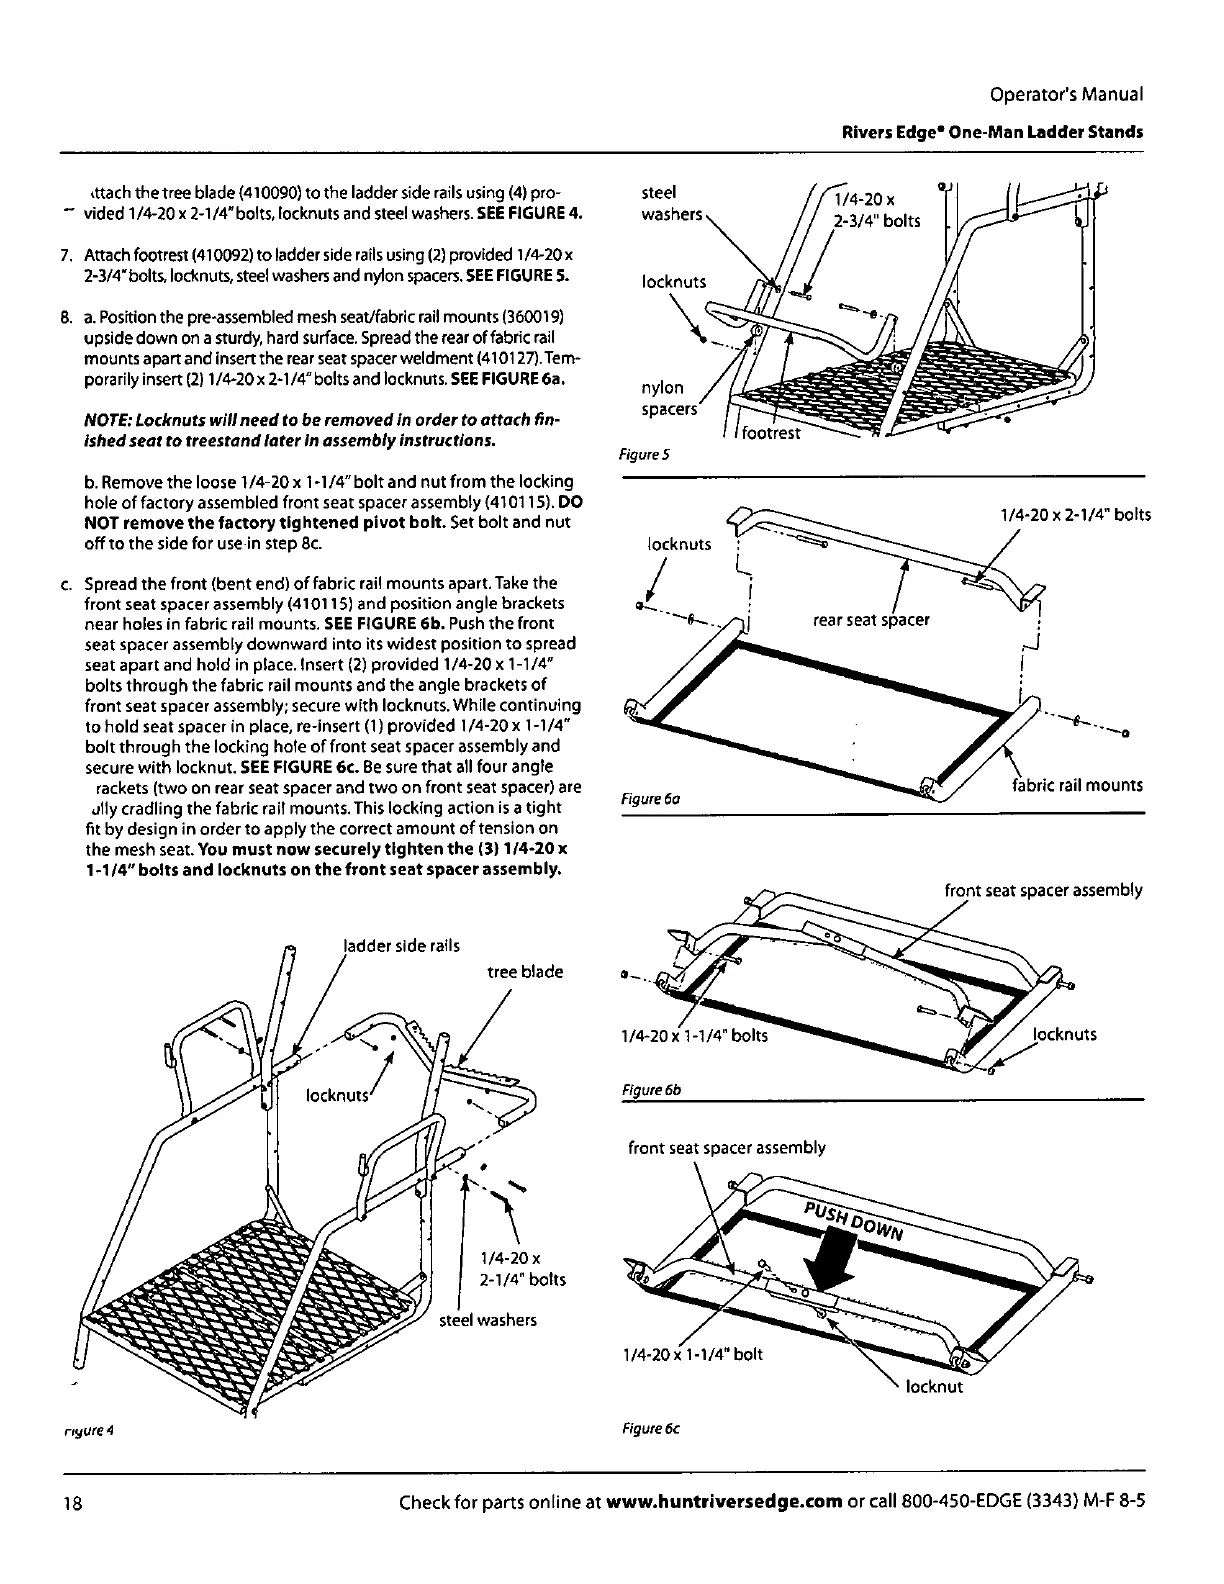
ladder side rails
locknuts
it
[vox
2-1/4" bolts
steel washers
tree blade
Operator's Manual
Rivers Edge* One-Man Ladder Stands
(ttach the tree blade (410090) to the ladder side rails using (4) pro-
- vided 1/4-20 x 2-1/4" bolts, locknuts and steel washers.
SEE FIGURE 4.
Attach footrest (410092) to ladder side rails using (2) provided 1/4-20 x
2-3/4"bolts, locknuts, steel washers and nylon spacers.
SEE FIGURES.
a. Position the pre-assembled mesh seat/fabric rail mounts (360019)
upside down on a sturdy, hard surface. Spread the rear of fabric rail
mounts apart and insert the rear seat spacer weldment (410127).Tem-
porarily insert (2) 1/4-20 x 2-1/4" bolts and locknuts.
SEE FIGURE 6a.
NOTE:
Locknuts will need to be removed in order to attach fin-
ished seat to treestand later In assembly instructions.
Figures
b. Remove the loose 1/4-20 x 1-1/4" bolt and nut from the locking
hole of factory assembled front seat spacer assembly (410115).
DO
NOT remove the factory tightened pivot bolt.
Set bolt and nut
off to the side for use in step 8c.
locknuts
1/4-20 x 2-1/4" bolts
c. Spread the front (bent end) of fabric rail mounts apart. Take the
front seat spacer assembly (410115) and position angle brackets
near holes in fabric rail mounts.
SEE FIGURE 6b.
Push the front
seat spacer assembly downward into its widest position to spread
seat apart and hold in place. Insert (2) provided 1/4-20x 1-1/4"
bolts through the fabric rail mounts and the angle brackets of
front seat spacer assembly; secure with locknuts. While continuing
to hold seat spacer in place, re-insert (1) provided 1/4-20 x 1-1/4"
bolt through the locking hole of front seat spacer assembly and
secure with locknut.
SEE FIGURE 6c.
Be sure that all four angle
rackets (two on rear seat spacer and two on front seat spacer) are
ally cradling the fabric rail mounts. This locking action is a tight
fit by design in order to apply the correct amount of tension on
the mesh seat.
You must now securely tighten the (3)1 /4-20 x
1-1/4" bolts and locknuts on the front
seat
spacer assembly.
nyure 4
front seat spacer assembly
Figure 6c
Check for parts online at
www.huntriversedge.com
or call 800-450-EDGE (3343) M-F 8-5
18