142
Chapter 8 Helpful Features
9. Press [KIT].
The “DRUM KIT” screen appears.
PITCH CTRL ASSIGN: OFF, ON
OFF:
Pitch Control is not active.
ON:
Pitch Control is active.
Setting the Range of Pitch Change
(PEDAL PITCH CTRL RANGE)
The degree to which the pitch is to change when the hi-hat
control pedal is pressed is set in semitone (half-step)
increments from -24 (down two octaves) to +24 (up two
octaves). When set to “0,” no change in pitch occurs.
fig.09-006
1. Press [KIT], then [F3 ( MENU)].
[KIT] lights, and a pop-up menu appears.
2. Press [INC/+] or [DEC/-], rotate the VALUE dial, or
press CURSOR [ ] or [ ] to move the cursor to
“FUNC.”
3. Press [F3] to confirm your choice.
4. Press [F2(PEDAL)].
The “PEDAL” screen appears.
5. Press CURSOR [ ] to move the cursor to “PEDAL
PITCH CTRL RANGE.”
6. Press [INC/+] or [DEC/-] or rotate the VALUE dial to
make the setting.
7. Press [KIT].
The “DRUM KIT” screen appears.
PEDAL PITCH CTRL RANGE:
-24–+24 (-2–+2 octaves)
When certain tone and instrument pitch settings are used, no
change may be realized, even when the pedal is pressed.
Using a Pad to Perform Button
Operations (PAD SWITCH)
With two pads connected with cables (PCS-31 or standard
insert cable), you can switch drum kits, patterns, or songs.
fig.09-006
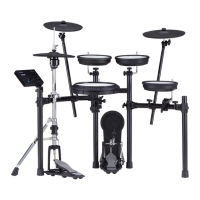
1. Connect pads to TRIGGER INPUT 11/12 (AUX1/AUX2).
Use PCS-31 cables (optional) or standard insert cable
when connecting two pads to TRIGGER INPUT 11/12.
2. Press [SETUP], then [F3 ( MENU)].
[SETUP] lights, and a pop-up menu appears.
3. Press [INC/+] or [DEC/-], rotate the VALUE dial, or
press CURSOR [ ] or [ ] to move the cursor to
“SWITCH.”
4. Press [F3] to confirm your choice.
5. Press [F2 (PAD)].
The “PAD SWITCH” screen appears.
Here, either “AUX1” or “AUX2” is highlighted,
depending on which pad is struck.
fig.09-006a
6. Press CURSOR [ ] to move the cursor to “PAD
SWITCH.”
7. Press [INC/+] or [DEC/-] or rotate the VALUE dial to
make the setting.
If selecting “KIT SELECT,” or “SEQ SELECT,” proceed
to Step 11.
8. When setting to “ASSIGNABLE,” press CURSOR [ ]
to move the cursor to “AUX1.”
9. Press [INC/+] or [DEC/-] or rotate the VALUE dial to
select the function for pads.
10.Set “AUX2” in the same manner.
 Loading...