Do you have a question about the Sauder Transit 414417 and is the answer not in the manual?
Assemble unit on carpeted floor or carton to prevent scratches.
Insert nineteen hidden cams into specific unit parts.
Insert metal end of cam dowels into installed hidden cams.
Separate extension slides from rails; note parts may be greasy.
Attach extension rails to lower end and center upright using screws.
Insert screw into rail, slide cartridge to align, then insert another screw.
Fasten hutch ends to the hutch top, tightening four hidden cams.
Do not stand unit upright without back fastened; it may collapse.
Ensure hidden cams are completely tightened (210 degrees) to prevent loosening.
Use four black 1-7/8" flat head screws to attach hutch uprights to hutch bottom.
Start each screw a few turns before fully tightening them.
Use four black 1-7/8" flat head screws to attach hutch bottom to hutch ends.
Carefully turn unit over, lay hutch back panel over unit.
Make equal margins on all edges; push corners to make unit 'square'.
Fasten the hutch back panel using nails.
Do not stand unit upright without back fastened; it may collapse.
Fasten desk frames to the hutch bottom using black 9/16" large head screws.
Upper molding has more holes than lower molding; do not confuse.
Fasten the upper molding to the hutch bottom using black 9/16" large head screws.
Fasten lower top to lower back panel, tightening four hidden cams.
Fasten lower top to desk frames using black 3/4" pan head screws.
Fasten the upright to the top, tightening two hidden cams.
Push the magnetic catch into the designated hole on the top.
Insert four metal pins into the divider.
Insert divider metal pins into the upright.
Fasten the center upright to the top, tightening two hidden cams.
Attach lower end and desk back to the top, tightening five hidden cams.
Loosen screw to raise rail for hidden cam tightening; retighten screw.
Fasten the bottom to a return frame using three black 9/16" large head screws.
Insert lower pivot hinge, fasten shelf to hinge with screw.
Insert upper pivot hinge, fasten shelf to hinge with screw.
Fasten the other return frame to the bottom using three black 9/16" large head screws.
Insert lower pivot hinge, fasten shelf to hinge with screw.
Insert upper pivot hinge, fasten shelf to hinge with screw.
Fasten the return frames to the top panel using six black 3/4" pan head screws.
Fasten a pivot hinge to the flip down door using a black 9/16" large head screw.
Fasten the strike plate to the flip down door using a black 1/2" flat head screw.
Insert pivot hinge into washers and center upright.
Insert door hinge into upright, then fasten free hinge to door.
Carefully stand your assembled unit upright.
Use four black 1-7/8" flat head screws to fasten uprights to lower top.
Fasten the lower molding to the desk frames using black 3/4" pan head screws.
Attach the pull to the drawer bottom using two black 1/2" flat head screws.
Fasten drawer sides to the drawer bottom using four black 1-7/8" flat head screws.
Attach the drawer back to the drawer sides using two black 1-7/8" flat head screws.
Fasten the drawer front to the drawer sides, tightening two hidden cams.
Fasten extension slides to drawer sides using four gold 5/16" flat head screws.
Line up extension slides and push drawer into unit until fully inserted.
Clean unit with furniture polish or damp cloth; wipe dry.
Please read back pages for important safety information.
Avoid overloading shelves and drawers to prevent injury or breakage.
Load from bottom up; place heavier items lower to prevent tipping.
Move furniture properly to avoid tipping or breakage; get help if needed.
Do not place TVs on furniture not designed for them due to tipping risk.
Covers defects for five years; excludes misuse, improper maintenance, or alterations.
Sauder repairs/replaces/refunds; excludes incidental/consequential damages.
Contact Sauder for assistance, assembly tips, or replacement parts.
Register your product online for immediate service and information.
Information on product origin, materials, and compliance with safety standards.
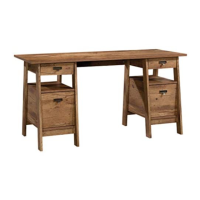
| Product Name | Sauder Transit 414417 |
|---|---|
| Category | Indoor Furnishing |
| Material | Engineered wood |
| Assembly Required | Yes |
| Style | Contemporary |
| Color | Oak |