AL-1551CS EXTERNAL VIEWS AND INTERNAL STRUCTURES 4 - 2
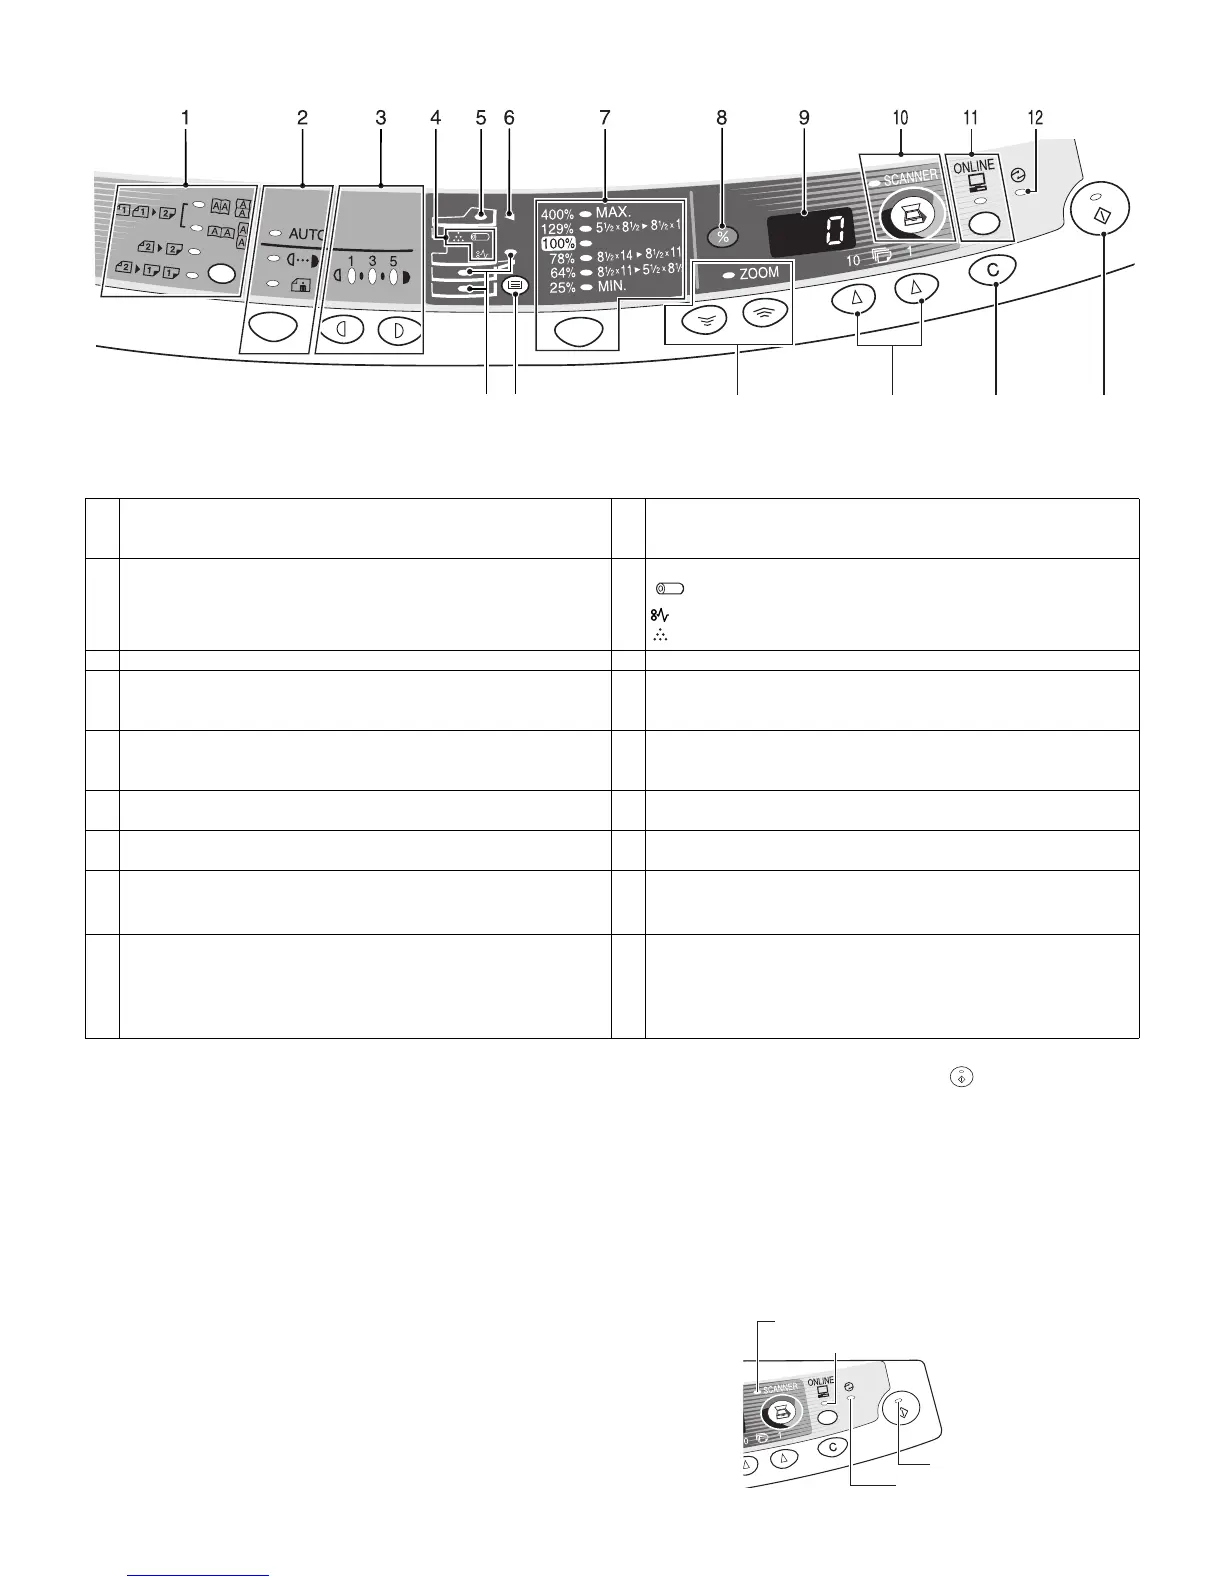
3. Operation panel
*1. Photoreceptor Cartridge Replacement indicator
After making 17,000 copies, the indicator will be “ON”, and after
1,000 copier more are made, the indicator starts blinking and
machine will hard-stop (after current job) until a new cartridge is
installed. End life of photoreceptor cartridge displays 3-digits x 2-
line (total 6-digits) by pressing CLEAR key for five seconds in user
simulation.
*2. Toner Developer Cartridge Replacement
When toner density is lower than a specified level, the TONER
DEVELOPER CARTRIDGE REPLACEMENT indicator lights up to
warn the user. If the Toner Developer Cartridge is not replaced in
that time, the Ready Lamp changes to blinking and then start to
supply the toner after around 10 copies. (Cartridge replacement
lamp continues to light.) If toner density is not back to specific level
after two minutes, the READY indicator goes out and Toner Devel-
oper indicator starts blinking, and the copier stops.
*3. Indicators on the operation panel
The ON LINE indicator and the start ( ) indicator indicate the
state of the printer or scanner.
Start indicator
(AL-1551CS)
13 14 15 16 17 18
1 Duplex Mode select key and indicator
(RSPF only)
2 Exposure mode selector key and indicators
Use to sequentially select the exposure modes: AUTO, MANUAL or
PHOTO. Selected mode is shown by a lit indicator.
3 Light and dark keys and exposure indicators
Use to adjust the MANUAL or PHOTO exposure level.
Selected exposure level is shown by a lit indicator.
Use to start and terminate user program setting.
4 Alarm indicators
Drum replacement required indicator *1
Misfeed indicator
TD cartridge replacement required indicator *2
5 SPF/RSPF indicator 6 SPF misfeed indicator
7 Copy ratio selector key and copy ratio indicators
Use to sequentially select preset reduction/enlargement copy ratios.
Selected copy ratio is shown by a lit indicator.
8 Copy ratio display (%) key
9 Display
Displays the specified copy quantity, zoom copy ratio, user program
code, and error code.
10 SCANNER key and indicator *3, *4
11 ON LINE key / indicator
Lights up when the machine is used as a printer and scanner. *3
12 Power save indicator
Lights up when the copier is in a power save mode.
13 Paper feed location indicators
Light up to show the selected paper feed station.
14 Tray select key
Use to select a paper feed station (paper tray or bypass tray).
15 Zoom keys / indicator
Use to select any reduction or enlargement copy ratio from 25% to
400% in 1% increments.
16 Copy quantity keys
• Use to select the desired copy quantity (1 to 99).
• Use to make user program entries.
17 Clear key
• Press to clear the display, or press during a copy run to terminate
copying.
• Press and hold down during standby to display the total number of
copies made to date.
18 Print key and ready indicator
• Copying is possible when the indicator is on.
• Use to set a user program.
• Press to start copying
On: Indicates the unit is ready for copying or scanning is
being performed.
Blinking: Indicates that an interrupt print job is in progress, or that
the unit is initializing (the cover has been opened and
closed or the power turned off and on).
Off: Indicates copying or scanning is being performed or the
unit is in the auto power shut-off mode.
Power save indicator
Start indicator
ON LINE indicator
SCANNER indicator