31
GB
7.5 Switching on and off and
adjusting the speed
Use the dial12 to switch the device on and off and select
the speed setting:
NOTE: when selecting the speed setting, consult the rec-
ommendation in the tables.
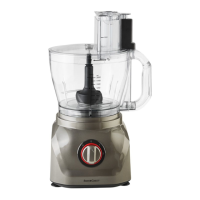
8. Using the blade assembly
DANGER! Risk of injury!
~ The blades of the blade assembly8 are very sharp.
Do not touch them. When you are not using the blade
assembly, push the blade guard on to the blades.
• Removing the blade
guard:
Pull the blade guard in the
middle slightly away from the
blade assembly and remove
this by pulling upwards.
• Attaching the blade
guard:
Place the blade assembly8
into the blade guard from the
top. Make sure that both
blades are completely pro-
tected.
Application area:
The blade assembly8 is suitable for chopping onions,
herbs, vegetables, fruit, parmesan and meat. You can also
use the blade assembly to knead dough.
WARNING! Risk of material damage!
~ Do not use the device to chop particularly hard food
such as bones or nutmegs.
~ The blade assembly is not suitable for grain, ice, nuts
or similar types of hard food.
Processing table for chopping:
Processing table for kneading:
WARNING! Risk of material damage!
~ Do not operate the device continuously with the blade
assembly8 in place for more than 3 minutes. After
this, the device must remain switched off until it has
cooled down to room temperature.
~ The device is unsuitable for heavy dough (e.g. full-
grain bread dough) or large amounts of dough. It is
possible to process sizeable amounts of dough in por-
tions.
Required accessories:
- Working container9
- Blade assembly8
-Lid3 with food pushers1, 1, 2
And this is how it works:
(For assembly see Figure M)
1. Position the working container9 on the base unit13.
Turn the working container slightly in a clockwise di-
rection until it is heard to lock into place.
2. Place the blade assembly8 into the working contain-
er9.
3. Fill the ingredients into the working container9. Fur-
ther ingredients can be added at a later time through
the food chute.
4. Place the lid3 with the food pushers1, 1, 2 onto the
working container9. Turn the lid slightly in a clock-
wise direction until it is heard to lock into place.
5. Connect the mains plug10 to a wall socket.
6. Use the dial12 to select the desired speed setting.
Switch
position
Function
P
Pulse function:
- Hold the dial12 in the P position to
switch on the device.
- Release the dial12 to switch off the
device.
- Enables working with several brief
pulses in a row – recommended e.g.
for herbs and onions
0 Turned off
1 Speed setting 1 (normal)
2 Speed setting 2 (high)
Ingredients Preparation
max.
quantity
Processing
time
Switch
Meat
cutting into
cubes,
approx.
2x2cm
500 g
approx.
30 - 60 sec.
2 / P
Onions
quartered,
without peel
500 g
approx.
30 - 60 sec.
P
Garlic
without peel
500 g
approx.
30 - 60 sec.
P
Carrots
cutting into
pieces,
approx.
2x2cm
500 g
approx.
30 - 60 sec.
2 / P
Ingredients max. quantity Processing time
Switch
Yeast dough max. 500 g of flour approx. 3 min.
1
__326488_Kuechenmaschine Multi_B8.book Seite 31 Dienstag, 6. August 2019 10:40 10
 Loading...