EasyManua.ls Logo

Sirman PLL 300 - User Manual

Sirman PLL 300
28 pages
Print Icon
To Next Page IconTo Next Page
Loading...
1
GRAVITA
PLL 300-330-350 AUTOMATICA
EC Professional Slicer
USE AND MAINTENANCE MANUAL
Question and Answer IconNeed help?

Do you have a question about the Sirman PLL 300 and is the answer not in the manual?

Summary

Receiving the Slicer

Packaging Information

Details the slicer's shipping method, including pallet, box, and protective nylon, and disposal of materials.

Checking Packaging Upon Delivery

Instructions for inspecting packaging for transport damage and reporting issues to the carrier immediately.

Slicer Installation Guide

Unpacking the Slicer

Lists components included in the package: machine, blade extractor, feet, and toolkit with accessories.

Slicer Positioning Requirements

Guides on placing the slicer, attaching feet, and requirements for a stable, level surface with adequate space and environment.

Electrical Connection Procedures

Covers connecting single-phase and three-phase motors, specifying cable types, plugs, and differential switches.

Slicer Wiring Diagram

Presents the electrical schematic for a 230V, 50Hz power supply, showing main board, motor, and other components.

Control Panel Overview

Explains the function of each button and display on the control panel for operating the slicer.

Preliminary Operational Checks

Details pre-operation checks for manual and automatic slicing, including safety interlocks and self-start prevention.

Machine Information and Safety

General Safety Precautions

Fundamental safety rules for installation, usage, and servicing, covering intended use and manufacturer responsibilities.

Getting Familiar with the Slicer

Construction Features of the Slicer

Describes the materials used for the slicer body (anodized aluminium alloy) and blade (hardened steel).

Safety Devices Installed

Details mechanical and electrical safety features such as gauge plane, ring, cap, pusher, handguard, and microswitch for operator protection.

Machine Description and Benefits

Highlights the slicer's design purpose, safety, hygiene, precision, robust construction, and quiet operation.

Technical Specifications and Dimensions

Presents technical specifications including dimensions, weights, motor power, and noise levels for different models.

Using the Slicer

Operational Checks Before Use

Step-by-step guide for performing initial checks before first use, ensuring correct installation and functionality.

Loading and Cutting Product

Instructions for loading food and performing manual and automatic slicing, emphasizing safe handling and body positioning.

Blade Sharpening Procedure

Provides safety warnings and detailed steps for sharpening the slicer blade to maintain precision and performance.

Routine Cleaning Procedures

Foreword on Routine Cleaning

Emphasizes daily cleaning, use of provided detergent, and safety precautions prior to cleaning operations.

Cleaning the Slicer Machine

Details general machine cleaning procedures, including removal and cleaning of the hopper assembly.

Lubricating Slide Guides

Explains how to periodically lubricate the slide guides on the hopper assembly using the provided oil.

Slicer Maintenance

Maintenance Foreword and Precautions

States essential preparatory steps before performing any maintenance operation on the slicer.

Belt Replacement Schedule

Notes that the belt does not require adjustment and typically needs replacement after 3-4 years.

Support Feet Inspection

Advises checking support feet for deterioration and contacting a service center for replacement if stability is affected.

Power Supply Cable Check

Recommends periodic checks for wear or damage on the power supply cable and contacting a service center for replacement.

Blade Wear and Replacement

Instructs to check blade diameter after sharpening, noting a 10mm reduction tolerance, and contact service for replacement.

Grinder Maintenance

Advises checking grinders' abrasive property during sharpening and replacing them if no longer abrasive to prevent blade damage.

Slide Guides Lubrication

Describes applying a few drops of oil to the round bar where the hopper assembly slides for lubrication.

Pushbutton Panel Label

Suggests contacting a service center for replacement if the pushbutton panel label becomes damaged over time.

Troubleshooting Error Codes

Lists error codes, their causes, and recommended remedies, advising to contact a service center if faults persist.

Slicer Scrapping and Disposal

Putting the Machine Out of Service

Instructs to disconnect the machine from mains and eliminate electrical connections to prevent unauthorized use.

Machine Scrapping Procedure

Recommends contacting a local specialized waste treatment center for proper disposal of the machine.

WEEE Waste Management

Explains the WEEE symbol and the user's responsibility for contacting the manufacturer for waste treatment and recycling.

Overview

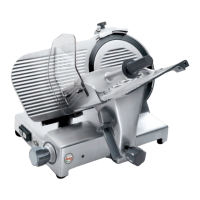
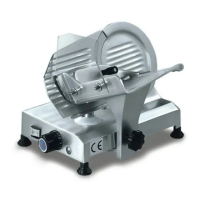
The document describes the "GRAVITA' PLL 300-330-350 AUTOMATICA" professional slicer, an EC-compliant device designed for slicing fresh boneless meat and pork products.

Function Description

The slicer is designed for precise and safe slicing of food products. It can operate in both manual and automatic modes, offering flexibility based on user needs. The automatic mode includes features for setting the number of slices and adjusting hopper speed and travel, making it suitable for various product sizes and desired slicing speeds. The machine ensures maximum safety during use, cleaning, and maintenance operations through a meticulous selection of materials and integrated safety devices.

Important Technical Specifications

The slicer is constructed primarily from anodized aluminum alloy (Peraluman AlMg5), a food-grade material resistant to acid, salt, and oxidation. The blade is made of 100 Cr6 rectified, chrome-plated, and hardened steel, ensuring slicing precision even after sharpening. Other components are made from shockproof plastic (ABS) for the handguard and AISI 430 or 304 steel.

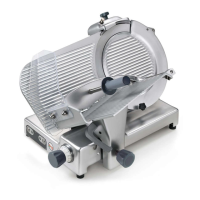
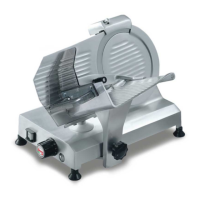
The available models are PLL 300, PLL 330, and PLL 350, with corresponding blade diameters of 300 mm, 330 mm, and 350 mm, respectively. Key dimensions and weights are:

  • Dimensions (AxBxC):
    • PLL 300: 780x640x700 mm (Gross weight: 46 Kg)
    • PLL 330: 780x640x700 mm (Gross weight: 47 Kg)
    • PLL 350: 780x640x700 mm (Gross weight: 48 Kg)
  • Dimensions (CxDxE):
    • PLL 300: 615x660x465 mm
    • PLL 330: 645x660x455 mm
    • PLL 350: 660x660x455 mm
  • Dimensions max (FxDxG): 730x660x650 mm for all models.
  • Hopper: 365x270 mm for all models.
  • Run of carriage: 310 mm for all models.
  • Cut capacity (XYHW):
    • PLL 300: 270x190x240x220 mm
    • PLL 330: 270x210x260x240 mm
    • PLL 350: 270x230x275x255 mm
  • Cut thickness: 30 mm for all models.
  • Motor: 210 + 200 Watt (0.30 + 0.27 Hp) for all models.
  • Net weight: 41 Kg (PLL 300), 42 Kg (PLL 330), 43 Kg (PLL 350).
  • Power source: 230 V / 50 Hz (single-phase) or 230-400 V / 50 Hz (three-phase).
  • Noise level: ≤ 60 dB.

Electrical connections vary by motor type:

  • Single-phase motor: 3x1mm² cable, 1.5m length, "SHUKO" plug. Requires a 230 V - 50 Hz supply with a 10 A ΔΙ= 0.03A thermomagnetic differential switch.
  • Three-phase motor (400 V): 5x1mm² cable, 1.5m length, red 15A 3F + T CEI plug. Requires a 400 V - 50Hz supply with a 10 A ΔΙ= 0.03A thermomagnetic differential switch.
  • Three-phase motor (230 V): 5x1mm² cable, 1.5m length, blue 15A 3F + T CEI plug. Requires a 230 V - 50Hz supply with a 10 A ΔΙ= 0.03A thermomagnetic differential switch. Blade rotation must be anti-clockwise when viewed from the bladeguard side.

Safety devices include:

  • Mechanical safety: Gauge plane, ring, cap, product pusher, product pusher grip, handguard. The trolley only transports when the thickness gauge plane is at "0" and at the end of its run, towards the operator side.
  • Electrical safety: A microswitch on the bladeguard stops the machine if the tie-rod is removed and prevents startup if not properly closed. A relay in the control circuit requires manual restart after an accidental power loss. The slicer complies with EEC 2006/42, EN 1974, EEC 2006/95, Directive 2004/108, EN 60335-1, and EN 60335-2-64 norms.

Usage Features

The control panel features pushbuttons for "ON" (1) and "OFF" (2), hopper speed settings (fast (3), medium (4), slow (5)), and food product size settings (small (6), medium (7), large (8)). It also includes a button to enable/disable automatic hopper travel (9) and a slice count display (10) with "+" (12) and "-" (11) buttons to adjust the number of slices.

Positioning: The slicer should be placed on a level, dry, smooth, robust, and stable surface, approximately 80 cm from the ground and at least 20 cm from walls or other objects to ensure sufficient operating room and operator safety. The environment should have a maximum humidity of 75% (non-saline) and a temperature range of +5°C to +35°C.

Manual Slicing:

  1. Disable automatic slicing by pressing pushbutton (9) to "MAN".
  2. Press "ON" (1).
  3. Guide the hopper assembly to slice the product.

Automatic Slicing with Slice Counter Programmed:

  1. Enable automatic slicing by pressing pushbutton (9) to "AUT".
  2. Press pushbutton (10) to "CONT".
  3. Set the desired number of slices using "+" (12) and "-" (11).
  4. Press "ON" (1).
  5. Set hopper assembly travel (6-7-8) and slicing speed (3-4-5) according to product size and desired speed.

Automatic Slicing without Programming Slice Counter:

  1. Press pushbutton (9) to "NUM".
  2. Press pushbutton (10) to "AUT".
  3. Press "ON" (1).
  4. The display (13) shows the number of slices cut.
  5. Set hopper assembly speed (3-4-5) and travel (6-7-8).
  6. Press "OFF" at the end of work.

Loading and Cutting:

  • Always set the graduated hand grip to "0" and ensure the motor is stopped before loading.
  • Position the adjustable product holder and product pusher to create space for the food product.
  • Load the food product, secure it with the adjustable product holder, and position the product pusher on top.
  • Multiple small products can be sliced simultaneously.
  • Select the desired slicing thickness using the knob.
  • For manual slicing, stand in a correct position, grip the product pusher with the right hand, and use the left hand near the slice guard to retrieve slices (do not touch the blade).
  • For automatic slicing, stand in a correct position, press "ON", and use the left hand near the slice guard to retrieve slices.
  • Never use the slicer without a food product.
  • After slicing, press "OFF" and turn the thickness selection knob to "0".
  • If slices appear threaded or rough, sharpen the blade.

Maintenance Features

General Maintenance:

  • Always disconnect the plug from the mains and turn the thickness selection knob to "0" before any maintenance.
  • The belt typically needs replacement every 3-4 years by a "SERVICE CENTRE".
  • Support feet may deteriorate and lose elasticity, requiring replacement by a "SERVICE CENTRE".
  • Periodically check the power supply cable for wear or damage and contact a "SERVICE CENTRE" for replacement if needed.
  • The blade diameter should not exceed a 10 mm reduction tolerance from the original diameter after numerous sharpening operations. Contact a "SERVICE CENTRE" for replacement if needed.
  • Grinders must maintain their abrasive property. Non-abrasive grinders should be replaced by a "SERVICE CENTRE" to prevent blade damage.
  • The pushbutton panel label can be damaged over time and can be replaced by a "SERVICE CENTRE".

Sharpening the Blade:

  • Disconnect the plug and clean the blade with denatured alcohol.
  • Lift the sharpener cap (1) and turn it 180°.
  • Release the cap (c) so it fits onto the locator pins (d).
  • Ensure the blade is between the two grinders.
  • Connect the plug and press "ON".
  • Press pushbutton (2) to bring the blade into contact with the grinders for 30-40 seconds to form a slight burr.
  • Press pushbuttons (2) and (3) simultaneously for 3/4 second to dress the blade.
  • Clean grinders and blade after sharpening.
  • Replace the sharpening device in its original position.
  • Blade dressing should not exceed 3/4 second to prevent damage.

Routine Cleaning:

  • Clean the slicer at least once a day, or more frequently if necessary.
  • All parts in contact with food must be scrupulously cleaned.
  • Do not use water cleaning machines or water jets; use the provided cleaning product or neutral detergents (pH 7). Avoid other detergents, utensils, brushes, or tools that could damage the surface.
  • Always disconnect the plug and turn the thickness selection knob to "0" before cleaning.
  • Cleaning the hopper: Turn the thickness selection knob to "0" (1), move the hopper assembly (2) to the end of travel (a) towards the controls, partially unscrew the hopper lock knob (3), pull the assembly towards the operator, completely unscrew the knob, and lift the assembly (4) (b). Clean with warm water and the provided detergent or a neutral detergent (pH 7) solution.
  • Cleaning the blade, bladeguard, and ring: Wear metal gloves and use a damp cloth. Unhook the bladeguard (Fig. n°50), remove the sharpening device (Fig. n°52 ref. a), and open the thickness gauge so the jig (Fig. n°52 ref. b) adheres to the blade. Unscrew the three or four screws (Fig. n°52 ref. f) that fasten the blade. Position the jig (b) on the blade so the split fits in the ring (Fig. n°50 ref. c), matching the axes of the two holes (Fig. n°52 ref. d) on the blade with the two knobs (Fig. n°52 ref. e) on the jig. Screw the two knobs (e) without overtightening. Clean the bladeguard with warm water and detergent.
  • Cleaning the sliceguard: Grasp the hand grip (1) and pull up to unhook the pins (2), then extract the sliceguard. Clean with warm water and detergent.
  • Cleaning the sharpener: Lift the cap (a), loosen the knob (1), lift the casing (2), and remove (1). Ensure the knob passes through the largest opening in the casing (2). Rub the grinders with a brush. Clean other components with warm water and detergent.

Slide Guides Lubrication:

  • Periodically lubricate the slide guides on the hopper assembly (1-2) with a few drops of the provided oil (a) through the "OIL" hole on the side of the thickness selection knob.

Error Codes: The display shows error codes for specific faults:

  • E1 (Motor failure): Check encoder wiring/connection, motor wiring/connection, and for mechanical failure.
  • E2 ("Slice" count set at "0" with slice counter function activated): Set the required number of slices.
  • E3 (Home search unsuccessful): Check encoder wiring/connection, motor wiring/connection, and end of travel magnet on hopper assembly.
  • E4 (Hardware error): Check communication between power supply and keypad.
  • E5 (Motor does not cut-in): Check encoder wiring/connection, motor wiring/connection, and for mechanical failure.
  • E6 (Overcurrent in motor driver): Check lubrication, weight, and quantity of food product being sliced. If faults cannot be remedied, contact an "Authorised Service Centre".

Dismantling and Scrapping:

  • When putting the machine out of service, disconnect it from the mains and eliminate electrical connections.
  • For scrapping, contact a local Specialised Waste Treatment Centre and separate components according to chap. 4 par. 4.1.
  • The device complies with Directive 2002/95/EC, 2002/96/EC, and 2003/108/EC regarding hazardous substances and waste electrical and electronic equipment (WEEE). It should not be disposed of with household waste; separate collection and recycling are managed by the manufacturer.

Sirman PLL 300 Specifications

General IconGeneral
BrandSirman
ModelPLL 300
CategoryKitchen Appliances
LanguageEnglish

Related product manuals