26
Uw camcorder zal vanzelf op uw onderwerp
scherpstellen.
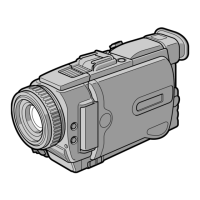
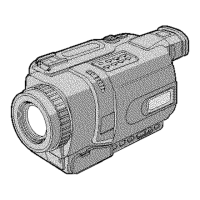
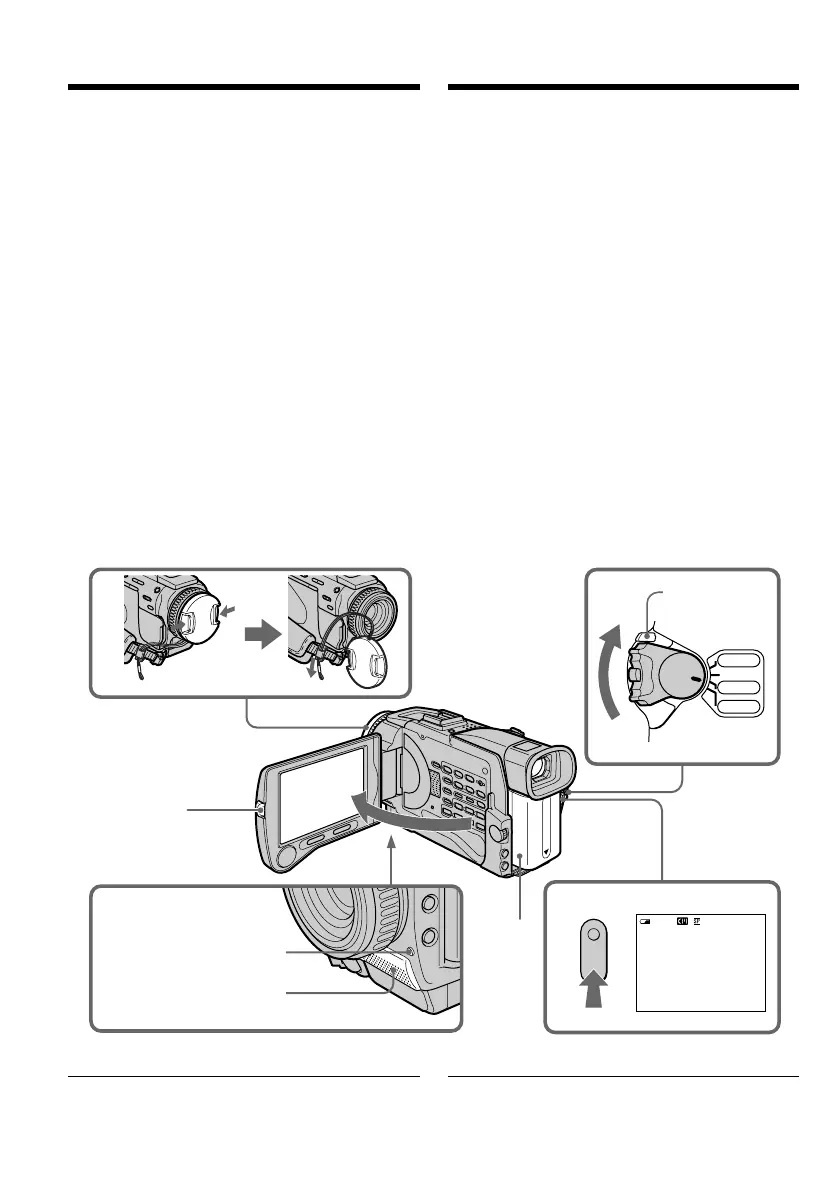
(1)Verwijder de lensdop door de nokken aan
weerszijden in te drukken en bevestig de
lensdop met het koordje aan de
handgreepband.
(2)Sluit een stroombron aan en plaats een
videocassette. Zie voor nadere aanwijzingen
“Stap 1” t/m “Stap 3” (op blz. 17 t/m 25).
(3)Druk het kleine groene knopje op de POWER
schakelaar in en schuif de schakelaar in de
“CAMERA” stand. De camcorder komt dan in
de opnamepauzestand.
(4)Druk op de OPEN toets en klap het LCD
scherm open. De beeldzoeker wordt dan
automatisch uitgeschakeld.
(5)Druk op de START/STOP toets. De
camcorder begint dan met opnemen. De
aanduiding “REC” licht op. Het camera-
opnamelampje voorop de camcorder gaat
branden. Om te stoppen met opnemen, drukt
u nogmaals op de START/STOP toets.
Opmerking
Trek de handgreepband stevig aan.
— Recording – Basics —
Recording a picture
Your camcorder automatically focuses for you.
(1)Remove the lens cap by pressing both knobs
on its sides and attach the lens cap to the grip
strap.
(2)Install the power source and insert a cassette.
See “Step 1” to “Step 3” for more information
(p. 17 to p. 25).
(3)Set the POWER switch to CAMERA while
pressing the small green button. Your
camcorder is set to the standby mode.
(4)Press OPEN to open the LCD panel. The
viewfinder automatically turns off.
(5)Press START/STOP. Your camcorder starts
recording. The REC indicator appears. The
camera recording lamp located on the front of
your camcorder lights up. To stop recording,
press START/STOP again.
Note
Fasten the grip strap firmly.
0:00:01
40min
REC
VCR
CAMERA
MEMORY
OFF(CHG)
POW
ER
1
3
5
2
4
LOCK switch/
LOCK knopje
Microphone/
Microfoon
Camera recording lamp/
Camera-opnamelampje
— Opnemen – basisbediening —
Video-opnamen maken