1-4
16
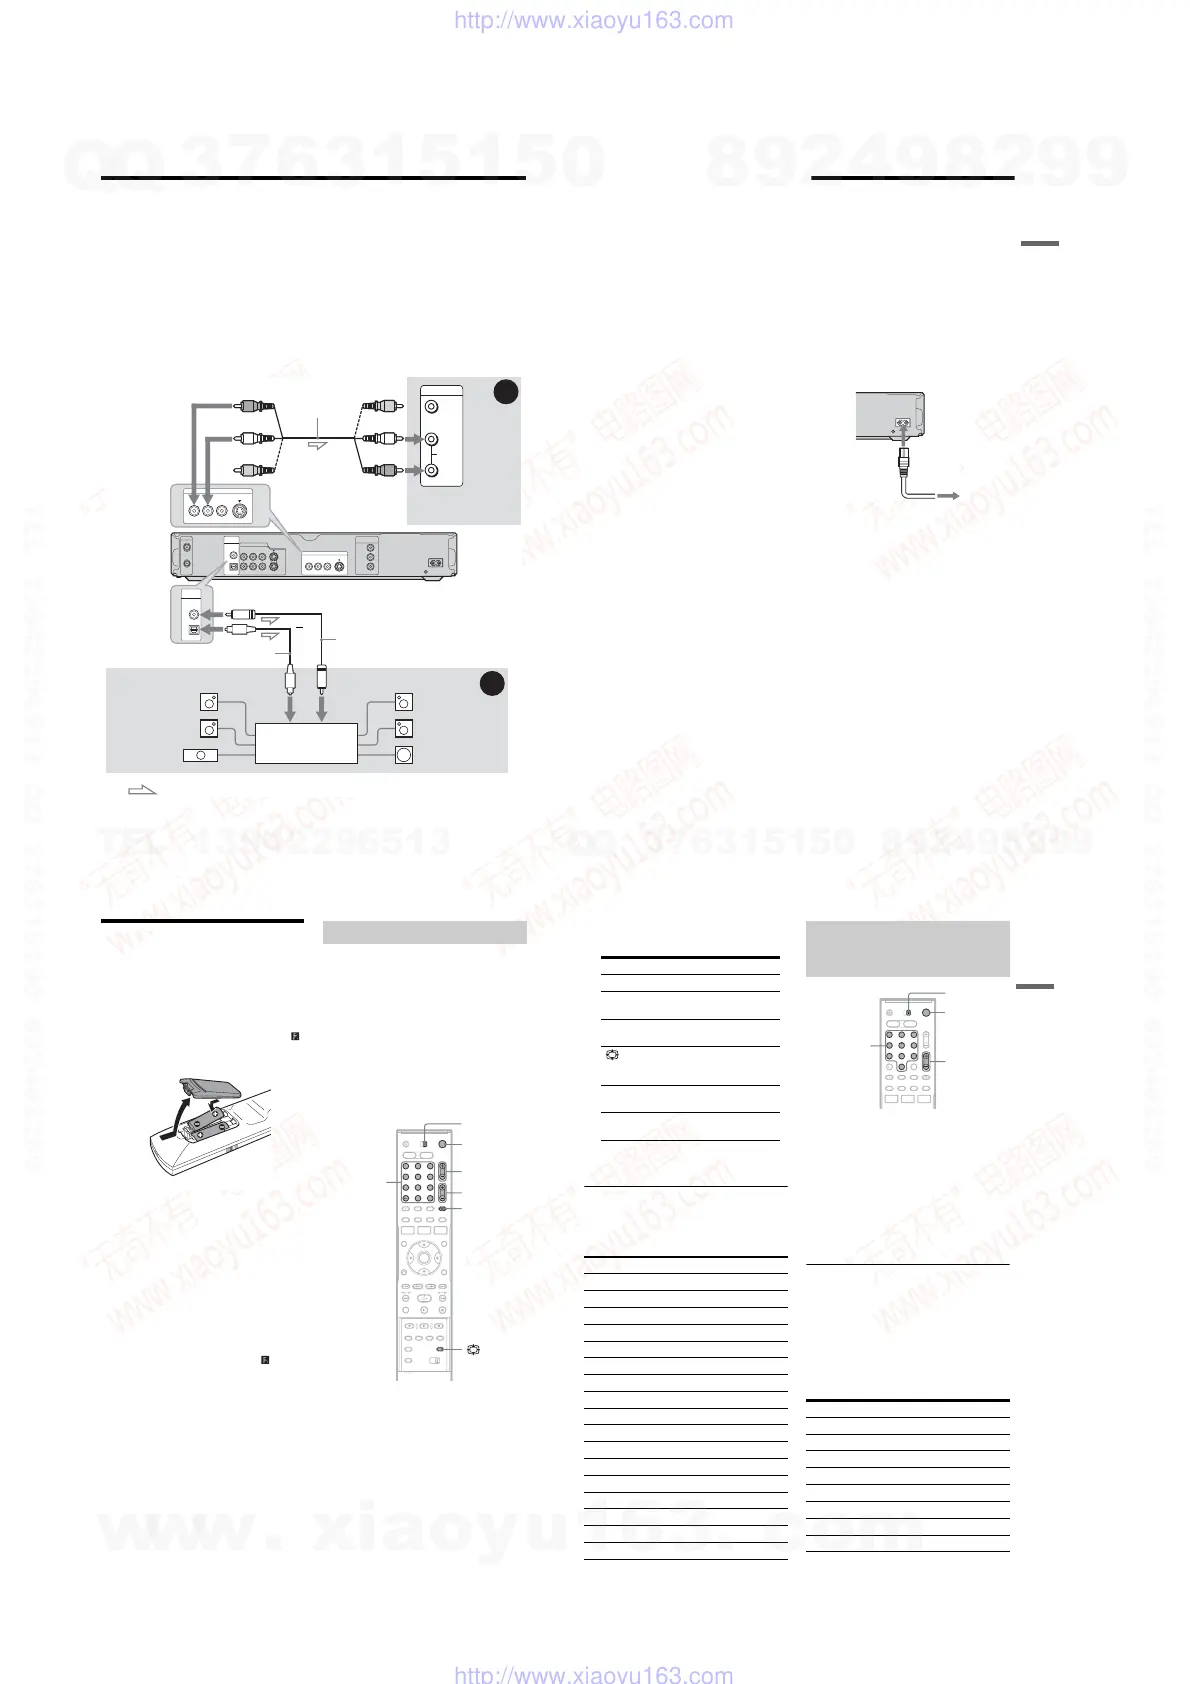
Step 4: Connecting the Audio Cords
Select one of the following patterns A or B, according to the input jack on your TV monitor, projector,
or AV amplifier (receiver). This will enable you to listen to sound.
A Connecting to audio L/R input jacks
This connection will use your TV’s or stereo amplifier’s (receiver’s) two speakers for sound. You can
enjoy the following surround effects (page 51).
• TV: Dynamic, Wide, Night
• Stereo amplifier (receiver): Standard, Night
B Connecting to a digital audio input jack
If your AV amplifier (receiver) has a Dolby
*1
Digital, DTS
*2
, or MPEG audio decoder and a digital input
jack, use this connection. You can enjoy Dolby Digital (5.1ch), DTS (5.1ch), and MPEG audio (5.1ch)
surround effects.
* The yellow plug is used for video signals (page 14).
~
AC IN
COMPONENT
VIDEO OUT
P
B
/C
B
Y
P
R
/C
R
DIGITAL
OUT
COAXIAL
OPTICAL
PCM/DTS/MPEG
DOLBY DIGITAL
LINE IN
1
3
VIDEO
S VIDEO
R-AUDIO-L
LINE OUT
VIDEO S VIDEOR-AUDIO-L
VIDEO
AUDIO
INPUT
L
R
IN
OUT
AERIAL
B
A
LINE OUT
VIDEO S VIDEOR-AUDIO-L
DIGITAL
OUT
COAXIAL
OPTICAL
PCM/DTS/MPEG/
DOLBY DIGITAL
AV amplifier (receiver)
with a decoder
(red)
TV, projector, or AV
amplifier (receiver)
Audio/video
cord (supplied)
: Signal flow
Coaxial digital cord (not supplied)
to DIGITAL OUT (COAXIAL or OPTICAL)
to LINE OUT (R-AUDIO-L)
Optical digital cord (not supplied)
Rear (L)
DVD recorder
(white)
(yellow)*
(yellow)
(white)
(red)
[Speakers]
Front (L)
[Speakers]
to coaxial
digital input
Rear (R)
Front (R)
Subwoofer
or
Centre
to optical
digital input
17
Hookups and Settings
z Hint
For correct speaker location, see the operating
instructions supplied with the connected components.
b Notes
• Do not connect your TV’s audio output jacks to the
LINE IN (R-AUDIO-L) jacks at the same time. This
will cause unwanted noise to come from your TV’s
speakers.
• In the connection A, do not connect the LINE IN (R-
AUDIO-L) and LINE OUT (R-AUDIO-L) jacks to
your TV’s audio output jacks at the same time. This
will cause unwanted noise to come from your TV’s
speakers.
• In the connection B, after you have completed the
connection, make the appropriate settings under
“Audio Connection” in “Easy Setup” (page 21).
Otherwise, no sound or a loud noise will come from
your speakers.
• With the connection B, the surround sound effects of
this recorder cannot be used.
*1
Manufactured under license from Dolby Laboratories.
“Dolby,” and the double-D symbol are trademarks of
Dolby Laboratories.
*2
“DTS” and “DTS Digital Out” are trademarks of
Digital Theater Systems, Inc.
Step 5: Connecting the
Power Cord (Mains Lead)
Connect the supplied power cord (mains lead) to
the AC IN terminal of the recorder. Then plug the
recorder and TV power cords (mains leads) into
the mains. After you connect the power cord
(mains lead), you must wait for a short while
before operating the recorder. You can
operate the recorder once the front panel display
lights up and the recorder enters standby mode.
If you connect additional equipment to this
recorder (page 22), be sure to connect the power
cord (mains lead) after all connections are
complete.
~
AC IN
to mains
to AC IN1
2
18
Step 6: Preparing the
Remote
You can control the recorder using the supplied
remote. Insert two R6 (size AA) batteries by
matching the 3 and # ends on the batteries to the
markings inside the battery compartment. When
using the remote, point it at the remote sensor
on the recorder.
b
Notes
• If the supplied remote interferes your other Sony DVD
recorder or player, change the command mode number
for this recorder (page 20).
• Use the batteries correctly to avoid possible leakage
and corrosion. Do not touch the liquid with bare hands
should leakage occur. Observe the following:
– Do not use a new battery with an old battery, or
batteries of different manufacturers.
– Do not attempt to recharge the batteries.
– If you do not intend to use the remote for an extended
period of time, remove the batteries.
– If battery leakage occurs, wipe out any liquid inside
the battery compartment, and insert new batteries.
• Do not expose the remote sensor (marked on the
front panel) to strong light, such as direct sunlight or
lighting apparatus. The recorder may not respond to the
remote.
You can adjust the remote’s signal to control your
TV.
If you connected the recorder to an AV amplifier
(receiver), you can use the supplied remote to
control the AV amplifier’s (receiver’s) volume.
b
Notes
• Depending on the connected unit, you may not be able
to control your TV or AV amplifier (receiver) with
some or all of the buttons below.
• If you enter a new code number, the code number
previously entered will be erased.
• When you replace the batteries of the remote, the code
number may be reset to the default setting. Set the
appropriate code number again.
1 Slide the TV/DVD switch to TV.
2 Hold down [/1.
3 Enter your TV’s manufacturer code (see
“Code numbers of controllable TVs”
below) using the number buttons.
Controlling TVs with the remote
1 2 3
4 6
7 8 9
0
5
TV/DVD switch
[/1
2 +/–
Number
buttons, SET,
-/--
t TV/VIDEO
PROG +/–
19
Hookups and Settings
4 Release [/1.
When the TV/DVD switch is set to TV, the
remote performs the following:
* If you use the number buttons to select the TV’s
programme position, press -/-- followed by the
number buttons for two-digit numbers.
Code numbers of controllable TVs
If more than one code number is listed, try
entering them one at a time until you find the one
that works with your TV.
1 Slide the TV/DVD switch to DVD.
2 Hold down [/1, and enter the
manufacturer code (see the table below)
for your AV amplifier (receiver) using the
number buttons.
3 Release [/1.
The 2 (volume) +/– buttons control the AV
amplifier’s volume.
If you want to control the TV’s volume, slide
the TV/DVD switch to TV.
z Hint
If you want to control the TV’s volume even when the
TV/DVD switch is set to DVD, repeat the steps above
and enter the code number 90 (default).
Code numbers of controllable AV amplifiers
(receivers)
If more than one code number is listed, try
entering them one at a time until you find the one
that works with your AV amplifier (receiver).
Buttons Operations
[/1 Turns your TV on or off
2 (volume) +/– Adjusts the volume of
your TV
PROG +/– Selects the programme
position on your TV
(wide mode) Switches to or from the
wide mode of a Sony
wide-screen TV
t TV/VIDEO Switches your TV’s
input source
Number buttons
and SET, -/--*
Selects the programme
position on your TV
Manufacturer Code number
Sony 01 (default)
Aiwa 01 (default)
Grundig 11
Hitachi 23, 24, 72
Loewe 06, 45
Nokia 15, 16, 69, 73
Panasonic 17, 49
Philips 06, 07, 08, 23, 45, 72
Saba 12, 13, 36, 43, 74, 75
Samsung 06, 22, 23, 71, 72
Sanyo 25
Sharp 29
Telefunken 12, 13, 36, 43, 74, 75
Thomson 12, 13, 43, 74, 75
Toshiba 38
LG 06
JVC 33
Controlling the volume of your AV
amplifier (receiver) with the
remote
Manufacturer Code number
Sony 78, 79, 80, 91
Denon 84, 85, 86
Kenwood 92, 93
Onkyo 81, 82, 83
Pioneer 99
Sansui 87
Technics 97, 98
Yamaha 94, 95, 96
1 2 3
4 6
7 8 9
0
5
TV/DVD switch
[/1
2 +/–
Number buttons
,
continued
w
w
w
.
x
i
a
o
y
u
1
6
3
.
c
o
m
Q
Q
3
7
6
3
1
5
1
5
0
9
9
2
8
9
4
2
9
8
T
E
L
1
3
9
4
2
2
9
6
5
1
3
9
9
2
8
9
4
2
9
8
0
5
1
5
1
3
6
7
3
Q
Q
TEL 13942296513 QQ 376315150 892498299
TEL 13942296513 QQ 376315150 892498299
http://www.xiaoyu163.com
http://www.xiaoyu163.com
 Loading...