1-24
96
The programme position cannot be changed
from the programme position you are
recording.
, Set the TV’s input source to “TV.”
Recording does not start immediately after you
press z REC.
, Operate the recorder only after “LOAD,”
“FORMAT,” or “INFOWRITE” disappears
from the front panel display.
Nothing was recorded even though you set the
timer setting correctly.
, There was a power failure during recording.
, The recorder’s internal clock stopped due to a
power failure that lasted for more than 1 hour.
Reset the clock (page 84).
, The channel was disabled after the timer
recording was set. See “Channel Setting” on
page 80.
, Disconnect the power cord (mains lead) from the
mains, and connect it again.
, The programme contains copy protection signals
that restrict copying.
, Other timer setting overlapped the timer setting
(page 45).
, There is no DVD inside the recorder.
, There is not enough disc space for the recording.
, The recorder was in the process of DV Dubbing.
Recording does not stop immediately after you
press x REC STOP.
, It will take a few seconds for the recorder to input
disc data before recording can stop.
Recording does not stop after you press x.
, Open the remote’s cover and press x REC
STOP.
Timer recording is not complete or did not start
from the beginning.
, There was a power failure during recording. If
the power recovers when there is a timer
recording, the recorder resumes recording.
Should the power failure continue for more than
1 hour, reset the clock (page 84).
, Other timer setting overlapped the timer setting
(page 45).
, Disc space was not enough.
Contents previously recorded were erased.
, Data that has been recorded on a DVD with a PC
will be erased from the disc when the disc is
inserted.
, “Auto Title Erase” in the TOOLS menu (appears
when you press TOOLS while the Timer List
menu is turned on) is set to “On” (page 45).
, The title was updated and recorded over
(page 39).
Nothing was recorded even though you set the
Synchro-Rec setting correctly.
, You forgot to turn off the connected equipment.
Turn off the connected equipment and set the
recorder to Synchro-Rec standby mode
(page 46).
, The recorder was not set to the Synchro-
Recording standby mode. Press SYNCHRO
REC to have the recorder stand by for recording.
Make sure the SYNCHRO REC indicator lights
up on the front panel (page 46).
, The recorder is connected to the TV output jack
of the connected equipment.
Synchro-Recording does not complete.
, The timer setting for the connected equipment
overlapped the recorder’s timer setting
(page 47).
, There was a power failure during the recording.
The recorder automatically starts recording
when the satellite receiver is turned on.
, The Synchro-Rec function was activated. Turn
off the satellite receiver and cancel the Synchro-
Rec function (page 46).
Recording/Timer recording/
Editing
Recording from the equipment
with a timer
97
Additional Information
The clock has stopped.
, Set the clock again (page 84).
, The clock stopped due to a power failure that
lasted for more than 1 hour. Reset the clock
(page 84).
The TIMER REC indicator is flashing.
, The disc does not have enough space.
, Insert a recordable disc inside the recorder.
The recording mode indication is incorrect.
, When the recording or dubbing is less than three
minutes, the recording mode indication may be
displayed incorrectly. The actual recording itself
is correctly made in the selected recording mode.
, After playing titles recorded in SLP and SEP
mode, the recording mode indication may
change depending on the recorded programme.
The clock does not appear in the front panel
display.
, “Dimmer” in “Options” setup is set to “Power
Save” (page 91).
, The “Power Save” in “Options” setup was set to
“On,” and the recorder is in standby (page 91).
The remote does not function.
, Batteries are weak.
, The remote is too far from the recorder.
, The remote’s manufacturer code returned to the
default setting when you replaced the batteries.
Reset the code (page 18).
, Turn on the recorder.
, The remote is not pointed at the remote sensor on
the recorder.
, Different command modes are set for the
recorder and remote. Set the same command
mode (page 20). The default command mode
setting for this recorder and the supplied remote
is DVD3.
, Set the TV/DVD switch to DVD (page 19).
Other Sony equipment responds to the remote.
, The same command mode is set for both the
equipment and recorder. Set a different
command mode for the recorder (page 20).
The recorder does not operate properly.
, Restart the recorder. Press down [/1 on the
recorder for more than ten seconds until
“WELCOME” appears in the front panel display.
, When static electricity, etc., causes the recorder
to operate abnormally, turn off the recorder and
wait until the clock appears in the front panel
display. Then, unplug the recorder and after
leaving it off for a while, plug it in again.
Five numbers or letters are displayed in the
front panel display.
, The self-diagnosis function was activated (see
the table on page 98).
The disc tray does not open after you press Z
(open/close).
, It may take a few seconds for the disc tray to
open after you have recorded or edited a DVD.
This is because the recorder is adding disc data to
the disc.
The disc tray does not open and “TRAY
LOCKED” appears in the front panel display.
, Contact your Sony dealer or local authorized
Sony service facility.
“RECOVERY” appears in the front panel
display.
, The recorder’s recovery function was activated
when the recorder was turned on because the
power was turned off or failed during recording.
Leave the recorder on until “RECOVERY”
disappears from the front panel display.
Display
Remote control
Others
,
continued
98
“HDD ERROR” appears in the front panel
display.
, The hard disk error occurred. Press down @/1 on
the recorder for ten seconds until “WELCOME”
appears in the front panel display. If this does not
resolve the problem, format the recorder’s HDD
by pressing down the HDD button on the
recorder for more than ten seconds until
“FORMAT” appears in the front panel display.
Note that all the contents recorded on the HDD
will be erased. If this does not fix the problem,
contact your nearest Sony dealer.
“FAN ERROR” appears in the front panel
display.
, Check that the vent on the rear of the recorder is
not blocked. Then, immediately disconnect the
AC power cord (mains lead). Leave the recorder
off for a while, then re-connect the power cord
(mains lead), and press [/1 on the recorder.
The disc tray does not open and you cannot
remove the disc after you press Z (open/
close).
, Turn off the recorder. Once the clock appears in
the front panel display, disconnect the power
cord (mains lead). Connect it again while
pressing down A on the recorder, and release the
button when the disc tray opens. Then, keep [/1
on the recorder pressed for about ten seconds
until “WELCOME” appears in the front panel
display.
“LOCKED” appears in the front panel display.
, The disc tray is locked. Cancel the Child Lock
(page 50).
Self-diagnosis Function
(When letters/numbers
appear in the display)
When the self-diagnosis function is activated to
prevent the recorder from malfunctioning, a five-
character service number (e.g., C 13 00) with a
combination of a letter and four numbers appears
in the front panel display. In this case, check the
following table.
First three
characters of
the service
number
Cause and/or corrective
action
C 13 There is a problem in the HDD.
, Contact your nearest Sony
dealer or local authorized
service facility.
The DVD is dirty.
, Clean the disc with a soft
cloth.
C 31 The DVD/CD is not inserted
correctly.
, Re-insert the disc correctly.
E XX
(xx is a number)
To prevent a malfunction, the
recorder has performed the self-
diagnosis function.
, Contact your nearest Sony
dealer or local authorized
Sony service facility and
give the five-character
service number.
Example: E 61 10
99
Additional Information
Notes About This Recorder
On operation
• If the recorder is brought directly from a cold to
a warm location, or is placed in a very damp
room, moisture may condense on the lenses
inside the recorder. Should this occur, the
recorder may not operate properly. In this case,
remove the disc and leave the recorder turned on
for about half an hour until the moisture
evaporates.
• When you move the recorder, take out any discs.
If you don’t, the disc may be damaged.
On adjusting volume
Do not turn up the volume while listening to a
section with very low level inputs or no audio
signals. If you do, the speakers may be damaged
when a peak level section is played.
On cleaning
Clean the cabinet, panel, and controls with a soft
cloth slightly moistened with a mild detergent
solution. Do not use any type of abrasive pad,
scouring powder or solvent such as alcohol or
benzine.
About repairing the hard disk drive
• It may be necessary to access data stored on the
hard disk for testing purposes; there is no
intention to copy or store the data, titles or any
other information.
• If replacement or initialization (format) is
required, the hard disk will be formatted at our
discretion. In this case, please note that all of the
contents recorded there will be erased (including
any data found to violate copyright law).
On cleaning discs
Do not use a commercially available cleaning
disc. It may cause a malfunction.
Notes about the discs
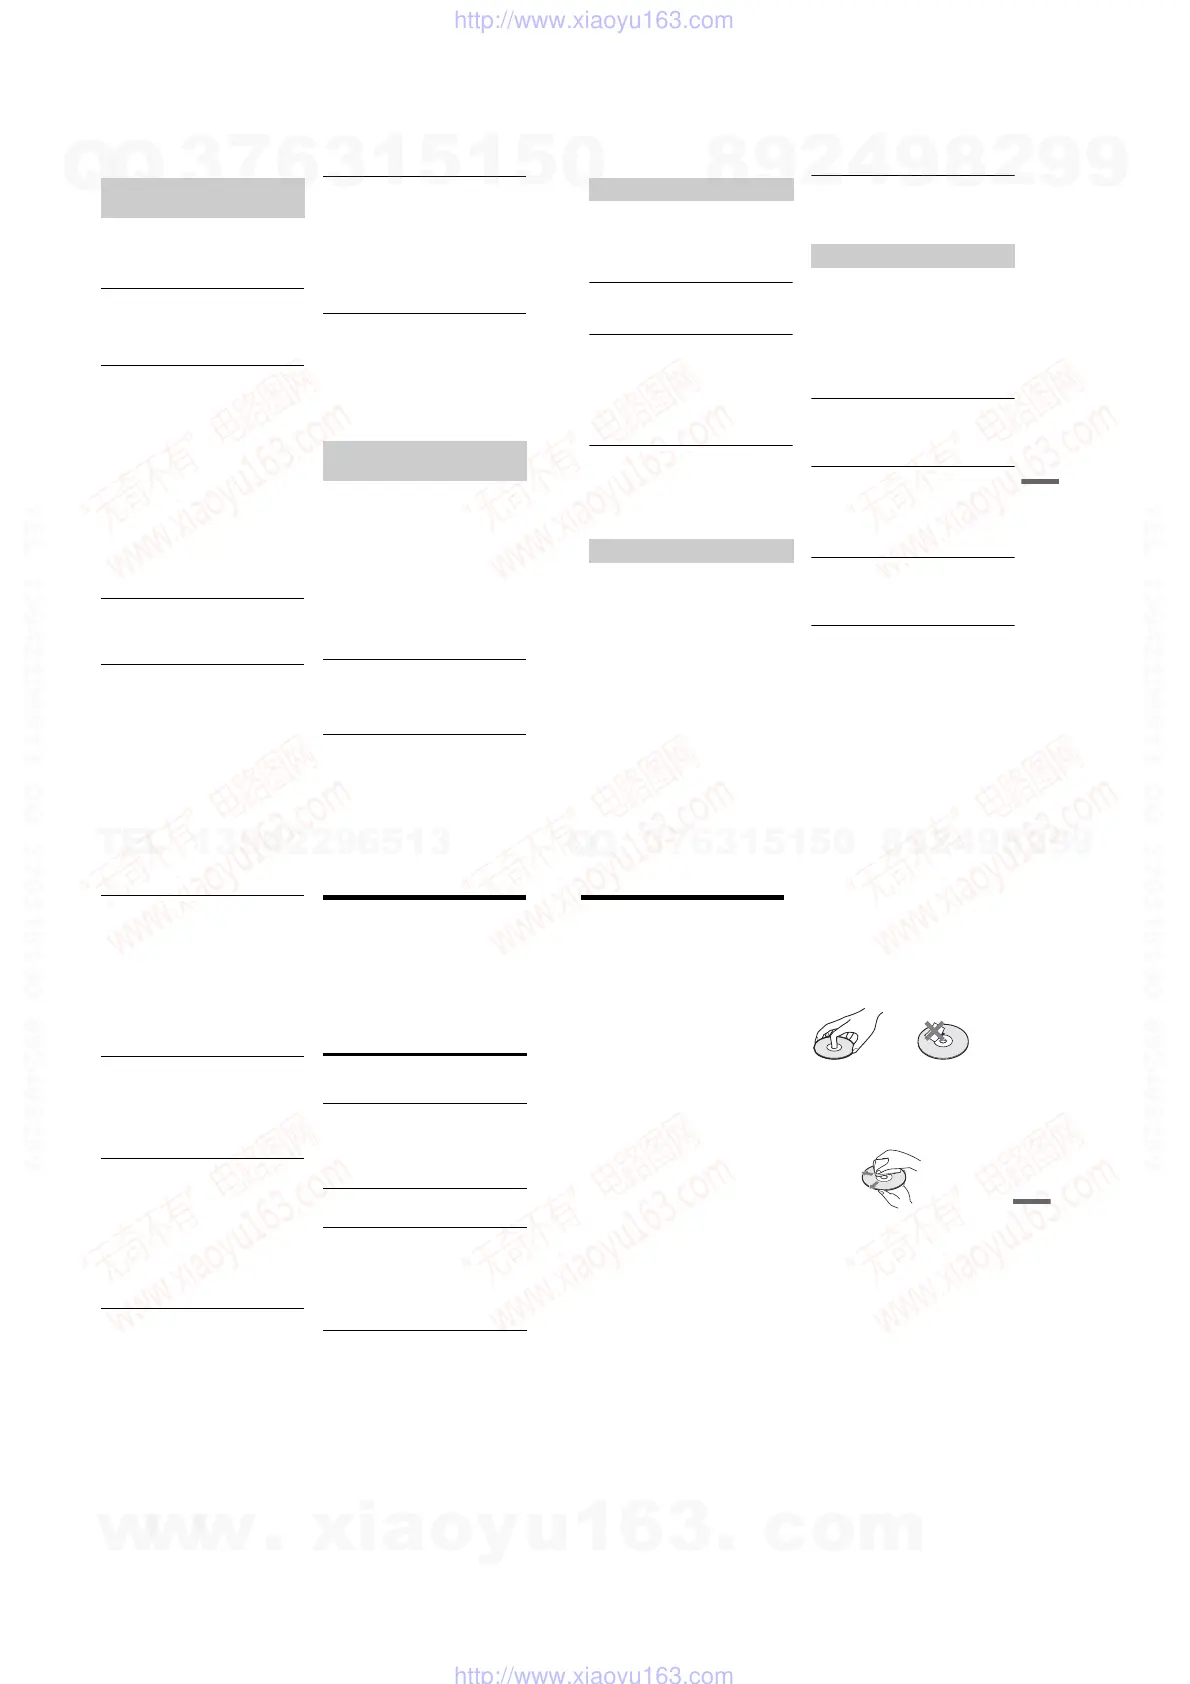
• To keep the disc clean, handle the disc by its
edge. Do not touch the surface. Dust,
fingerprints, or scratches on the disc may cause
it to malfunction.
• Do not expose the disc to direct sunlight or heat
sources such as hot air ducts, or leave it in a car
parked in direct sunlight as the temperature may
rise considerably inside the car.
• After playing, store the disc in its case.
• Clean the disc with a cleaning cloth. Wipe the
disc from the centre out.
• Do not use solvents such as benzine, thinner,
commercially available cleaners, or anti-static
spray intended for vinyl LPs.
• Do not use the following discs.
– A disc that has a non-standard shape (e.g.,
card, heart).
– A disc with a label or sticker on it.
– A disc that has cellophane tape or sticker
adhesive on it.
w
w
w
.
x
i
a
o
y
u
1
6
3
.
c
o
m
Q
Q
3
7
6
3
1
5
1
5
0
9
9
2
8
9
4
2
9
8
T
E
L
1
3
9
4
2
2
9
6
5
1
3
9
9
2
8
9
4
2
9
8
0
5
1
5
1
3
6
7
3
Q
Q
TEL 13942296513 QQ 376315150 892498299
TEL 13942296513 QQ 376315150 892498299
http://www.xiaoyu163.com
http://www.xiaoyu163.com