Do you have a question about the Sony RM-E300 and is the answer not in the manual?
Specific details and compliance information for users in Canada.
Instructions for safe operation, power source usage, installation environment, and cleaning methods.
Details on player and recorder types compatible with the RM-E300 editing controller.
Instructions for installing backup batteries to maintain memory data for editing and titles.
How to connect the RM-E300 using the CONTROL L connector for Sony recorders.
Instructions for connecting via the CONTROL S connector for Sony recorders.
Guide to setting the COMMAND MODE and PAUSE MODE selectors on the rear panel.
Overview of character and video image titles that can be created and memorized.
Detailed steps for typing, coloring, and positioning character titles.
How to input text for character titles using the keyboard.
Guide to choosing colors for character title lines.
Instructions on how to move and place character titles on the screen.
How to connect and view the video camera recorder's title output on a monitor.
Steps to save video image titles into the unit's memory.
Memorizing video images with adjustable picture density in specific pages.
Saving a scene from the player's tape as a title.
Options for selecting title colors and reversing color schemes.
How to view a memorized title as it is on the screen.
Instructions for scrolling titles from bottom to top or center to top.
Setting the background of a character title to gray.
Overview of the three main editing methods supported by the unit.
How to copy the entire contents of one tape to another.
Steps for locating and memorizing cut-in and cut-out points for editing.
Essential checks and considerations before starting the editing process.
Using the timing adjust function to compensate for recorder lag at the start.
Using buttons and the shuttle dial to find cut-in and cut-out points.
How to operate the shuttle dial for player and recorder playback control.
Step-by-step guide to finding and memorizing edit points for automatic editing.
Explains time lag issues in automatic editing and methods to reduce them.
How to modify previously memorized cut-out points for selected scenes.
Adding memorized titles to the video during the editing process.
How to disable title display while editing is in progress.
How to halt the automatic assemble editing process.
Tips for ensuring a smooth start when recording in automatic mode.
Removing only the title from a memorized program.
Replacing an existing title with a new one.
Clearing all memorized editing programs from the unit.
Deleting a particular scene's cut-in or cut-out points from memory.
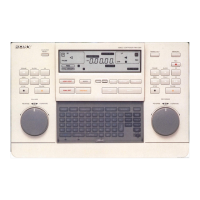
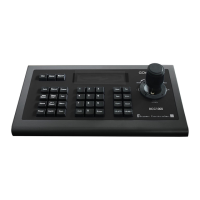
Description of the primary controls located on the RM-E300's main panel.
Details on rear panel connectors, battery compartment, and player shuttle dial.
Detailed explanations for each button related to editing operations.
Explains the functions and usage of the keys on the title keyboard.
| Brand | Sony |
|---|---|
| Model | RM-E300 |
| Category | Controller |
| Language | English |