1-16
64
Playing/searching at various speeds
To use the shuttle ring in normal mode
During playback or pause, turn the shuttle ring clockwise or anticlockwise.
Each change in the shuttle ring position changes the playback mode in the
following way.
To use the shuttle ring in jog mode
Use this mode for frame-by-frame playback.
Press JOG to enter the jog mode. The JOG button lights up. If you change to
the jog mode during any playback mode, playback pauses so you can see a
still picture. Each change in the shuttle ring position shifts the picture one
frame. To shift frames in reverse, turn the shuttle ring anticlockwise. The
frame shift speed depends on the speed you turn the shuttle ring.
To resume normal mode, press JOG again. The JOG button turns off.
Tip
• Adjust the picture using the PROGRAM +/– buttons on the VCR
if:
– Streaks appear while playing in slow motion.
– Bands appear at the top or bottom while pausing.
– The picture shakes while pausing.
To set tracking to the centre position, press both buttons (+/–) at the same time.
Notes
• The sound is muted during these operations.
• In the LP mode, noise may appear or there may be no colour.
• If the playback mode mark doesn’t appear on the TV screen, press DISPLAY.
Pause
Slow motion
in reverse
Normal speed
in reverse
Double speed
in reverse
High speed in
reverse
Slow motion
Double speed
High speed
Normal speed
(Initial speed)
65
Setting the recording duration time
Additional Operations
Setting the recording duration time
After you have started recording in the normal way, you can have the VCR stop
recording automatically after a specified duration.
Before you start
…
• Refer to “Index to parts and controls” for button locations.
To extend the duration
Press z REC repeatedly to set a new duration time.
To cancel the duration
Press z REC repeatedly until the indicator disappears and the VCR
returns to the normal recording mode.
To stop recording
To stop the VCR while recording, press x STOP.
Note
• You cannot display the current tape time in the display window when setting the
recording duration time.
1
While recording, press z REC.
The indicator appears in the display window.
2
Press z REC repeatedly to set the duration time.
Each press advances the time in increments of 30 minutes.
The tape counter decreases minute by minute to 0:00, then the VCR stops
recording and turns off automatically.
SP OPCVIDEO
0:30 1:00
5:30 6:00
Normal recording
66
Synchronized Recording (not available on SLV-SE610N/K)
Synchronized Recording
(not available on SLV-SE610N/K)
You can set the VCR to automatically record programmes from equipment
such as a satellite tuner by connecting the equipment to the DECODER/
LINE-3 IN*
1
(or DECODER/LINE-2 IN*
2
) connector. The connected
equipment must have a timer function for this feature to work.
When the connected equipment turns on, the VCR also automatically turns
on and starts recording a programme from DECODER/LINE-3 IN*
1
(or
DECODER/LINE-2 IN*
2
).
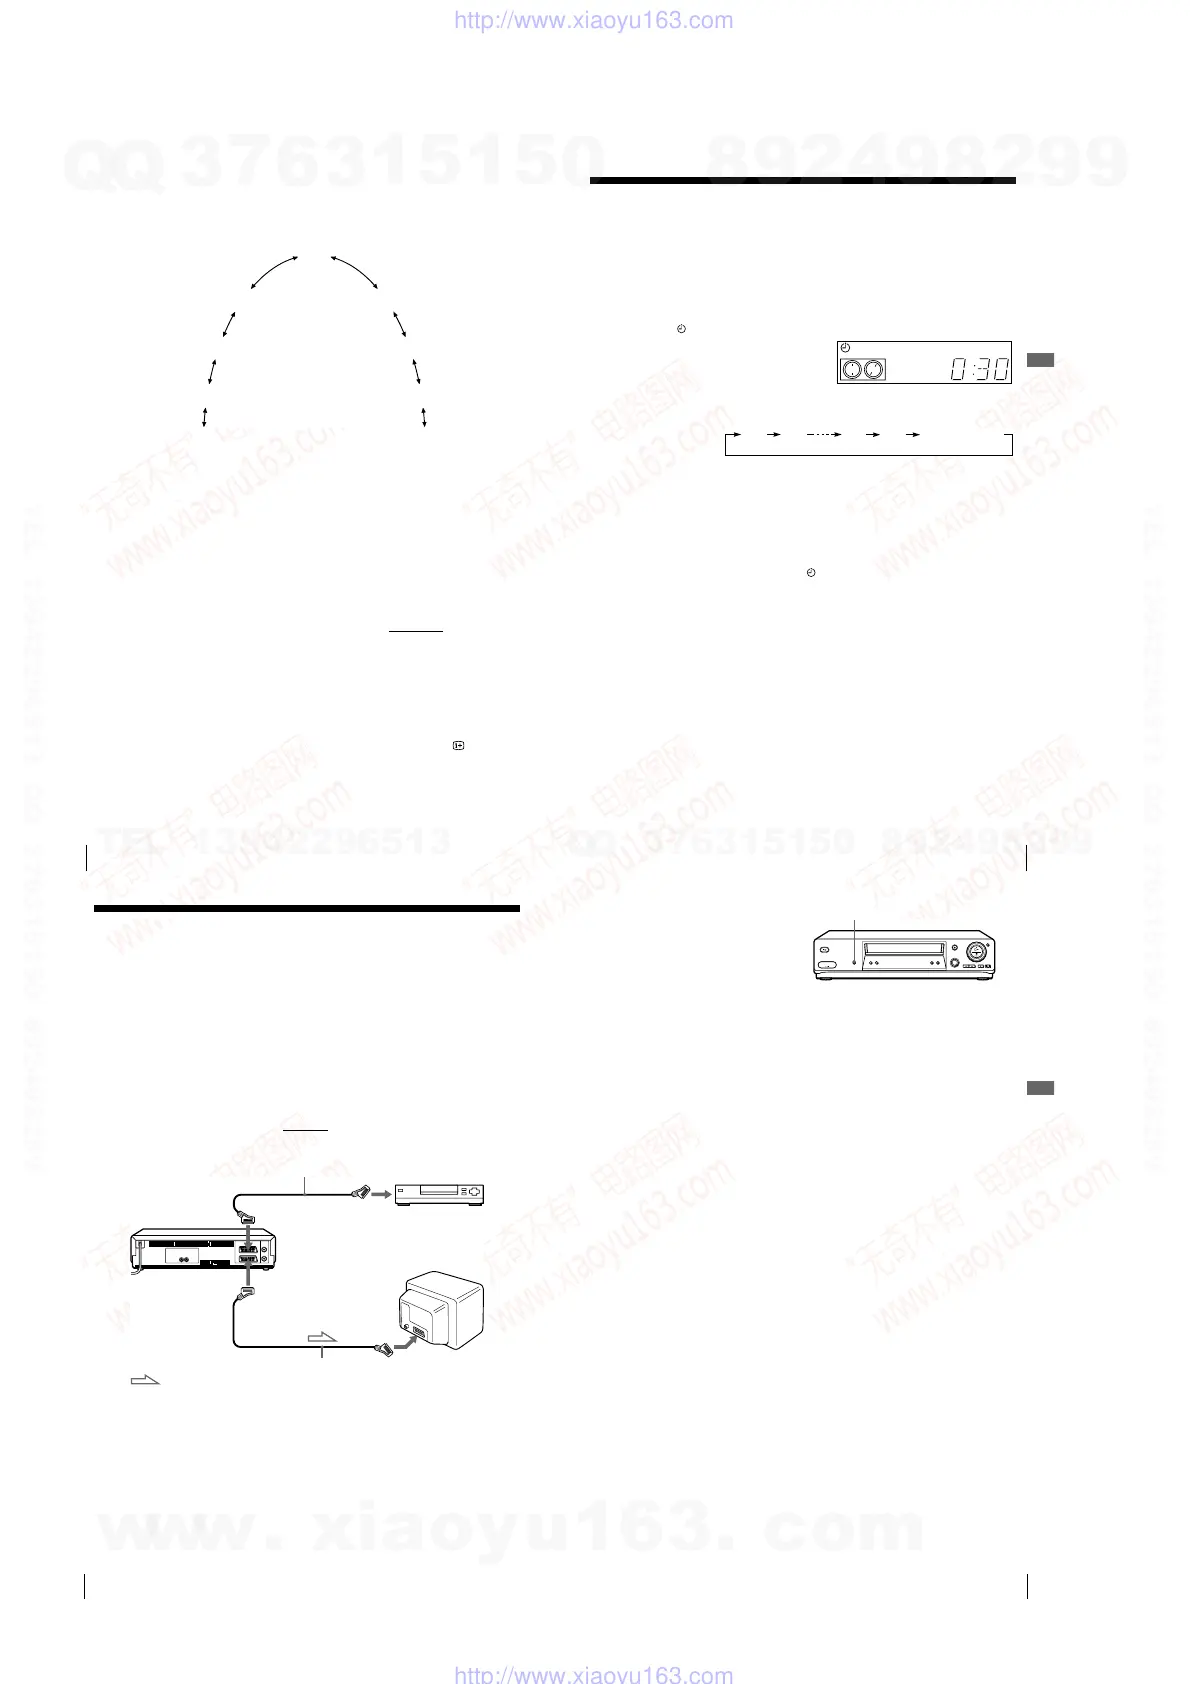
How to connect for Synchronized Recording
Connect the DECODER/LINE-3 IN*
1
(or DECODER/LINE-2 IN*
2
)
connector of the VCR to the TV Scart
connector of the satellite tuner. Then
connect the LINE-1 (TV) connector to the TV.
Scart cable (not supplied)
DECODER/
t
LINE-3 IN*
1
or
DECODER/
t
LINE-2 IN*
2
i
LINE-1 (TV)
TV Scart
connector
Satellite tuner, etc.
Scart cable (not supplied)
Scart (EURO-AV)
: Signal flow
67
Synchronized Recording (not available on SLV-SE610N/K)
Additional Operations
To cancel the Synchronized Recording function
Press SYNCHRO REC. The SYNCHRO indicator disappears.
To stop recording
Press x STOP while recording.
Notes
• This function may not work with some types of satellite tuners.
• Some TVs or other equipment with timer functions will automatically turn off if no
operation is performed within a certain amount of time. In this case, the
Synchronized Recording also stops automatically.
• When the connected equipment turns on while the SYNCHRO indicator is
appeared, recording starts automatically.
• If the settings for timer recording and Synchronized Recording overlap, the
programme that starts first has priority and the second programme starts recording
only after the first programme has finished.
• The Auto Clock Set function does not work while the VCR stands by for
Synchronized Recording.
*
1
SLV-SE810N/K only
*
2
SLV-SE710N/K and SX710N/K only
Recording programmes using
the Synchronized Recording
function
Before you start...
• Insert a tape with its safety tab in place.
Make sure the tape is longer than the total
recording time.
• Set DECODER/LINE3*
1
(or DECODER/
LINE2*
2
) to LINE3*
1
(or LINE2*
2
) in the
OPTIONS-2 menu (see page 85).
• Refer to “Index to parts and controls” for
button locations.
1
Press INPUT SELECT or PROG +/– to display “L3*
1
(or L2*
2
)” in the
display window.
2
Set the timer on the connected equipment to the time of the programme
you want to record, then turn it off.
3
Press SP/LP to select the tape speed.
4
Hold down SYNCHRO REC for more than two seconds.
The SYNCHRO indicator appears in the display window and the VCR
stands by for recording.
The VCR automatically turns on and starts recording when it receives an
input signal from the connected equipment.
The VCR automatically stops recording when the tape reaches the end or
when the connected equipment stops transmitting an input signal.
SYNCHRO REC
w
w
w
.
x
i
a
o
y
u
1
6
3
.
c
o
m
Q
Q
3
7
6
3
1
5
1
5
0
9
9
2
8
9
4
2
9
8
T
E
L
1
3
9
4
2
2
9
6
5
1
3
9
9
2
8
9
4
2
9
8
0
5
1
5
1
3
6
7
3
Q
Q
TEL 13942296513 QQ 376315150 892498299
TEL 13942296513 QQ 376315150 892498299
http://www.xiaoyu163.com
http://www.xiaoyu163.com