1-21
84
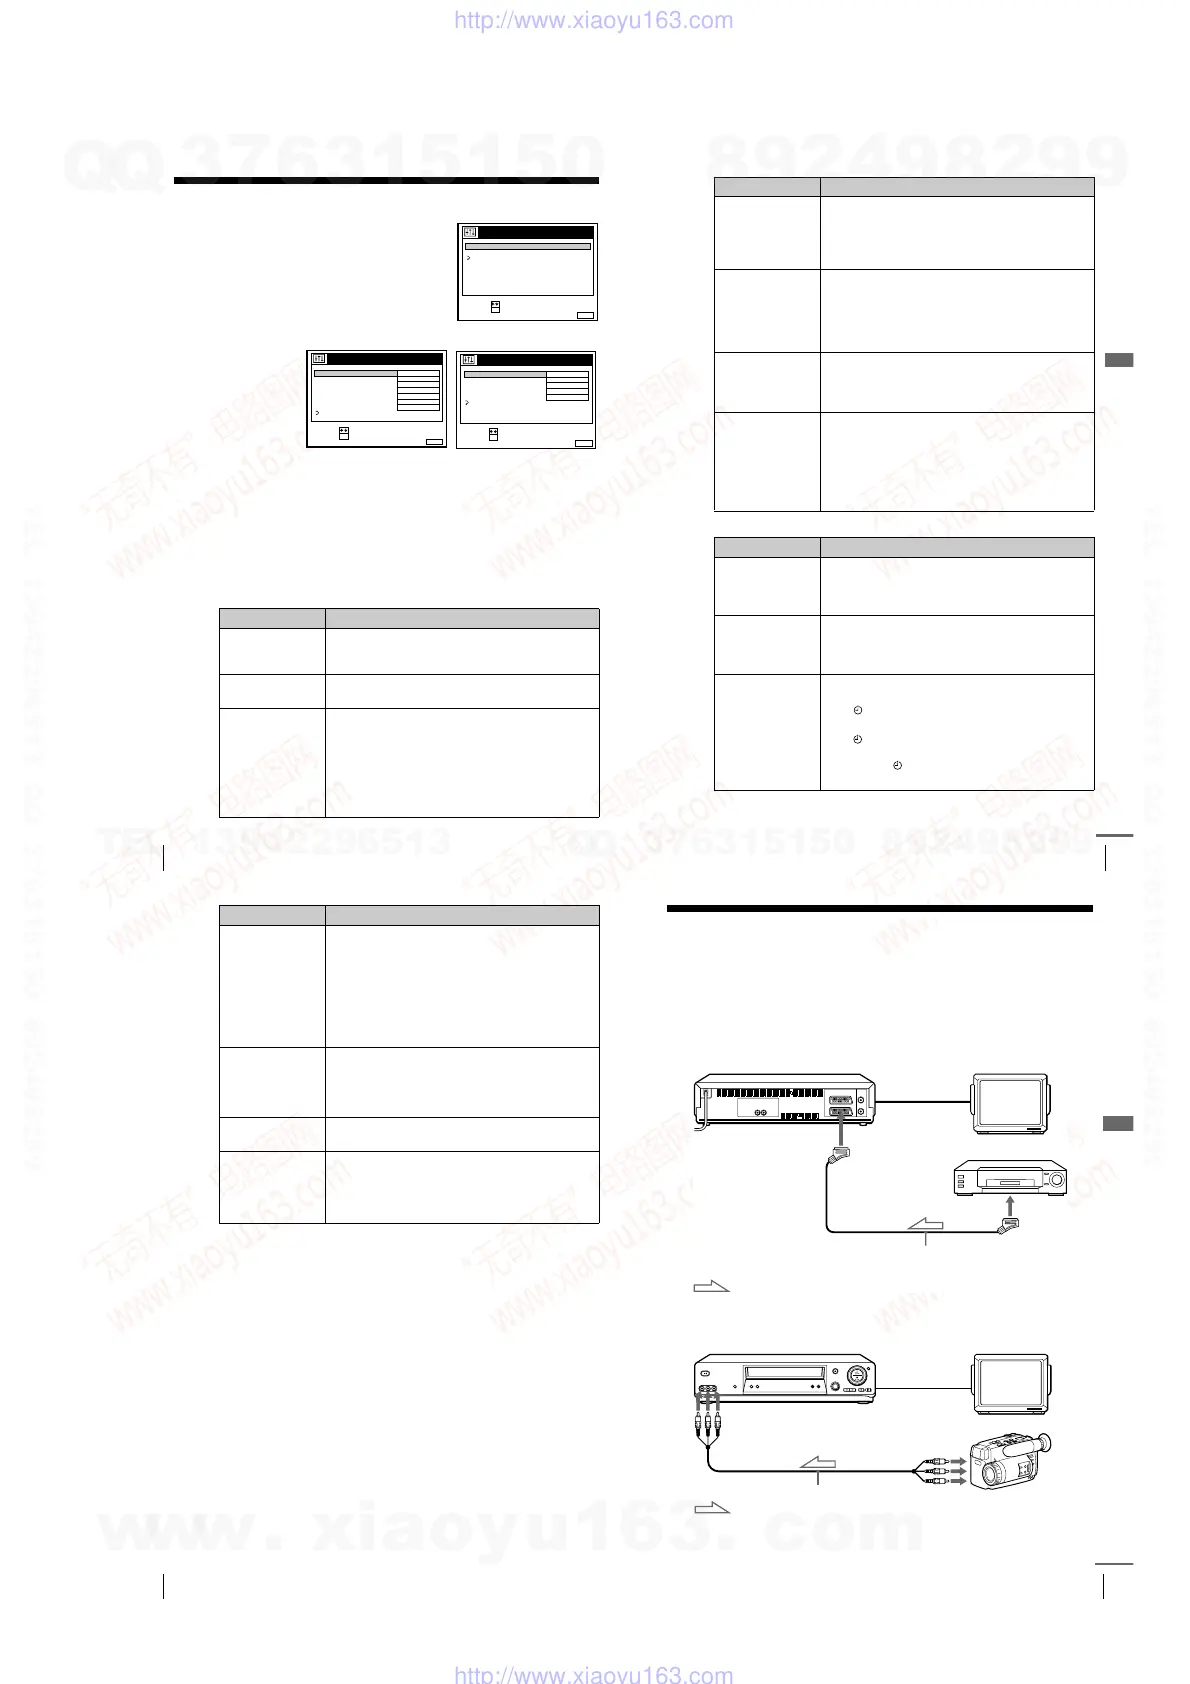
Changing menu options
Changing menu options
Menu choices
Initial settings are indicated in bold print.
OPTIONS-1
1
Press MENU, then select OPTIONS and
press OK.
2
Press M/m to highlight OPTIONS-1 or OPTIONS-2, then press OK.
3
Press M/m to select the option, then press OK.
4
Press M/m to change the setting, then press OK.
5
Press MENU to return to the original screen.
Menu option Set this option to
OPC •
ON
to switch on the OPC (Optimum Picture Control)
function and improve picture quality.
• OFF to switch off OPC.
EDIT • ON to minimize picture deterioration when editing.
•
OFF
to turn off EDIT.
AUDIO MIX
• ON to listen to the hi-fi and normal audio tracks at the
same time. The AUDIO MONITOR button will not
function.
•
OFF
to listen to the hi-fi and normal audio tracks
separately. Select the sound using the AUDIO
MONITOR button.
• If you press
Z
EJECT, AUDIO MIX will be reset to
OFF. For details, see page 72.
RETURN
SET :
SELECT :
OK
MENUEXIT :
OPTIONS
OPTIONS - 1
OPTIONS - 2
SET :
SELECT :
OK
MENUEXIT :
OPTIONS - 2
TIMER OPTIONS
DECODER / LINE3
POWER SAVE
TV DIRECT REC
VARIABLE
DECODER
OFF
ON
RR
NORMAL
RETURN
SET :
SELECT :
OK
MENUEXIT :
OPTIONS - 1
OFF
OFF
NICAM
ON
OFF
E
AUTO
180
OPC
EDIT
AUDIO MIX
HIFI AUDIO
AUTO LONG PLAY
TAPE LENGTH
COLOUR SYSTEM
RETURN
85
Changing menu options
Additional Operations
OPTIONS-2
HIFI AUDIO*
1
•
NICAM
to record NICAM broadcasts on the hi-fi audio
track.
• STANDARD to record standard sound on the hi-fi audio
track.
For details, see page 70.
AUTO LONG PLAY • ON to change the timer recording tape speed
automatically to the LP mode when the remaining tape
length becomes shorter than the recording time. Note
that for AUTO LONG PLAY to work correctly, the
TAPE LENGTH setting must be accurate.
•
OFF
to keep the set tape speed.
TAP E L E NG T H •
E180
to use an E-180 or shorter type tape.
• E195 to use an E-195 type tape.
• E240 to use an E-240 type tape.
• E300 to use an E-300 type tape.
COLOUR SYSTEM •
AUTO
to set the colour system automatically.
• PAL to play back a tape recorded in the PAL colour
system.
• MESECAM to play back a tape recorded in the
MESECAM colour system.
If you press
Z
EJECT or turn the VCR off, COLOUR
SYSTEM will be reset to AUTO.
Menu option Set this option to
DECODER/
LINE2*
2
•
DECODER
to use the DECODER/LINE-2 IN
connector as the Canal Plus decoder connector.
• LINE2 to use the DECODER/LINE-2 IN connector as
the line input connector.
DECODER/
LINE3*
3
•
DECODER
to use the DECODER/LINE-3 IN
connector as the Canal Plus decoder connector.
• LINE3 to use the DECODER/LINE-3 IN connector as
the line input connector.
TIMER OPTIONS*
4
•
VARIABLE
to display the TIMER METHOD menu for
selecting STANDARD or SHOWVIEW when pressing
the
TIMER button.
• STANDARD to display the TIMER menu when pressing
the
TIMER button.
• SHOWVIEW to display the SHOWVIEW menu when
pressing the
TIMER button.
For details, see page 55 and 59.
Menu option Set this option to
continued
86
Changing menu options
Notes
• When the VCR stands by for recording, the indicators in the display window
remain lit even when POWER SAVE is set to FULL, PARTIAL or ON.
• With the EDIT option ON, the OPC function does not work.
*
1
SLV-SE610N, SE710N, SX710N, and SE810N only
*
2
SLV-SE710N/K and SX710N/K only
*
3
SLV-SE810N/K only
*
4
not available on SLV-SE610N/K
*
5
SLV-SE610N/K only
POWER SAVE*
4
• FULL to turn off the indicators in the display window
during standby mode to reduce the VCR’s power
consumption to a minimum. For using the Line Through
function (page 18) or the decoder (page 39), select
PARTI AL o r OF F.
• PARTIAL to turn off the indicators in the display
window to conserve the VCR’s power.
•
OFF
to turn on the indicators in the display window
while the VCR is standing by.
POWER SAVE*
5
• ON to turn off the indicators in the display window
during standby mode to reduce the VCR’s power
consumption to a minimum.
•
OFF
to turn on the indicators in the display window
while the VCR is standing by.
TV DIRECT REC*
4
•
ON
to activate the TV Direct Rec function.
• OFF to deactivate it.
RR
•
NORMAL
for normal everyday use.
• HIGH for well-used video tapes such as rented tapes.
Select this option when NORMAL does not improve the
picture quality.
• OFF to switch off the Reality Regenerator function.
Menu option Set this option to
87
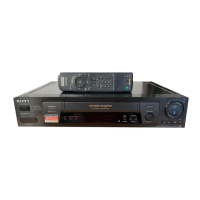
Connecting to a VCR or stereo system
Editing
Editing
Connecting to a VCR or stereo system
How to connect to record on this VCR
Connect the line outputs of the other VCR to the LINE IN connector or jacks
of this VCR. Refer to the examples A through C and choose the connection
that best suits your VCR.
Example A
Example B
TV
i LINE-1 (TV)
VMC-2121HG Scart cable (not supplied)
Scart
(EURO-AV)
: Signal flow
Your VCR (Recorder)
Other VCR (Player)
TV
VMC-820HG audio/video cable (not supplied)
LINE OUT
Your VCR (Recorder)
Other VCR (Player)
: Signal flow
t
tt
t LINE-2 L o
o o
o R
(open cover to connect)
continued
w
w
w
.
x
i
a
o
y
u
1
6
3
.
c
o
m
Q
Q
3
7
6
3
1
5
1
5
0
9
9
2
8
9
4
2
9
8
T
E
L
1
3
9
4
2
2
9
6
5
1
3
9
9
2
8
9
4
2
9
8
0
5
1
5
1
3
6
7
3
Q
Q
TEL 13942296513 QQ 376315150 892498299
TEL 13942296513 QQ 376315150 892498299
http://www.xiaoyu163.com
http://www.xiaoyu163.com