24
Powering the SF601
1. Open the battery door pulling the battery door latch.
TheSF601willbeshippedwithalkalinebatteries.
Rechargeablebatteriescanbeusedoptionalbutneedtobechargedexternally
2.InsertfourAAbatteriesnotingtheplus(+)andminus(-)diagramsinside
on the battery door.
3.Closethebatterydoor.Pushdownuntilit“clicks”intothelockedposition.
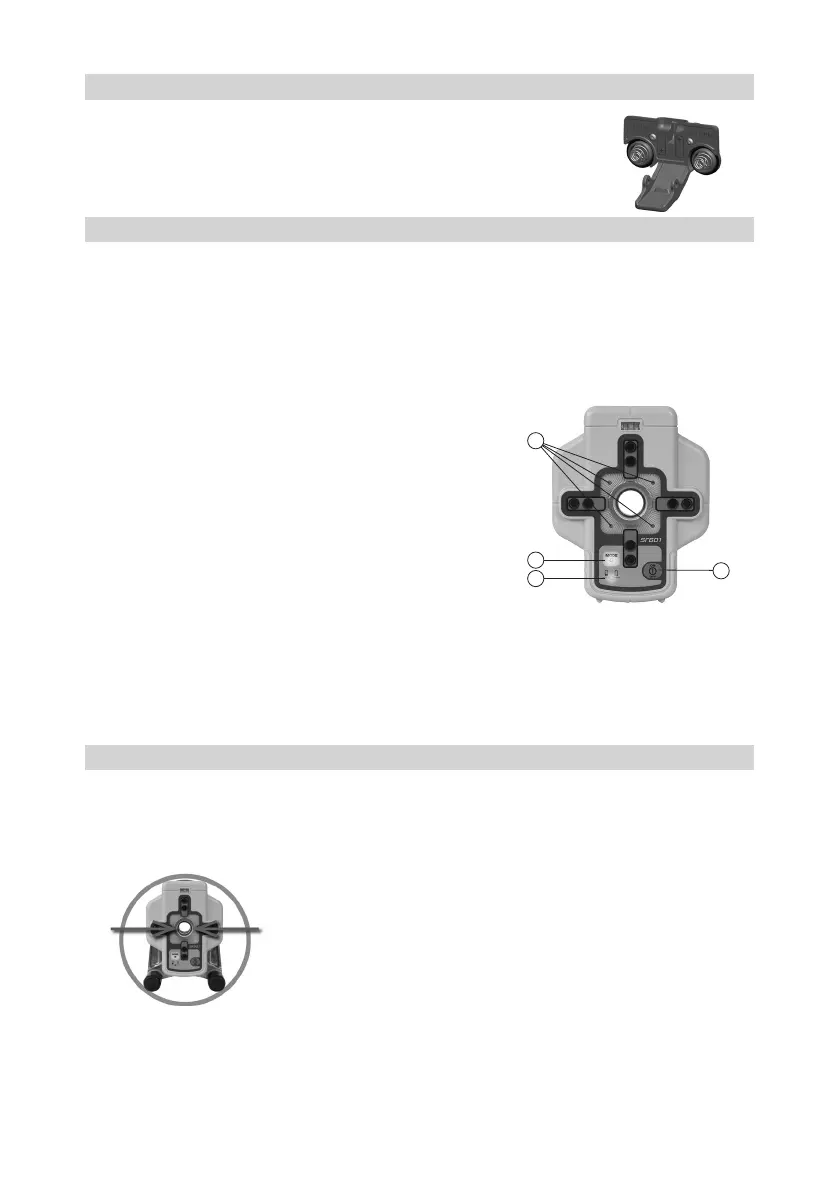
SF601 - Features and Functions
1. Power/Mode Button:PressandreleasethepowerbuttontoturnONtheSF601.
AlldisplayLED’swilllightfor1.0sec.
Pressandholdpowerbuttonfor>1sec.toturnOFFtheSF601.After1sec.alldisplayLED’swilllight1.0sec.
Note: If the SF601 has been turned on, ashort buttonpress activates/deactivates the fan beam lens (a
previouslychosenautomaticmodewillbeexitedautomatically).
LED’s:
2. LED1:
solidgreenwhenSF601isonandbatteryOK
blinkingredifbatteryvoltageis3,8V<Vbat<4V
solidredifbatteryvoltageis<3,8V;
SF601turnsoffautomaticallyafter5min.
3. Mode LED2:
yellowsolid:automaticmode
ashing:noneorlostsignal
off:manualmode
4. Direction LEDs red:
Manualmode:pointingtowardsthecenteroftheplumbbeam.
All4LEDsaresolidredwhenthebeamiscentered.
AutomaticSpotLockmode:solidfor5min.,thenLED’sashevery5seconds.
Using the SpotFinder SF601 for vertical UL applications
WiththeUL633NusingIRconnection,theSF601canbeusedinthreedifferentautomaticmodesAutomatic-
SpotAlignment,SpotLokandSpot-Matchandinadditioninamanual/display(SpotSearch)modetodetect
the plumb beam (fan beam).
Automatic-Spot Alignment: SF601guidesthebeamtothetargetpointinthe
horizontalaxis,whiletheZ-axisgradevaluewillbemaintained.
2
4
3
1

 Loading...