Hardware layout and configuration UM1974
24/85 UM1974 Rev 9
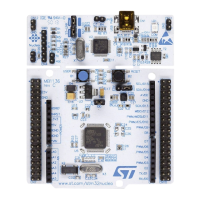
6.5 LEDs
User LD1: a green user LED is connected to the STM32 I/O PB0 (SB120 ON and SB119
OFF) or PA5 (SB119 ON and SB120 OFF) corresponding to the ST Zio D13.
User LD2: a blue user LED is connected to PB7.
User LD3: a red user LED is connected to PB14.
These user LEDs are on when the I/O is HIGH value, and are off when the I/O is LOW.
LD4 COM: the tricolor LED LD4 (green, orange, red) provides information about ST-LINK
communication status. LD4 default color is red. LD4 turns to green to indicate that
communication is in progress between the PC and the ST-LINK/V2-1, with the following
setup:
• Slow blinking red/off: at power-on before USB initialization
• Fast blinking red/off: after the first correct communication between PC and
ST-LINK/V2-1 (enumeration)
• Red LED on: when the initialization between the PC and ST-LINK/V2-1 is complete
• Green LED on: after a successful target communication initialization
• Blinking red/green: during communication with target
• Green on: communication finished and successful
• Orange on: communication failure
LD5 USB power fault: LD5 indicates that the board power consumption on USB exceeds
500
mA, consequently the user must power the board using an external power supply.
LD6 PWR: the green LED indicates that the STM32 part is powered and +5 V power is
available on CN8 pin 9 and CN11 pin 18.
LD7 and LD8 USB FS: refer to Section 6.10: USB OTG FS or device.
6.6 Push-buttons
B1 USER: the user button is connected to the I/O PC13 by default (Tamper support, SB173
ON and SB180 OFF) or PA0 (Wakeup support, SB180 ON and SB173 OFF) of the STM32
microcontroller.
B2 RESET: this push-button is connected to NRST and is used to RESET the STM32
microcontroller.
6.7 JP5 (I
DD
)
Jumper JP5, labeled IDD, is used to measure the STM32 microcontroller consumption by
removing the jumper and by connecting an ammeter:
• JP5 ON: STM32 is powered (default)
• JP5 OFF: an ammeter must be connected to measure the STM32 current. If there is no
ammeter, the STM32 is not powered
To get a correct current consumption, the Ethernet PHY must be set in power-down mode or
SB13 must be removed. Refer to
Section 6.11: Ethernet for details.