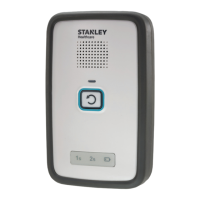
Monitor Setup
M200 Fall Monitor – Setup & User Guide 15
DIP Switch Settings
The M200 contains DIP switches on the back of the monitor allowing
you to configure various features by manually toggling the switch
from “A” to “B.” See the table below.
1 2 3 4
See “Recording
Custom Pad Alarms”
on page 14.
See “Latching and
Non-Latching” on
page 16.
See”Suspend Mode
(2 Minutes)” on
page 24.
See “Interfacing
with a Nurse
Call System” on
page 30.
A Disable the use
of the recorded
message
– A user can not
record or listen to a
recorded message,
and the message
will not be played.
Non-latching
– Local Audio and
Visual alarms are
reset when the
patient/resident
returns to the
pad.
Disable Suspend
mode
Normally Open
(NO) Nurse Call
system.
– The NO system
looks for a
switch to close
for an alarm.
B Enable the use
of the recorded
message
– Play the recorded
message followed
by the selected
alarm tone.
Latching
– The alarm con-
tinues even if the
patient/resident
returns to the
pad.
Enable Suspend
mode
Normally Closed
(NC) Nurse Call
system.
– The NC system
looks for a
switch to open
for an alarm.
Recording Custom Pad Alarms
Note: The Voice Recording Alarm feature (DIP switch position 1B) must
be enabled in order to allow a recording to be made. See “DIP
Switch Settings” on page 15.
Playback Button
Record Button
Recording
Red LED
Microphone
The Playback and Record buttons are found on the back of the
monitor. The microphone is located outside the battery compartment
as shown above.
1. Press and hold the Record button, beside the microphone icon.
The Red LED flashes while the button is depressed, indicating
that the device is recording.
2. Speak in a clear voice towards the microphone (not more than
about 10 cm [4 inches] away) and release the microphone
button when finished; the Red LED will stop flashing.
3. Press the Playback button to hear the recorded message.
Note: Messages can be recorded at any time except during an alarm.
Note: Recorded message length can be up to a maximum of 15 seconds
at which time a Positive Confirmation Tone sounds indicating the
recording time is over.