STULZ Ultra-Series Humidifier Controller
(August, 2013) 9
3.0 INSTALLATION
3.1 Uncrating and Inspection
The controller has been tested and inspected prior to
shipment. Perform a visual inspection of the packaging
immediately upon delivery to ensure the equipment has
been delivered in excellent condition. If there is visible
shipping damage, it must be noted on the freight carrier's
delivery forms BEFORE signing for the equipment. Any
freight claims MUST be done through the freight carrier.
STULZ ships all equipment FOB factory. STULZ can assist
in the claim filing process with the freight carrier.
Carefully remove all protective packaging, open the
controller access door and thoroughly inspect for any signs
of transit-incurred damage. Should any such damage be
present, notify STULZ prior to attempting any repairs. Refer
to the last section of this manual for instructions.
NOTE
The controller should always be stored indoors in a
dry location prior to installation. A Data Package
has been sent with the unit. It contains this manual,
an IOM for the Humidifier, system drawings and
any other applicable instructions based on the
configuration and options furnished with the unit.
These documents should be kept with the unit for
reference.
NOTE
Shipped loose items such as sensors are shipped
separately unless specified otherwise by the
customer. Remove and store these items in a safe
place unless they are being installed immediately.
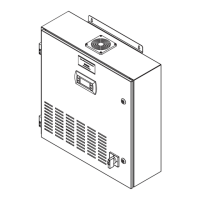
3.2 Mounting
The control box is designed for indoor installation only.
Mount the control box within 10 feet of the supply water
source for the STULZ supplied water conductivity probe to
reach. Avoid installing the controller in locations where
ambient temperatures are above 90°F or where the relative
humidity is above 90%. Do not install the controller where it
will be subjected to strong vibrations or bumps. Avoid
mounting in areas exposed to direct sunlight or with wide
and rapid temperature fluctuations. The control box may be
mounted to an equipment rack, a wall or a flat surface.
Secure the enclosure through the 4 mounting holes taking
care not to damage the internal components. Ensure the
mounting surface is capable of supporting the total weight
of the unit. Ensure that the areas around the enclosure
vents are free of obstructions that may impede Airflow.
CAUTION
When the unit is operating, the enclosure vent
openings must be completely free of obstructions.
3.3 Wiring Connections
The controller is provided with terminals for all required
field-wiring connections. Refer to Figure 3 for the location of
the interconnect terminals and see the electrical drawing(s)
supplied with the unit for all field wired power and control
connections. It is important to identify the options that were
purchased with the unit in order to assure which field
connections are required.
WARNING
Verify power is turned off before making
connections to the equipment.
AC Input
3.3.1
It is important that the controller nameplate be examined to
determine the operating voltage, frequency and phase of
the system. The supply voltage measured at the unit must
be within ±10% of the voltage specified on the system
nameplate. The unit nameplate is located inside the
controller enclosure. The nameplate also provides the full
load amps (FLA), the current that the unit will draw under
full design load, the maximum fuse size for circuit
protection, and the minimum circuit ampacity (MCA) for wire
sizing.
When the main power wires are connected, the electric box
has power to the main power non-fused service switch.
A separate equipment ground lug is provided within the
electrical box for termination of an earth ground wire.
DC Output to Humidifier(s)
3.3.2
Consult the wire sizing table in the Humidifier IOM to
determine the correct wire gauge, by Humidifier model, for
the length of wire to be run. Insufficient wire gauge will
result in excessive voltage drop between the controller and
Humidifier(s). Distances over 75 feet are not recommended.
STULZ recommends the use THHN or NTW, stranded
conductor (not solid conductor) wire.
Control Wiring to Humidifiers
3.3.3
CAT 5e cable, with RJ45 connector terminations; connect
the controller to the Humidifier(s) in a daisy chain fashion
(See Figure 5). Do not exceed 1,000 feet in total length.
Ensure the termination resistor (shipped loose) is plugged
on the last Humidifier in the string as shown in the electrical
drawing(s). Older systems use shielded 3 conductor cable.
Ask STULZ Product Support for instructions on wiring these
systems.
 Loading...