Home
Sun Microsystems
Storage
StorEdge 3510
Sun Microsystems StorEdge 3510 Installation Guide
4
of 1
of 1 rating
96 pages
Give review
Manual
Specs
To Next Page
To Next Page
To Previous Page
To Previous Page
Loading...
Chapter 2
Disk Drive, Air Management Sled, and T
abletop Cov
er FRUs
2-13
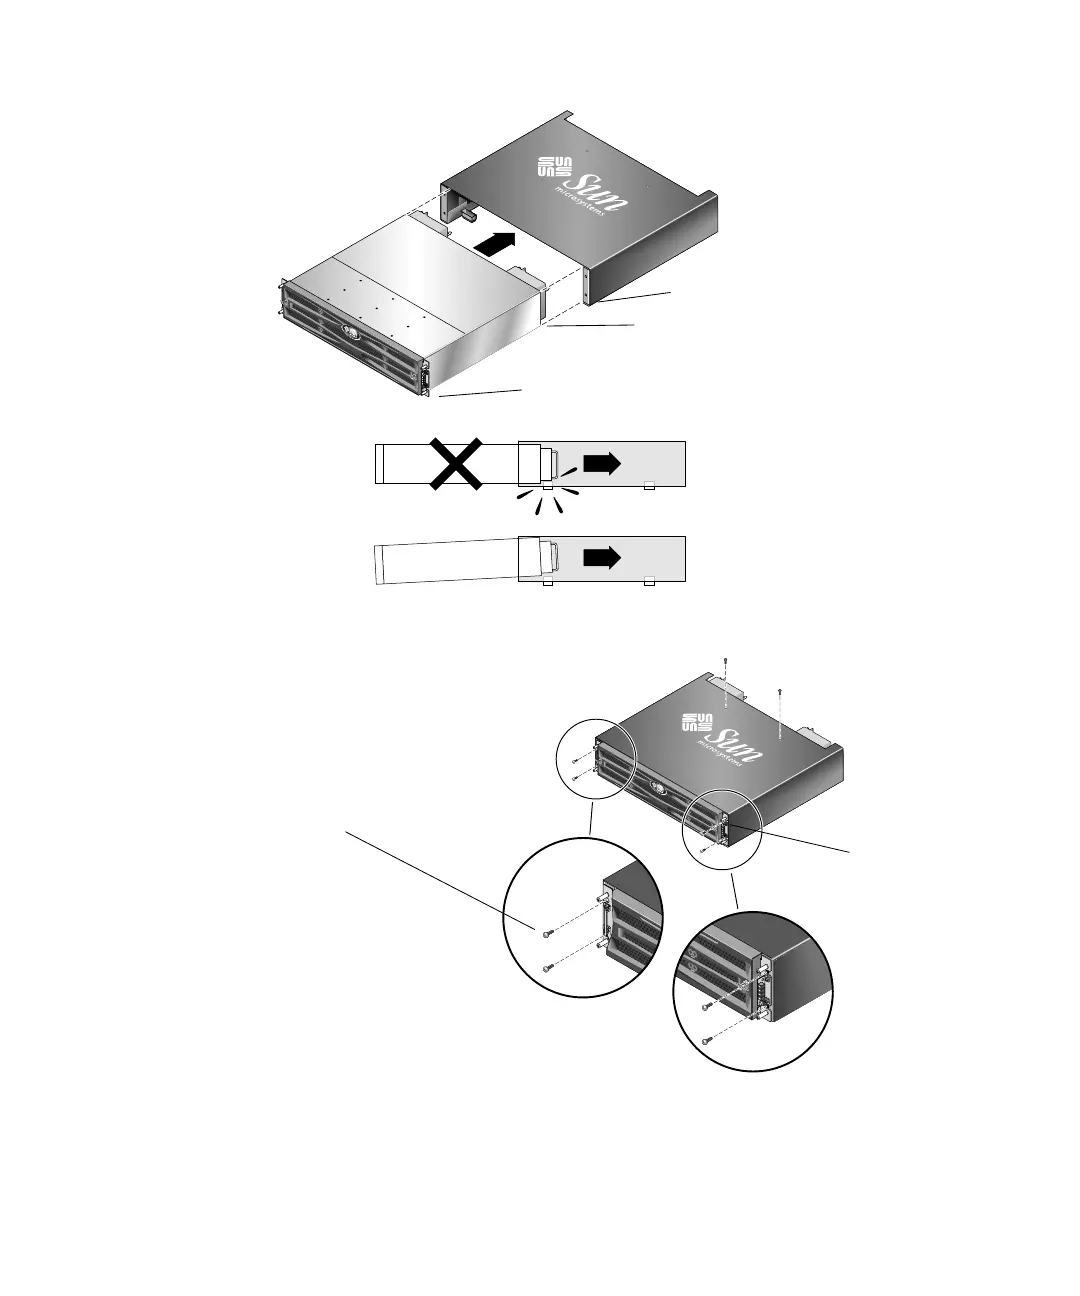
FIGURE
2-4
Sliding
the
Chassis
Into
the
T
abletop
Cover
FIGURE
2-5
Attaching
the
Chassis
Ears
to
the
T
abletop
Cover
9.
Put
the
caps
back
onto
the
ears:
Back of RAID product
F
ront of tabletop cov
er
F
ront of RAID product
Screws to attach the co
ver to the chassis ears
Chassis ear LEDs
24
26
Table of Contents
Table of Contents
3
Sun Storedge 3000 Family Frus
7
Available Frus
8
Static Electricity Precautions
11
Powering off the Array
11
Disk Drive, Air Management Sled, and Tabletop Cover Frus
13
Replacing a Disk Drive
14
I "Replacing a Disk Drive
14
Identifying the Defective Disk Drive
15
Removing a Defective Disk Drive
16
Installing a New Disk Drive
17
Scanning the New Drive and Related Procedures
18
Scanning the New Drive
18
Checking and Performing the Correct Powerup Sequence
19
Assigning a Disk Drive as a Spare
20
If the Logical Drive Status Is REBUILDING
21
Automatic Rebuild and Automatic Global Spare Assignments after a Failed Drive Is Replaced
21
Installing an Air Management Sled
23
Adding or Removing the Tabletop Cover
23
Converting a Rack-Ready Array to a Tabletop Array
24
Converting a Tabletop Array to a Rack-Ready Array
26
Power and Fan Module Frus
27
Replacing Power Supply/Fan Modules for 2U Arrays
28
Removing an AC Power Supply/Fan Module
28
Installing an AC Power Supply/Fan Module
29
Replacing a DC Power Supply/Fan Module
29
Removing a DC Power Supply/Fan Module
29
Installing a DC Power Supply/Fan Module
29
Replacing Power Supply/Fan Modules for 1U Arrays
31
Replacing an AC Power Supply/Fan Module
31
Removing an AC Power Supply/Fan Module
31
Installing an AC Power Supply/Fan Module
32
Replacing a DC Power Supply/Fan Module
32
Removing a DC Power Supply/Fan Module
32
Installing an DC Power Supply/Fan Module
33
Battery Frus
35
Battery Operation
36
Battery Status on the Initial Firmware Screen
36
I "Battery Operation
36
Battery Dating on the Battery Labels
37
Replacing a Battery
39
Replacing a SCSI Battery
39
Replacing an FC Battery
42
FC Battery Status and In-Service Date Procedures
44
Viewing Status and Setting the In-Service Date with the CLI
44
Viewing Status and Setting the In-Service Date with SSCS
45
Verifying the In-Service Date When Replacing a Battery in SSCS
47
FC Module Frus
49
Replacing an I/O Controller Module
50
Saving the Configuration Settings to NVRAM
50
Removing an I/O Controller Module
51
Installing an I/O Controller Module
54
Monitoring the Automatic Firmware Update with a Recently Installed Controller FRU
55
SES Firmware Update Sometimes Required with I/O Controller Module Replacements
56
Converting a Dual-Controller Array to a Single Controller Array
58
I/O Controller Replacement for a Single-Controller or Powered-Off Array
58
I "I/O Controller Replacement for a Single-Controller or Powered-Off Array" on
58
Replacing I/O Expansion Modules
59
Removing the I/O Expansion Module
59
Installing the I/O Expansion Module
59
Installing Small Form-Factor Pluggable Transceivers
60
Installing a Raid/Expansion Chassis FRU
62
Converting an FC JBOD into an FC RAID Array
65
SCSI Module Frus
75
Replacing a SCSI Controller Module
76
Saving the Configuration Settings to NVRAM
76
Removing a SCSI Controller Module
76
Installing a SCSI Controller Module
77
Monitoring the Automatic Firmware Update with a Recently Installed Controller FRU
78
Replacing a Single-Controller Array or Powered off Array
79
Replacing SCSI I/O Modules
80
Installing Gaskets if Needed
80
Removing the SCSI I/O Module
81
Installing a SCSI I/O Module
81
Replacing the SCSI Terminator Module
82
Removing the SCSI Terminator Module
82
Installing a Terminator Module
83
Replacing the EMU Module
84
Removing an EMU Module
84
Installing an EMU Module
85
Installing a Raid/Expansion Chassis FRU
85
Special JBOD Usage with External Terminators
88
External Terminators for Special Dual-Bus JBOD Maintenance
89
Older JBOD Dual-Bus Configurations
90
Installing a Filler Panel on a SCSI Array
93
Sun Storedge 3120 SCSI Array Frus
95
Installing an Expansion Chassis FRU
95
Note - be Sure to Follow "Static Electricity Precautions
96
For All
96
Other manuals for Sun Microsystems StorEdge 3510
Installation, Operation And Service Manual
328 pages
Manual
64 pages
4
Based on 1 rating
Ask a question
Give review
Questions and Answers:
Need help?
Do you have a question about the Sun Microsystems StorEdge 3510 and is the answer not in the manual?
Ask a question
Sun Microsystems StorEdge 3510 Specifications
General
Brand
Sun Microsystems
Model
StorEdge 3510
Category
Storage
Language
English
Related product manuals
StorEdge 3000 Series
328 pages
StorEdge3000 Series
328 pages
StorageTek SL500
436 pages
Sun Microsystems SUN BLADE 150
218 pages