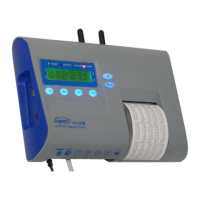
Temperature recorder and printer
21
▲ End Of Paper – no thermal paper
▲ No GSM Network – cellular communication disconnected and delay before alarm
▲ Temp Over 65C – ambient temperature above 65°C
▲ USB Memory Full – external USB memory full
▲ SD Card Full – external micro-SD memory full
▲ CopyProgPrnt Ended – message for: end of copying, data setting, & report printing
▲ Sensor Error – sensor failure
▲ SMS Setting – setting recipients, delay and repeat of SMS text messages
▲ Buzzer Setting – activate buzzer in every alarm event
If for 30 seconds no key is pressed, changes will be saved, Saving setting will be
displayed, Settings saved will be printed, and the display will revert to the readings screen.
Setting Alarm Limits to Sensor
Channel 1,2,3,4 (Alarm type:) enables setting limits for every channel: temperature,
humidity, voltage, etc., upper and lower, contact position and delay duration for the alarm.
1. Press / until the Settings Submenu is displayed.
2. Press to enter the settings menu, Enter password: will be displayed.
3. Enter a password, (4 keys in a row). If you have not yet changed your password, use the
default password: , , , . The first of the settings submenu, will appear
on the display: Load configuration file.
4. Scroll with / . Find the Set Alarms menu and press .
5. Channel No. 1 (Alarm type:) will be displayed. The channel number will flash. To change
the channel number (1-4)/event, press / and press to confirm.
6. The event name will be displayed, for example: Channel Alarm 1: YES, YES will flash
(Channel 1 alarm: yes/no). To change the selection YES/NO, scroll with / and
press to confirm.
7. If NO is selected, the display will revert to event selection (Section 5). If the selection is
YES, the line Sensor 1 threshold high value: 30.0, for example, will appear and will
indicate the upper limit value for channel no. 1. To change the value, press / and
to confirm. For a switch type (contact on/off), select OFF to activate the alarm.
8. If, for example, Sensor 1 threshold high delay 0010 Min., is shown (the value 0010
will flash), the upper limit delay time for channel No. 1 is 10 minutes. The high delay time
can be set from 0 to 9,999 minutes (0000 minutes is without high delay). To change the
high delay time press / , to select, and press to confirm.
9. If, for example, Sensor 1 threshold low value: 2.0 is shown, the lower limit delay time
for channel No. 1 is displayed. To change the value, press / , select, and press
to confirm (the value must be lower than the value set for the upper limit)
10. If Sensor 1 threshold low delay 0010 Min., is displayed, (0010 value will flash) the
lower limit delay time for channel No. 1 is 10 minutes. The lower delay time can be set from
0 to 9,999 minutes (0000 minutes is without low delay). To change the lower delay time
press / , to select, and press to confirm.
11. The name of an alarm event will reappear, for example: Channel No. 1 (Alarm type:),
the channel number will flash. To change the channel number (1-4) or to select another
alarm event, press / , select, and press to confirm.
12. To save the changes and exit the Alarm Event Setup menu, press 3 times. Please
wait, Saving Setting will be displayed, and then, several seconds later, the readings
screen will revert. Settings saved will also be printed.
Note: When the cursor is flashing, a continuous pressing of the / when setting the
upper limit, the lower limit and the delay time will run the digits in the display faster.