PD030003 Rev. A 3 MicroVention, Inc.
35. At the end of the detachment cycle, three audible tones will sound and the
light will flash yellow three times. This indicates that the detachment cycle is
complete. If the coil does not detach during the detachment cycle, leave the
V-Grip
®
detachment controller attached to the V-Trak
®
delivery pusher and
attempt another detachment cycle when the light turns green.
36. The light will turn red after the number of detachment cycles specified on the
V-Grip
®
labeling. DO NOT use the V-Grip
®
detachment controller if the light
is red. Discard the V-Grip
®
detachment controller and replace it with a new one
when the light is red.
37. Verify detachment of the coil by first loosening the RHV valve, then pulling back
slowly on the delivery system and verifying that there is no coil movement. If the
implant did not detach, do not attempt to detach it more than two additional
times. If it does not detach after the third attempt, remove the delivery system.
38. After detachment has been confirmed, slowly retract and remove the delivery
pusher. Advancing the V-Trak
®
delivery pusher once the coil has been
detached involves risk of aneurysm or vessel rupture. Do NOT advance the
delivery pusher once the coil has been detached.
39. Verify the position of the coil angiographically through the guide catheter.
40. Prior to removing the microcatheter from the treatment site, place an
appropriately sized guidewire completely through the microcatheter lumen to
ensure that no part of the coil remains within the microcatheter.
The physician has the discretion to modify the coil deployment technique to
accommodate the complexity and variation in embolization procedures. Any technique
modifications must be consistent with the previously described procedures, warnings,
precautions and patient safety information.
SPECIFICATIONS FOR V-GRIP
®
DETACHMENT CONTROLLER
• Output voltage: 8 ± 1 VDC
• Cleaning, preventative inspection, and maintenance: The V-Grip
®
detachment
controller is a single use device, preloaded with battery power, and packaged
sterile. No cleaning, inspection, or maintenance is required. If the device does not
perform as described in the Detachment section of these Instructions, discard the
V-Grip
®
detachment controller and replace it with a new unit.
• The V-Grip
®
detachment controller is a single use device. It should not be cleaned,
re-sterilized, or re-used.
• Batteries are pre-loaded into the V-Grip
®
detachment controllers. Do not attempt
to remove or replace the batteries prior to use.
• After use, dispose of the V-Grip
®
detachment controller in a manner consistent
with local regulations.
PACKAGING AND STORAGE
The MCS is placed inside a protective, plastic dispenser hoop and packaged in a
pouch and unit carton. The MCS and dispenser hoop will remain sterile unless the
package is opened, damaged, or the expiration date has passed. Store at a controlled
room temperature in a dry place.
The V-Grip
®
detachment controller is packaged separately in a protective pouch and
carton. The V-Grip
®
detachment controller has been sterilized; it will remain sterile
unless the pouch is opened, damaged, or the expiration date has passed. Store at a
controlled room temperature in a dry place.
SHELF LIFE
See the product label for the device shelf life. Do not use the device beyond the
labeled shelf life.
MR INFORMATION
The MicroPlex Coil System (MCS) implant has been determined to be MR conditional
according to the terminology specified in the American Society for Testing and
Materials (ASTM) International, Designation: F2503-08.
Non-clinical testing demonstrated that the MCS implant is MR conditional. A patient
can be scanned safely, immediately after placement under the following conditions:
• Static magnetic field of 3 Tesla or less
• Maximum spatial gradient field of 720 Gauss/cm or less
MRI-Related Heating
In non-clinical testing, the MCS implant produced a maximum temperature rise of 1.6°C
during MRI performed for 15 minutes of scanning in the 3 Tesla (3-Tesla/128-MHz,
Excite, HDx, Software 14X.M5, General Electric Healthcare, Milwaukee, WI) MR system.
Therefore, the MRI-related heating experiments for the MCS implant at 3 Tesla using
a transmit/receive RF body coil at an MR system reported whole body averaged SAR
of 2.9 W/kg (i.e., associated with a calorimetry measured whole body averaged value
of 2.7 W/kg) indicated that the greatest amount of heating that occurred in association
with these specific conditions was equal to or less than 1.6°C.
Image Artifact Information
MR image quality may be compromised if the area of interest is in the exact same area
or relatively close to the position of the MCS implant. Therefore, optimization of MR
imaging parameters to compensate for the presence of this device may be necessary.
of the coil into the aneurysm. Rotating the MCS V-Trak
®
delivery pusher may
result in a stretched coil or premature detachment of the coil from the V-Trak
®
delivery pusher, which could result in coil migration. Angiographic assessment
should also be performed prior to detachment to ensure that the coil mass is not
protruding into the parent vessel.
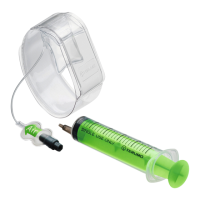
25. Advance the coil into the desired site until the radiopaque proximal marker on
the delivery system is aligned with the proximal marker on the microcatheter as
shown.
MICROCATHETER
IMPLANT
DISTAL END OF V-TRAK
DELIVERY PUSHER
PROXIMAL MARKER
26. Tighten the RHV to prevent movement of the coil.
27. Verify repeatedly that the distal shaft of the V-Trak
®
delivery pusher is not under
stress before coil detachment. Axial compression or tension could cause the tip
of the microcatheter to move during coil delivery. Catheter tip movement could
cause the aneurysm or vessel to rupture.
DETACHMENT OF THE MCS COIL
28. The V-Grip
®
detachment controller is pre-loaded with battery power and will
activate when a MicroVention V-Trak
®
delivery pusher is properly connected.
It is not necessary to push the button on the side of the V-Grip
®
detachment
controller to activate it.
29. Verify that the RHV is firmly locked around the V-Trak
®
delivery pusher before
attaching the V-Grip
®
detachment controller to ensure that the coil does not
move during the connection process.
30. Although the V-Trak
®
delivery pusher’s gold connectors are designed to be
compatible with blood and contrast, every effort should be made to keep the
connectors free of these items. If there appears to be blood or contrast on
the connectors, wipe the connectors with sterile water before connecting the
V-Grip
®
detachment controller.
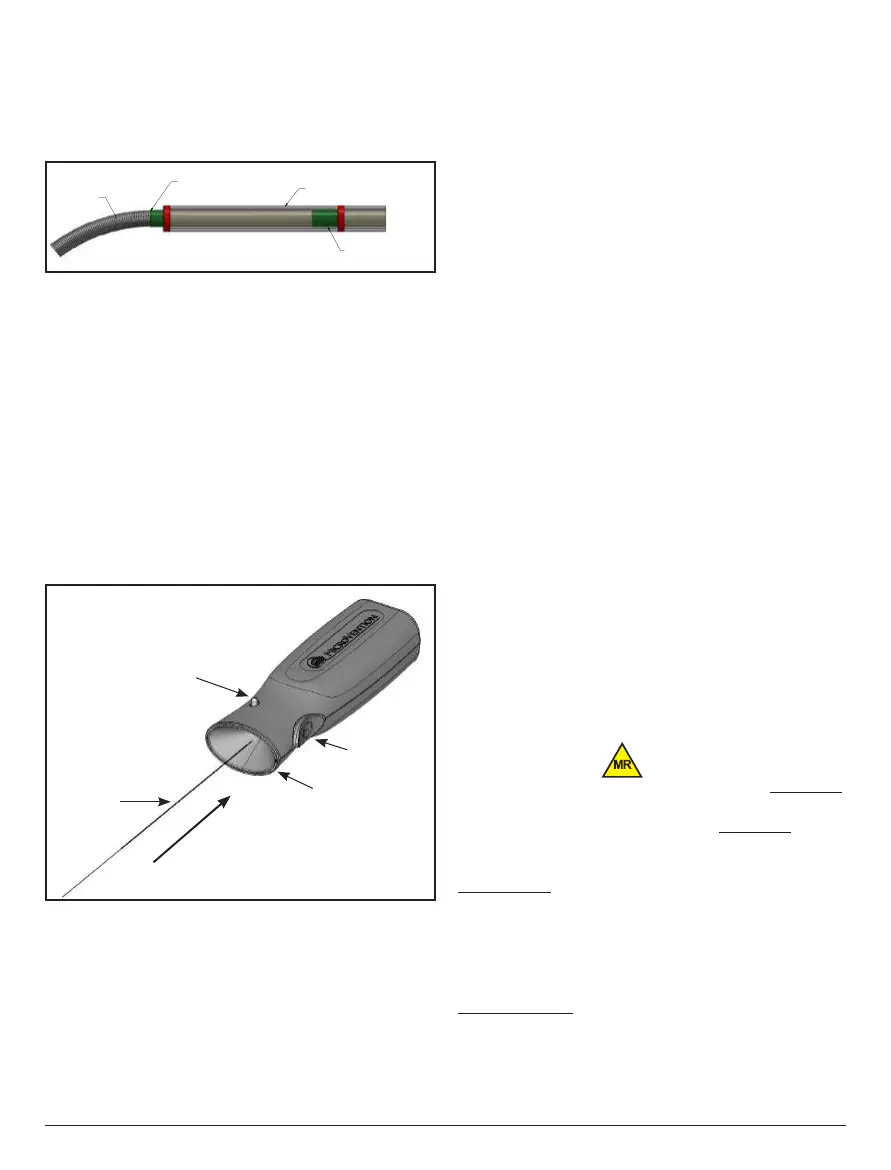
31. Connect the proximal end of the V-Trak
®
delivery pusher to the V-Grip
®
detachment controller by firmly inserting the proximal end of the V-Trak
®
delivery
pusher into the funnel section of the V-Grip
®
detachment controller.
V-Grip
®
Detachment Controller
32. When the V-Grip
®
detachment controller is properly connected to the V-Trak
®
delivery pusher, a single audible tone will sound and the light will turn green to
signal that it is ready to detach the coil. If the detachment button is not pushed
within 30 seconds, the solid green light will slowly flash green. Both flashing
green and solid green lights indicate that the device is ready to detach. If the
green light does not appear, check to ensure that the connection has been
made. If the connection is correct and no green light appears, replace the
V-Grip
®
detachment controller.
33. Verify the coil position before pushing the detachment button.
34. Push the detachment button. When the button is pushed, an audible tone will
sound and the light will flash green.
Insert Direction
Funnel
Detachment Button
Light
V-Trak
®
delivery
pusher
 Loading...