EX-TRAFIRE
®
45SD
Operator manual, Revision T-5 9
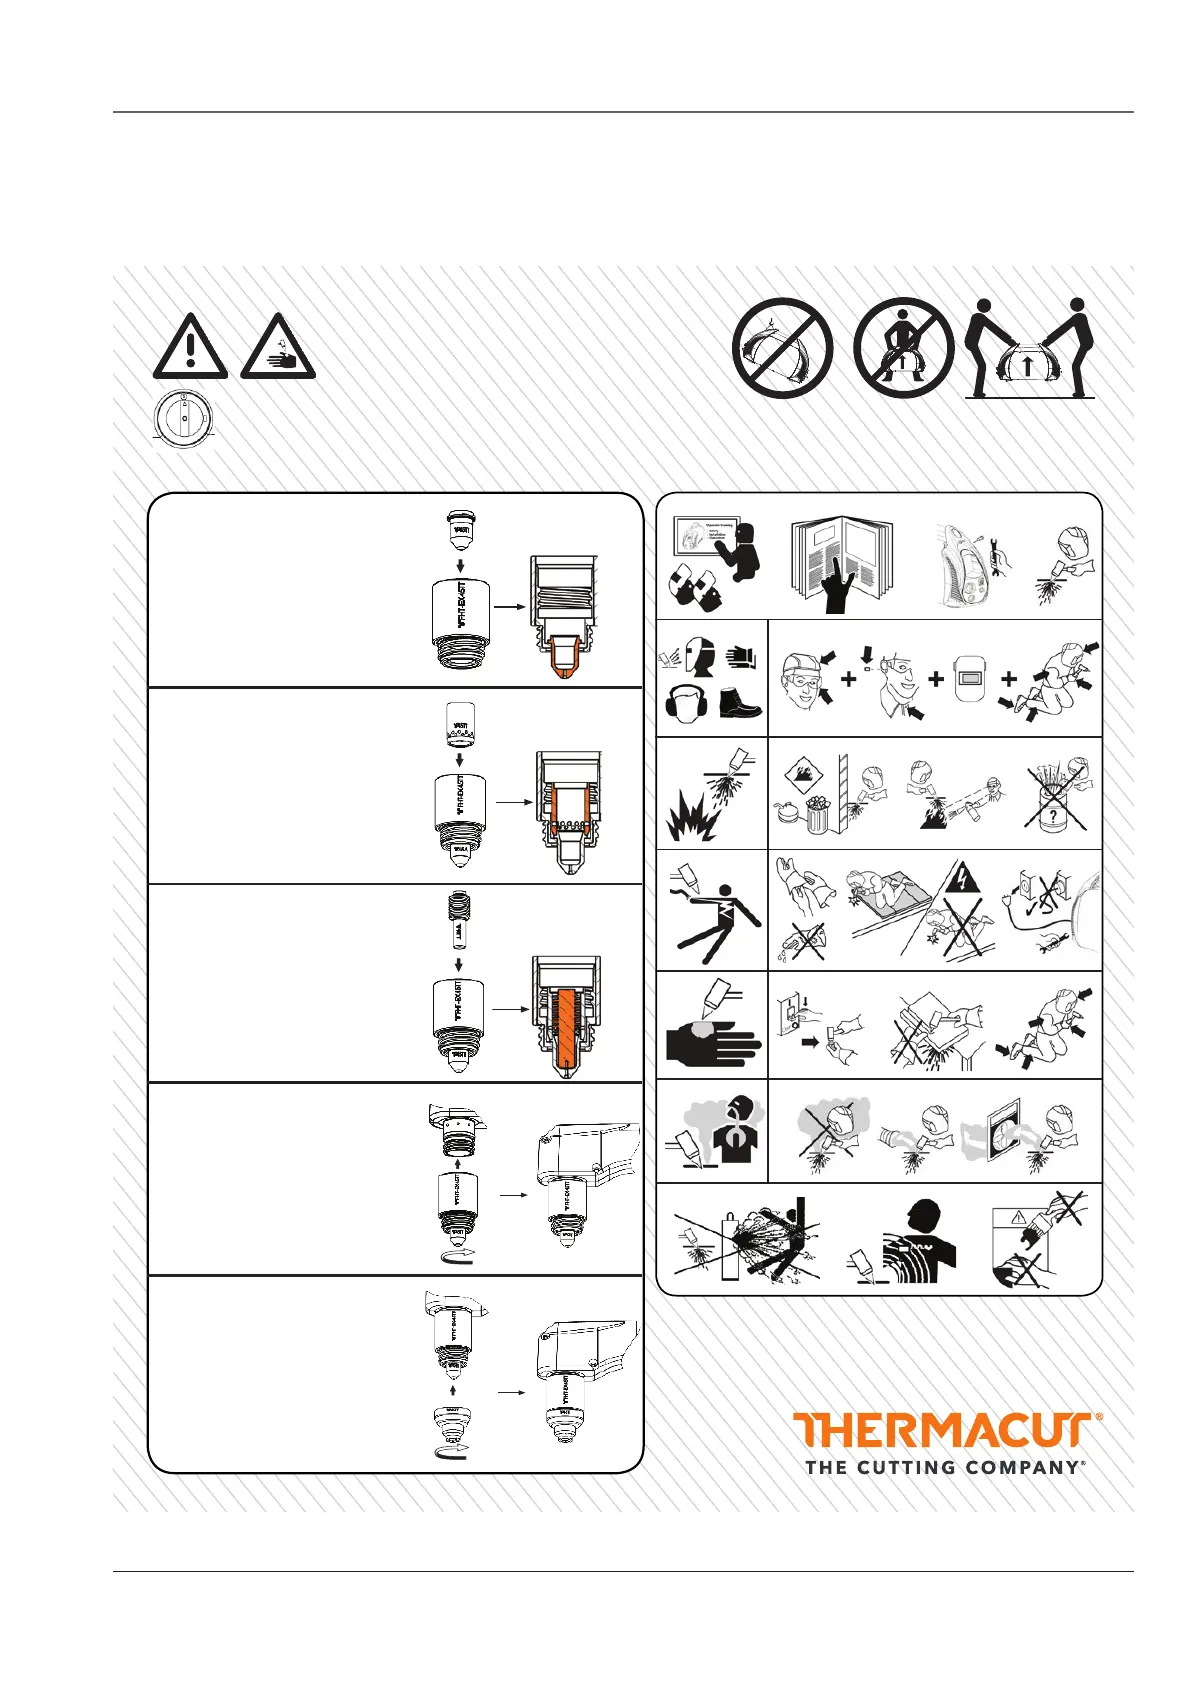
Safety Sticker
WARNING!
Plasma arc is generated immediately
when the torch trigger is depressed.
Plasma arc is generated immediately when the torch trigger is
depressed. The plasma arc will cut quickly through gloves and skin.
Make sure the power is switched off before changing consumables.
+ =
+
1
2
3
4
6
2.1
3.1 3.2 3.3
4.1
4.2
4.3
5.1 5.2 5.3
6.1 6.2 6.3
5
7
Torch consumable installation
Safety instructions
EX-0-904-014
N-22225
1. Insert the nozzle into the
retaining cap.
2. Insert the swirl ring into the
assembly
(nozzle retaining cap + nozzle).
3. Insert the electrode into the
assembly
(nozzle retaining cap +
nozzle + swirl ring).
5. Screw on the shield
and tighten by hand.
Do NOT overtighten.
EX-TRAFIRE
®
45HD
Operator Manual, Revision T-1 1
Hand torch consumables installation
WARNING
Plasma arc is generated immediately
when the torch trigger is depressed
Plasma arc is generated immediately when the torch trigger is depressed.
The plasma arc will cut quickly through gloves and skin.
Make sure the power is switched off before changing consumables.
1. Insert the nozzle into the retaining cap.
2. Insert the swirl ring into the assembly
(nozzle retaining cap + nozzle).
3. Insert the electrode into the assembly
(nozzle retaining cap + nozzle + swirl
ring).
4. Screw on this whole assembly (retaining cap + nozzle +
electrode + swirl ring) to the seat bottom of the torch and
tighten by hand. Do NOT overtighten.
The nozzle must seat properly without any movement.
If not, reasseble it and put these parts together again.
5. Screw on the shield and tighten by hand.
Do NOT overtighten.
SHIELD NOZZLE RETAINING CAP NOZZLE SWIRL RING ELECTRODE TORCH
Cross - section
of assembly.
Cross - section
of assembly.
Cross - section
of assembly.
4. Screw on this whole assembly
(retaining cap + nozzle +
electrode + swirl ring)
to the seat bottom of the torch
and tighten by hand. Do NOT
overtighten. The nozzle must seat
properly without any movement.
If not, reasseble it and put these
parts together again.
EX-TRAFIRE
®
45HD
Operator Manual, Revision T-1 1
Hand torch consumables installation
WARNING
Plasma arc is generated immediately
when the torch trigger is depressed
Plasma arc is generated immediately when the torch trigger is depressed.
The plasma arc will cut quickly through gloves and skin.
Make sure the power is switched off before changing consumables.
1. Insert the nozzle into the retaining cap.
2. Insert the swirl ring into the assembly
(nozzle retaining cap + nozzle).
3. Insert the electrode into the assembly
(nozzle retaining cap + nozzle + swirl
ring).
4. Screw on this whole assembly (retaining cap + nozzle +
electrode + swirl ring) to the seat bottom of the torch and
tighten by hand. Do NOT overtighten.
The nozzle must seat properly without any movement.
If not, reasseble it and put these parts together again.
5. Screw on the shield and tighten by hand.
Do NOT overtighten.
SHIELD NOZZLE RETAINING CAP NOZZLE SWIRL RING ELECTRODE TORCH
Cross - section
of assembly.
Cross - section
of assembly.
Cross - section
of assembly.
Cross - section
of assembly.