TEW-823DRU
34
© Copyright 2014 TRENDnet. All Rights Reserved.
ÍNote: Before applying scheduling, please ensure your Time sengs are congured
correctly and you have dened a schedule. Refer to “Set the Date and Time” on
page 42 and “Create Schedules” on page 30 to create a schedule.
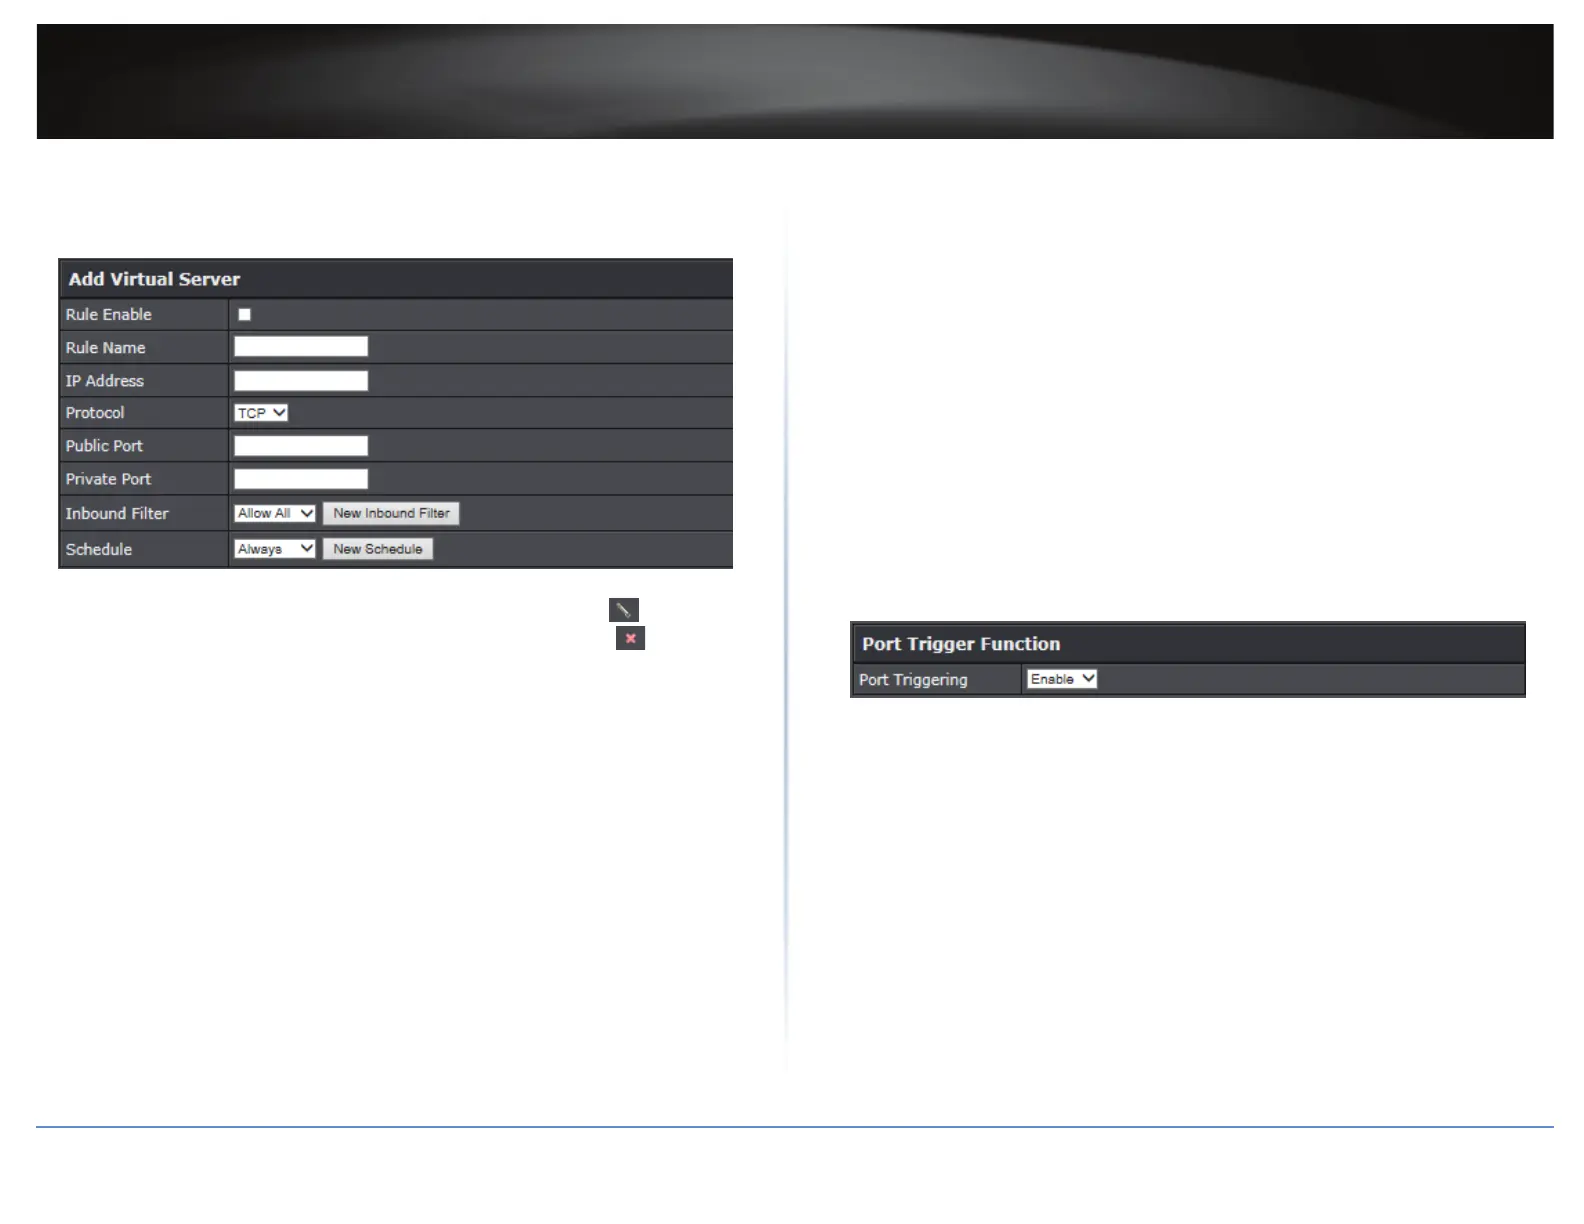
ÍNote: In the Virtual Server List secon, you can edit a rule by clicking in the Edit
column next to the rule you would like to edit. To delete the rule, click in the Delete
column next to the rule you would like to delete.
Example: To forward the TCP port 80 to your IP camera, you need to do the following:
1 Setup DynDNS service. Refer to “Idenfy Your Network on the Internet” on page 29.
2 Access TRENDnet IP Camera management page and forward Port 80 (refer to the product
documentaon).
3 Make sure to congure your network/IP camera to use a stac IP address.
ÍNote: You may need to reference your camera documentaon on conguring a
stac IP address.
4 Log into your router management page (refer to “Log in to Management Page” on page
8).
5 Click on Advanced > Firewall > Virtual Server.
6 Check the Rule Enable opon to enable the Virtual Server.
7 Enter the IP address of the camera. For example, 192.168.10.101.
8 Next to Protocol, make sure TCP is selected from the drop-down list.
9 The Private Port and Public Port, enter the port number 80 for both.
10 Click Add to save the sengs.
Special Applicaons
Advanced > Firewall > SpecialApplicaons
Applicaon rules (also called port triggering) is typically used for online gaming applicaons
or communicaon applicaons that require a range of ports or several ports to be
dynamically opened on request to a device on your network. The router will wait for a
request on a specic port or range of ports (or trigger port/port range) from a device on
your network and once a request is detected by your router, the router will forward a single
port or mulple ports (or incoming port/port range) to the device on your network. This
feature is not typically used as most devices and routers currently use UPnP (Universal Plug
and Play) to automacally congure your router to allow access for applicaons. Refer to
“Enable/Disable UPnP” on page 29.
IMPORTANT: Please refer to the device documentaon to determine if your device supports
UPnP rst, before conguring this feature.
1 Log into your router management page (refer to “Log in to Management Page” on page 8).
2 Click on Advanced > Firewall > Special Applicaons.
3 In Port Trigger Funcon secon, click the Port Triggering drop-down menu and choose
Enable.
4 Click Apply to save the changes.
5 In Add Port Trigger Rule secon, review and modify the following sengs:
Rule Enable: Check the opon to enable the port trigger rule.
Rule Name: Enter a name for the port trigger rule.
Match Protocol: Select the protocol for the rewall ports required for your device.
The available opons are TCP, UDP, or Any (TCP and UDP).
Match Port: Enter the ports or port range to be forwarded to the device. For example,
2000-2038,2200-2210.
Trigger Protocol (Trigger): Select the trigger port protocol requested by the device.
The available opons are TCP, UDP, or Any.
Trigger Port: Enter the port requested by the device. For example, 554-554 or 6112-
6112).


 To Next Page