GO
Once the last digit of a station has been entered, the
DIRECT TUNE screen will close and the system will
automatically tune to that station.
The selected Station or Channel number is displayed in the
Direct Tune text box.
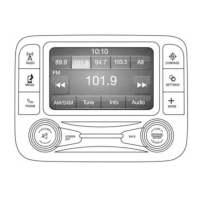
Setting Presets
The Presets are available for all Radio Modes, and are
activated by pressing any of the six “Preset” buttons on the
touchscreen, located at the top of the screen.
When you are receiving a station that you wish to commit
into memory, press and hold the desired numbered button
on the touchscreen for more than two seconds or until you
hear a confirmation beep.
The Radio stores up to 12 presets in each of the Radio
modes. A set of 6 presets are visible at the top of the radio
screen.
You can switch between the two radio presets by pressing
the “arrow button” located in the upper right of the radio
touchscreen.
Browse In AM/FM
When in either AM or FM, the Browse Screen provides a
means to edit the Presets List and is entered by pushing the
ENTER/BROWSE button.
Scrolling Preset List
Once in the Browse Presets screen, you can scroll the preset
list by rotation of the TUNE/SCROLL knob, or by pressing
the “Up and Down” arrow keys, located on the right of the
screen.
Preset Selection From List
A Preset can be selected by pressing any of the listed
Presets, or by pushing the ENTER/BROWSE button on the
TUNE/SCROLL knob to select the currently highlighted
Preset.
When selected, the radio tunes to the station stored in the
Preset and returns to the main radio screen.
Deleting Presets
A Preset can be deleted in the Presets Browse screen by
pressing the “Trash Can” icon for the corresponding Preset.
4
UCONNECT 8.4/8.4 NAV 79