Do you have a question about the Unipulse F340A and is the answer not in the manual?
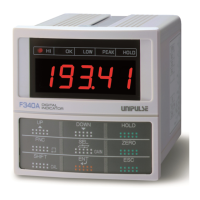
Describes the device's front panel, including status and numerical displays, and the setting keypad.
Details the rear panel connections, including ground terminals, option slots, and power/signal boards.
Provides instructions for connecting cables to the cage clamp terminal block, including stripping and insertion.
Illustrates the wiring for connecting 4-wire and 6-wire strain gauge sensors to the device.
Explains how to connect AC and DC power input terminals, including specifications and precautions.
Describes the SI/F serial interface connection for printers and external displays.
Details how to connect external loads to the high/low limit relays, with AC/DC power examples.
Explains the equivalent circuits for inputting hold and digital zero signals.
Describes how to connect the analog monitor output terminal for voltage proportional to sensor input.
Outlines the flow for selecting various setting items within different setting modes (Mode 1-4).
Shows how setting items are displayed, indicating their status (blinking/off) on the device.
Provides a list of setting items, their default values, and lock status for each setting mode.
Details the step-by-step procedure for setting various parameters using the device's keys.
Step-by-step guide to calibrate using rated output and rating values without actual loads.
Step-by-step guide to calibrate using actual applied loads for better accuracy.
Explains the function of high/low limit values and their output conditions.
Details modes for high/low limit comparison, including stable status and always-on comparisons.
Describes the hysteresis function to prevent chattering by setting a deadband for limit comparators.
Explains how to apply a digital offset to the indicated value to adjust zero or add an offset.
Describes the Near Zero function, which detects when the indicated value is close to zero.
Details the digital filter function for stabilizing readings by averaging data.
Explains the analog filter for cutting out noise from the input signal.
Covers parameters for detecting stable measurements based on value changes over time.
Describes automatic compensation for zero point shifts due to drift.
Explains Peak Hold and Sample Hold functions for retaining displayed values.
Details automatic printing of stable indicated values to a UNIPULSE printer.
Describes printing the peak or held value to a UNIPULSE printer.
Explains how to lock settings and calibration values to prevent misoperation.
Sets the minimum digital change value, defining the resolution of displayed increments.
Allows selection of how often indicated values are displayed per second.
Selects the bridge excitation voltage supplied to the strain gauge sensor.
Describes the operation of the Peak Hold function, showing input/output timing.
Explains the Sample Hold (Digital Hold) operation and its timing.
Details performing digital zero using the device's keys.
Explains how to use an external signal to trigger the digital zero function.
Lists the pin assignments for the 36-pin Amphenol connector for BCD output.
Explains how to switch between positive and negative logic for signal outputs.
Shows the equivalent output and input circuits for BCD data.
Details the timing signals for P.C, OVER, and STROBE in BCD output.
Allows selection of the update rate for BCD parallel data output.
Lists standard communication parameters like signal level, distance, method, and speed.
Shows the pin assignments for the 25-pin D-sub connector for RS-232C.
Provides information on cross cables for connecting PCs to the F340A via RS-232C.
Guides on setting RS-232C communication parameters like baud rate, parity, and stop bits.
Explains different communication modes (0, 1, 2) for RS-232C.
Details the data format for reading values and status via RS-232C.
Describes the voltage output feature, its range, and connection.
Describes the current output feature, its range, and connection.
Explains the display indicators for overrange conditions like overflow.
Lists common calibration error codes and their meanings.
Details how to perform a self-check to detect internal errors and ensure normal operation.
Explains how to reset the device's memory to factory settings.
Provides a block diagram illustrating the internal components and connections of the F340A.
Lists specifications for the analog input and output sections, including voltage, range, and accuracy.
Specifies details about the numeric display, status LEDs, and count display.
Lists various configurable settings and calibration types available on the device.
Details the specifications for external signals like limit relays and monitor outputs.
Mentions the SI/F output interface.
Lists available optional features such as BCD output and D/A converter.
Covers power requirements, consumption, environmental conditions, dimensions, and weight.
Lists the standard accessories included with the product.
| Touch Type | Resistive |
|---|---|
| Display | Color LCD |
| Resolution | 640 x 480 pixels |
| Interface | RS232, USB |
| Operating Temperature | 0°C to 50°C |
| Storage Temperature | -20 to 60°C |