12
45
InstalaciónMaintenance
Section 5 Maintenance
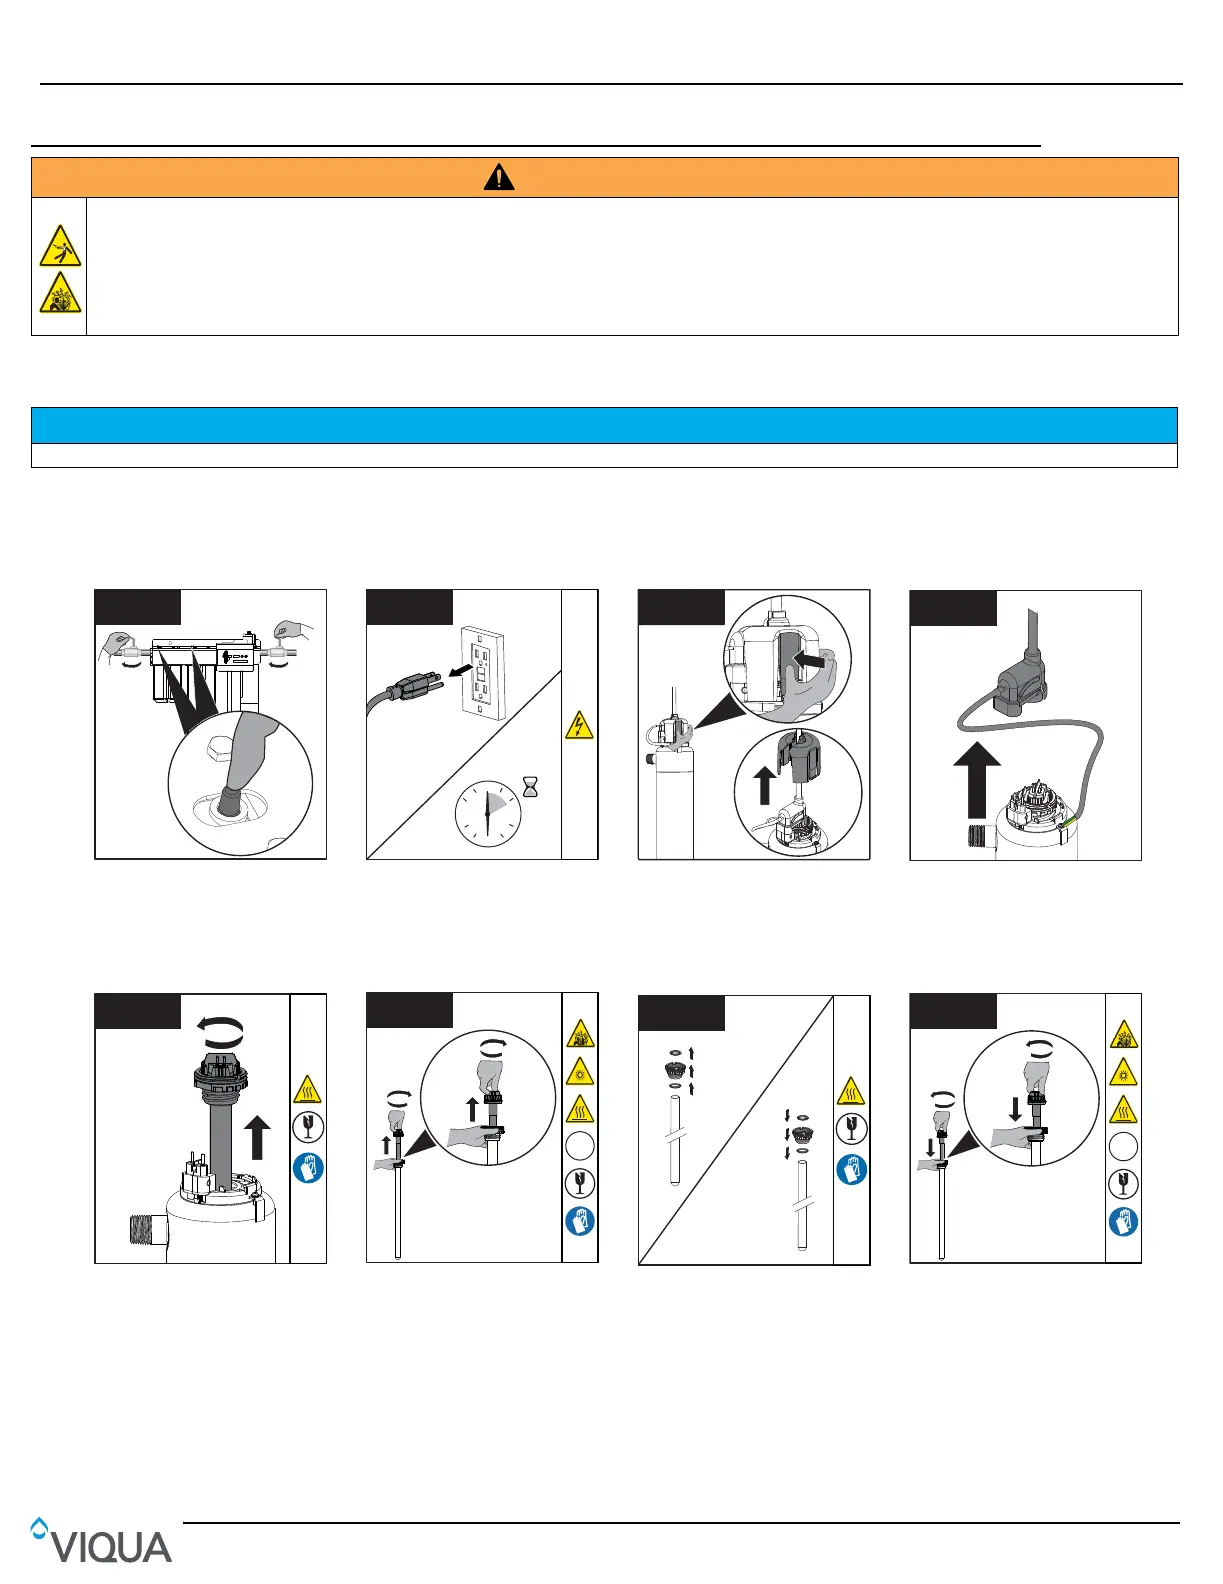
5.1 Replacing UV Lamp
Lamp replacement is a quick and simple procedure requiring no special tools. The UV lamp must be replaced after 9000
hours of continuous operation (approximately one year) in order to ensure adequate disinfection.
Procedure:
WARNING
• Always disconnect power before performing any work on the disinfection system.
• Always shut-off water flow and release water pressure before servicing.
• Regularly inspect your disinfection system to ensure that the power indicators are on and no alarms are present.
• Replace the UV lamp annually (or biennially if seasonal home use) to ensure maximum disinfection.
• Always drain the chamber when closing a seasonal home or leaving the unit in an area subject to freezing temperatures.
NOTICE
Do not use water during replacement of UV lamp.
• Close all faucets and water
supply.
• Press the pressure release
button to relieve the pressure
from the cartridges.
• Disconnect main power
source and allow the unit to
cool for 10 minutes.
• Remove the safety cap by
squeezing the tabs.
Note: Ensure the lamp plug
wires remain connected.
• Remove the lamp plug.
Note: Ensure the strain relief
wires remain connected.
• Remove lamp/sleeve
assembly along with sleeve
bolt from chamber.
Hg
UV
• Unscrew the UV lamp by
holding the sleeve bolt.
1
2
3
1
2
3
• Remove the sleeve bolt and
remove 2 O-rings from the
sleeve.
• Install 2 new O-rings onto
sleeve on either side of
sleeve bolt as pictured.
Hg
UV
2
2
1
1
• Install and secure the new
lamp into sleeve.
Note: Over tightening will
break the sleeve.
v
• Inserte la ficha de referencia entre
el controlador y la abrazadera de
montaje.
Nota: La salida debe estar
protegida mediante un interruptor
de circuito de fallos de conexión
a tierra (GFCI).
• Conecte el cable de alimentación
al controlador.
• NO conecte el cable de
alimentación a la toma GFCI en
este momento.
• Puede que se necesite un
conjunto de lámpara. Si los
cables están en el exterior del
cristal, la lámpara/la vaina tubular
están separadas. Continúe con el
paso 7. Si los cables están dentro
del cristal, pase al paso 9.
• Instale el perno de la vaina tubular
con las 2 juntas tóricas nuevas.
1
1
2
2
Hg
UV
• Instale la lámpara en la vaina
tubular y apriete con la mano.
Nota: Si se aprieta demasiado,
se romperá la vaina.
• Inserte el conjunto de
lámpara/vaina tubular en la
cámara y apriete con la mano.
Nota: Si se aprieta demasiado,
se romperá la vaina.
10
• Alinee las conexiones girando la
abrazadera de anillo e instale el
enchufe de la lámpara.
• Introduzca la tapa de seguridad.
12
• Conecte la alimentación.
• Abra todos los grifos y encienda el
suministro de agua. Examine si
hay fugas.
Nota: La salida debe estar
protegida mediante un interruptor
de circuito de fallos de conexión
a tierra (GFCI).